Amazon EC2 for SAP Sailing Analytics
Quickstart
Servers
- Web Server: ec2-54-229-94-254.eu-west-1.compute.amazonaws.com
- Database Server: dbserver.internal.sapsailing.com
- Database and Queue Server: rabbit.internal.sapsailing.com
Starting an instance
- Which instance type to choose:
- Archive: m2.2xlarge
- Live: c1.xlarge
You may need to select "All generations" instead of "Current generation" to see these instance configurations. Of course, you may choose variations of those as you feel is appropriate for your use case.
- Using a release, set the following in the instance's user data, replacing
myspecificeventby a unique name of the event or series you'll be running on that instance, such askielerwoche2014or similar.INSTALL_FROM_RELEASE=`name-of-release` USE_ENVIRONMENT=live-server MONGODB_NAME=myspecificevent REPLICATION_CHANNEL=myspecificevent SERVER_NAME=MYSPECIFICEVENT BUILD_COMPLETE_NOTIFY=simon.marcel.pamies@sap.com SERVER_STARTUP_NOTIFY=simon.marcel.pamies@sap.com ADDITIONAL_JAVA_ARGS="$ADDITIONAL_JAVA_ARGS -Dcom.sap.sailing.domain.tracking.MailInvitationType=SailInsight2"
The MailInvitationType property controls which version of the SAP Sail Insight app will be targeted by tracking invitations sent out by e-mail. Two different Branch.io URL schemes exist for the Sail Insight app: sailinsight-app.sapsailing.com and sailinsight20-app.sapsailing.com. They can be selected by providing SailInsight1 or SailInsight2, respectively, as the values for the property. If the property is set to LEGACY, no Branch.io link is used in the invitation at all. This mode should no longer be used as soon as the Branch.io-enabled iOS app has hit the store. If not provided, it will default to SailInsight1.
Note that when you select to install an environment using the USE_ENVIRONMENT variable, any other variable that you specify in the user data, such as the MONGODB_NAME or REPLICATION_CHANNEL properties in the example above, these additional user data properties will override whatever comes from the environment specified by the USE_ENVIRONMENT parameter.
- To build from git, install and start, set the following in the instance's user data, adjusting the branch name (
BUILD_FROM), themyspecificeventnaming and memory settings according to your needs:BUILD_BEFORE_START=True BUILD_FROM=master RUN_TESTS=False COMPILE_GWT=True BUILD_COMPLETE_NOTIFY=you@email.com SERVER_STARTUP_NOTIFY= SERVER_NAME=MYSPECIFICEVENT MEMORY=2048m REPLICATION_HOST=rabbit.internal.sapsailing.com REPLICATION_CHANNEL=myspecificevent MONGODB_HOST=dbserver.internal.sapsailing.com MONGODB_PORT=10202 MONGODB_NAME=myspecificevent
Setting up a new image (AMI) from scratch (more or less)
See here
Receiving wind from Expedition
- To receive and forward wind with an Expedition connector, log into webserver as user trac and switch to $HOME/servers/udpmirror. Start the mirror and forward it to the instance you want. In order to receive wind through the Igtimi connector, this step is not required as the wind data is received directly from the Igtimi server.
Setting up Master and Replica
- Fire up a master with the following configuration. There is a preconfigured master environment at http://releases.sapsailing.com/environments/live-master-server that you should use.
INSTALL_FROM_RELEASE=(name-of-release)
USE_ENVIRONMENT=live-master-server
SERVER_NAME=MYSPECIFICEVENT
REPLICATION_CHANNEL=myspecificevent
MONGODB_NAME=myspecificevent
SERVER_STARTUP_NOTIFY=you@email.com
ADDITIONAL_JAVA_ARGS="$ADDITIONAL_JAVA_ARGS -Dcom.sap.sailing.domain.tracking.MailInvitationType=SailInsight2"
- After your master server is ready, note the internal IP and configure your replica instances. Make sure to use the preconfigured environment from http://releases.sapsailing.com/environments/live-replica-server. Then absolutely make sure to add the line "REPLICATE_MASTER_SERVLET_HOST" to the user-data and adjust the
myspecificeventmaster exchange name to theREPLICATION_CHANNELsetting you used for the master configuration.
INSTALL_FROM_RELEASE=(name-of-release) USE_ENVIRONMENT=live-replica-server REPLICATE_MASTER_SERVLET_HOST=(IP of your master server) REPLICATE_MASTER_EXCHANGE_NAME=myspecificevent # Provide authentication credentials for a user on the master permitted to replicate, either by username/password... REPLICATE_MASTER_USERNAME=(user for replicator login on master server having SERVER:REPLICATE: permission) REPLICATE_MASTER_PASSWORD=(password of the user for replication login on master) # Or by bearer token, obtained, e.g., through # curl -d "username=myuser&password=mysecretpassword" "https://master-server.sapsailing.com/security/api/restsecurity/access_token" | jq .access_token # REPLICATE_MASTER_BEARER_TOKEN= SERVER_NAME=MYSPECIFICEVENT MONGODB_NAME=myspecificevent-replica EVENT_ID=<some-uuid-of-an-event-you-want-to-feature> SERVER_STARTUP_NOTIFY=you@email.com ADDITIONAL_JAVA_ARGS="$ADDITIONAL_JAVA_ARGS -Dcom.sap.sailing.domain.tracking.MailInvitationType=SailInsight2" </pre> #### Setting up a Multi Instance To set up a multi instance for a server with name "SSV", subdomain "ssv.sapsailing.com" and description "Schwartauer Segler-Verein, [www.ssv-net.de](http://www.ssv-net.de), Alexander Probst, [webmaster@alexprobst.de](mailto:webmaster@alexprobst.de)" perform the following steps: ##### Instance configuration 1. Connect to the EC2 instance where your multi instance should be deployed. For example: Connect to the instance "SL Multi-Instance Sailing Server" with dns name "ec2-34-250-136-229.eu-west-1.compute.amazonaws.com" in region Ireland via SSH.ssh sailing@ec2-34-250-136-229.eu-west-1.compute.amazonaws.com2. Navigate to the directory /home/sailing/servers.cd /home/sailing/servers3. Create a new directory with name "ssv".mkdir ssv4. Copy the file /home/sailing/code/java/target/refreshInstance.sh to your new directory.cp /home/sailing/code/java/target/refreshInstance.sh ssv5. Initialize a new environment variable "DEPLOY_TO" with the name of the directory.export DEPLOY_TO=ssv6. Execute the refreshInstance.sh script with your desired release build version from releases.sapsailing.com../refreshInstance.sh install-release build-2017122708447. Once the script finished, uncomment the following lines in your env.sh file.# Uncomment for use with SAP JVM only: ADDITIONAL_JAVA_ARGS="$ADDITIONAL_JAVA_ARGS-XX:+GCHistory -XX:GCHistoryFilename=logs/sapjvm_gc@PID.prf"Afterwards comment out the line where it says "JAVA_HOME=/opt/jdk1.8.0_20"# JAVA_HOME=/opt/jdk1.8.0_208. Find the next unused ports for the variables SERVER_PORT, TELNET_PORT and EXPEDITION_PORT. You can do this by extracting all existing variable assignments from all env.sh files within the /home/sailing/servers directory.for i in /home/sailing/servers/*/env.sh; do cat $i | grep "^ *SERVER_PORT=" | tail -1 | tr -d "SERVER_PORT="; done | sort -nDo this for TELNET_PORT and EXPEDITION_PORT likewise. If this is the first multi instance on the server, use the values SERVER_PORT=8888, TELNET_PORT=14888, EXPEDITION_PORT=2010. 9. Append the following variable assignments to your env.sh file.SERVER_NAME=SSV TELNET_PORT=14888 SERVER_PORT=8888 MONGODB_NAME=SSV EXPEDITION_PORT=2010 MONGODB_HOST=dbserver.internal.sapsailing.com MONGODB_PORT=10202 DEPLOY_TO=ssv10. Append the following description to the /home/sailing/servers/README file.# ssv (Schwartauer Segler-Verein, www.ssv-net.de, Alexander Probst, webmaster@alexprobst.de) SERVER_NAME=SSV TELNET_PORT=14900 SERVER_PORT=8888 MONGODB_NAME=SSV EXPEDITION_PORT=200011. Start the multi instance.cd /home/sailing/servers/ssv ./start12. Change the admin password now and create a new user with admin role. 13. Your multi instance is now configured and started. It can be reached over ec2-34-250-136-229.eu-west-1.compute.amazonaws.com:8888. ##### Reachability To reach your multi instance via "ssv.sapsailing.com", perform the following steps within the AWS Web Console inside region Ireland. 1. Create a new target group with the following details, where the name "S-shared-ssv" is created as follows: "S" for "Sailing", "shared" because it's a shared instance, and "ssv" represents the server instance name: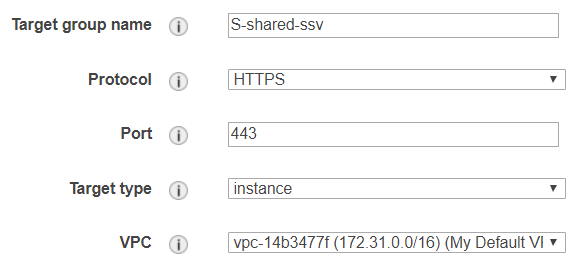
Notice the overwritten health check port that is now pointing directly to the instance with its `SERVER_PORT` 8888. BE CAREFUL please use for a live-server and live-master-server the traffic port for Health Checks. 2. Add the "SL Multi-Instance Sailing Server" instance to the target group.
3. Create a rule within the application load balancer that is forwarding ssv.sapsailing.com to your created target group. Choose "Load Balancers" from the sidebar an select the load balancer with the name "Sailing-eu-west-1". Click on the tab "Listeners" and then on "View/edit rules" inside the row of the HTTPS Listener.
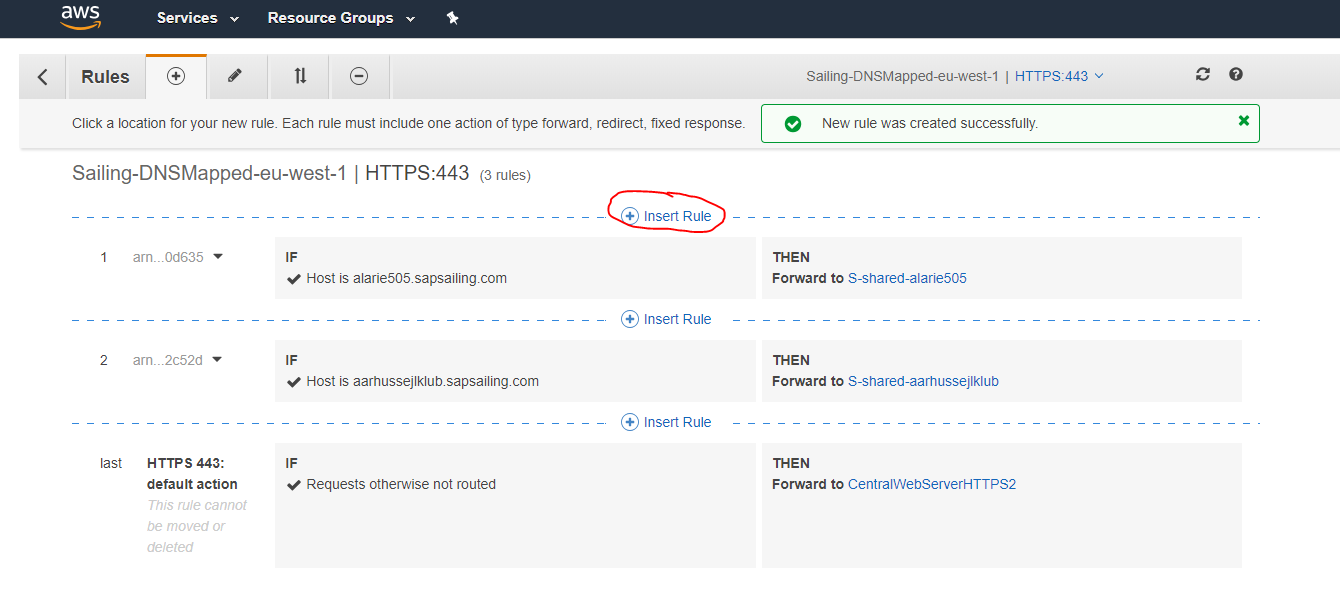
Click on the plus sign and insert the new rule at the very top. Enter "ssv.sapsailing.com" into the host-header field and select the target group "S-shared-ssv" under "forward". Then click on "Save".
Your application load balancer is now configured to redirect all requests with host-header "ssv.sapsailing.com" to the target group "S-shared-ssv". That means all requests will now be routed to the "SL Multi-Instance Sailing Server" instance inside this target group using HTTPS and port 443 as specified in the configuration of the target group. To establish a connection on port 8888 (the `SERVER_PORT` property from above), where our multi instance is listening, we have to modify the apache configuration on the "SL Multi-Instance Sailing Server" instance. 4. Connect to the "SL Multi-Instance Sailing Server" instance via SSH as user `root`. Navigate to the directory /etc/httpd/conf.d. Open up the file "001-events.conf" and append the following line.
Use Plain-SSL ssv.sapsailing.com 127.0.0.1 8888where 8888 is again the `SERVER_PORT` from before. 5. Save the file and run a configuration file syntax check.apachectl configtestIf it reports "Syntax OK", continue with reloading the httpd configuration. 6. Reload the httpd configuration.service httpd reloadYou should now be able to reach your multi instance with the dns name "ssv.sapsailing.com". #### Setting up a Dedicated Instance [...] ## Costs per month To give you a feeling about the costs you can refer to the following table. To get all details go to http://www.awsnow.info/
| Server Type | Cost per Month | Cost per Month (Reserved instance for 12 months) |
| m2.2xlarge (Archive) | $800 | $400 |
| c1.xlarge (Build and Live) | $500 | $350 |
 Associated to the root account are _n_ users that can be configured using the IAM (User Management, https://console.aws.amazon.com/iam/home). Each of these users can belong to different groups that have different rights associated. Currently two groups exist:
* **Administrators**: Users belonging to this group have access to all EC2 services (including IAM). They do not have the right to manage main account information (like billing).
* **Seniors**: Everyone belonging to this group can not access IAM but everything else.
Users configured in the IAM and at least belonging to the group Seniors can log in using the following url https://017363970217.signin.aws.amazon.com/console. All users that belong to one of these groups absolutely need to have MFA activated. MFA (Multi-Factor-Authentication) can be compared to the RSA token that needs to be input every time one wants to access the SAP network. After activation users need to synchronize their device using a barcode that is displayed in IAM. The device can be a software (Google Authenticator for iOS and Android) or a physical device.
Associated to the root account are _n_ users that can be configured using the IAM (User Management, https://console.aws.amazon.com/iam/home). Each of these users can belong to different groups that have different rights associated. Currently two groups exist:
* **Administrators**: Users belonging to this group have access to all EC2 services (including IAM). They do not have the right to manage main account information (like billing).
* **Seniors**: Everyone belonging to this group can not access IAM but everything else.
Users configured in the IAM and at least belonging to the group Seniors can log in using the following url https://017363970217.signin.aws.amazon.com/console. All users that belong to one of these groups absolutely need to have MFA activated. MFA (Multi-Factor-Authentication) can be compared to the RSA token that needs to be input every time one wants to access the SAP network. After activation users need to synchronize their device using a barcode that is displayed in IAM. The device can be a software (Google Authenticator for iOS and Android) or a physical device.
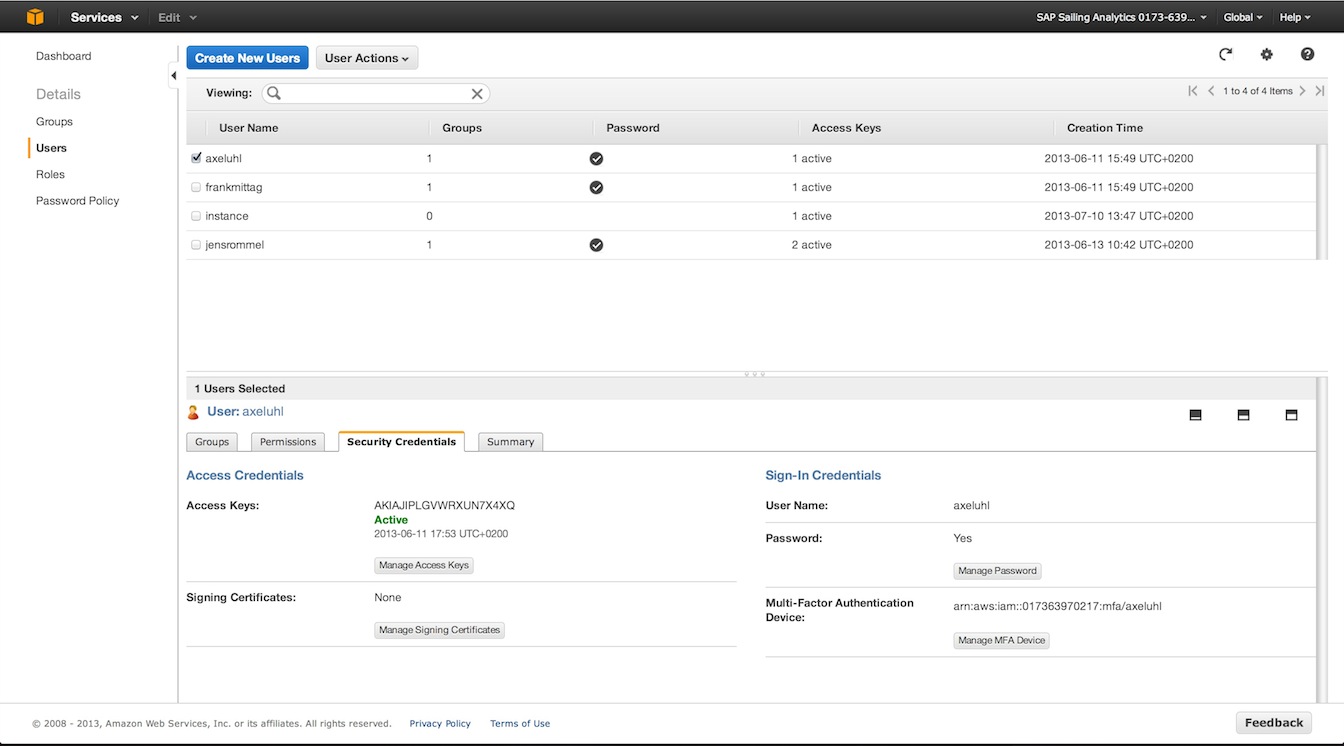 In addition to having a password and MFA set for one user one can activate "Access Keys". These keys are a combination of hashed username ("ID") and a password ("Key"). These are needed in case of API related access (e.g. S3 uploader scripts). One user should not have more than 1 access key active because of security concerns and never distribute them over insecure channels.
## EC2 Server Architecture for Sailing Analytics
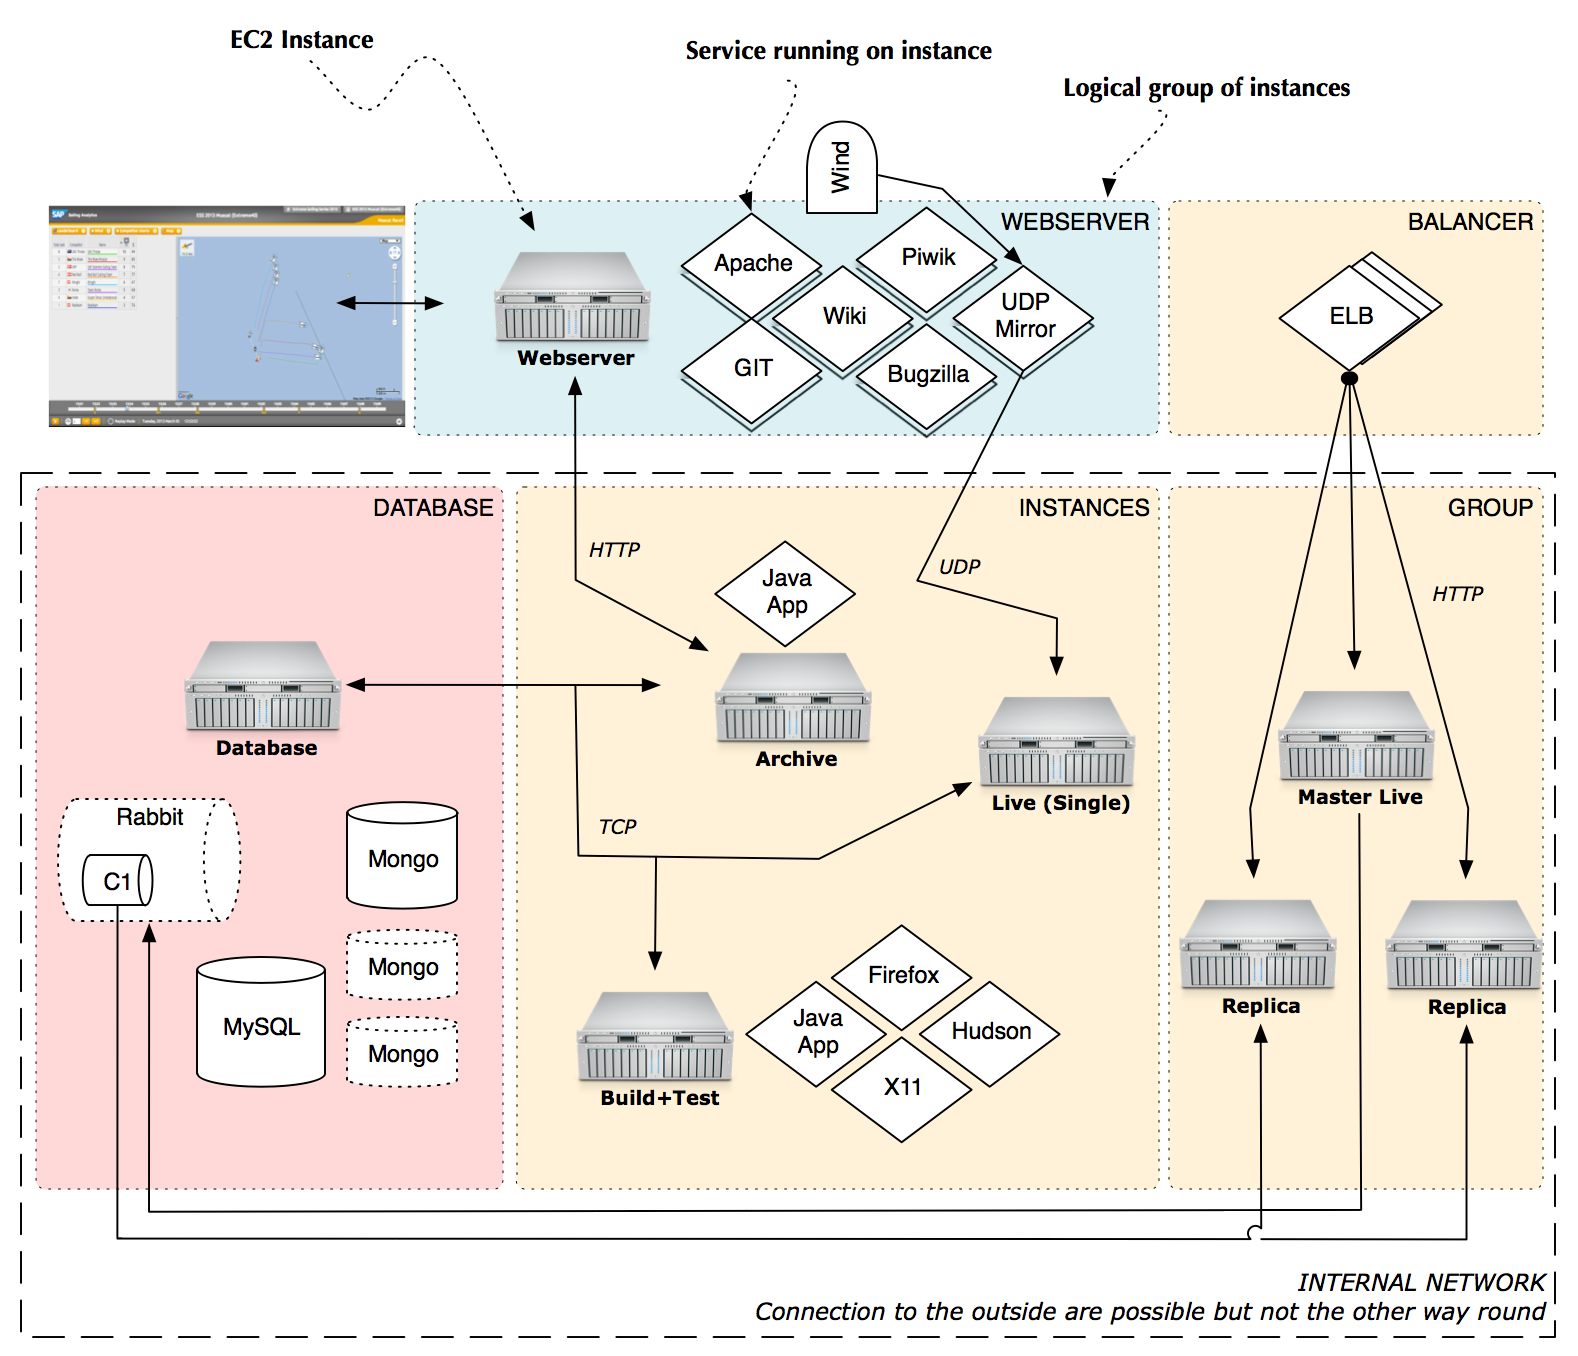
The architecture is divided into logical tiers. These are represented by firewall configurations (Security Groups) that can be associated to Instances. Each tier can contain one or more instances. The following image depicts the parts of the architecture.
In addition to having a password and MFA set for one user one can activate "Access Keys". These keys are a combination of hashed username ("ID") and a password ("Key"). These are needed in case of API related access (e.g. S3 uploader scripts). One user should not have more than 1 access key active because of security concerns and never distribute them over insecure channels.
## EC2 Server Architecture for Sailing Analytics
The architecture is divided into logical tiers. These are represented by firewall configurations (Security Groups) that can be associated to Instances. Each tier can contain one or more instances. The following image depicts the parts of the architecture.
 ### Tiers
* **Webserver**: Holds one or more webserver instances that represent the public facing part of the architecture. Only instances running in this tier should have an Elastic IP assigned. In the image you can see one configured instance that delivers content for sapsailing.com. It has some services running on it like an Apache, the GIT repository and the UDP mirror. The Apache is configured to proxy HTTP(S) connections to an Archive or Live server.
* **Balancer**: Features an Elastic Load Balancer. Such balancers can be configured to distribute traffic among many other running instances. Internally an ELB consists of multiple balancing instances on which load is distributed by a DNS round robin so that bandwidth is not a limiting factor.
* **Database**: Instances handling all operations related to persistence. Must be reachable by the "Instance" and "Balancer+Group" tier. In the standard setup this tier only contains one database server that handles connections to MongoDB, MySQL and RabbitMQ.
* **Instances**: Space where all instances, that are not logically grouped, live. In the image one can see three running instances. One serving archived data, one serving a live event and one for build and test purposes.
* **Balancer+Group**: Analytics instances grouped and managed by an Elastic Load Balancer. A group is just a term describing multiple instances replicating from one master instance. The word "group" does in this context not refer to the so called "Placement Groups".
### Instances
### Tiers
* **Webserver**: Holds one or more webserver instances that represent the public facing part of the architecture. Only instances running in this tier should have an Elastic IP assigned. In the image you can see one configured instance that delivers content for sapsailing.com. It has some services running on it like an Apache, the GIT repository and the UDP mirror. The Apache is configured to proxy HTTP(S) connections to an Archive or Live server.
* **Balancer**: Features an Elastic Load Balancer. Such balancers can be configured to distribute traffic among many other running instances. Internally an ELB consists of multiple balancing instances on which load is distributed by a DNS round robin so that bandwidth is not a limiting factor.
* **Database**: Instances handling all operations related to persistence. Must be reachable by the "Instance" and "Balancer+Group" tier. In the standard setup this tier only contains one database server that handles connections to MongoDB, MySQL and RabbitMQ.
* **Instances**: Space where all instances, that are not logically grouped, live. In the image one can see three running instances. One serving archived data, one serving a live event and one for build and test purposes.
* **Balancer+Group**: Analytics instances grouped and managed by an Elastic Load Balancer. A group is just a term describing multiple instances replicating from one master instance. The word "group" does in this context not refer to the so called "Placement Groups".
### Instances
| Name | Access Key(s) | Security Group | Services | Description |
| Webserver (Elastic IP: 54.229.94.254) | Administrator | Webserver | Apache, GIT, Piwik, Bugzilla, Wiki | This tier holds one instance that has one public Elastic IP associated. This instance manages all domains and subdomains associated with this project. It also contains the public GIT repository. |
| DB & Messaging | Administrator | Database and Messaging | MongoDB, MySQL, RabbitMQ | All databases needed by either the Analytics applications or tools like Piwik and Bugzilla are managed by this instance. |
| Archive | Administrator, Sailing User | Sailing Analytics App | Java App | Instance handling the access to all historical races. |
| Build and Test | Administrator, Sailing User | Sailing Analytics App | X11,Firefox,Hudson | Instance that can be used to run tests |
INSTALL_FROM_RELEASE=master-201311062138
USE_ENVIRONMENT=live-server
BUILD_COMPLETE_NOTIFY=simon.marcel.pamies@sap.com
SERVER_STARTUP_NOTIFY=simon.marcel.pamies@sap.com
- The second option is to let the instance build itself from a specified branch. It is currently not supported to then specify an environment file. Attention: You can not start the building process on t1.micro instances having less than 1.5 GB of RAM! The configuration then looks like this:
BUILD_BEFORE_START=True
BUILD_FROM=master
RUN_TESTS=False
COMPILE_GWT=True
BUILD_COMPLETE_NOTIFY=simon.marcel.pamies@sap.com
SERVER_STARTUP_NOTIFY=
SERVER_NAME=LIVE1
MEMORY=2048m
REPLICATION_HOST=rabbit.internal.sapsailing.com
REPLICATION_CHANNEL=sapsailinganalytics-live
TELNET_PORT=14888
SERVER_PORT=8888
MONGODB_HOST=dbserver.internal.sapsailing.com
MONGODB_PORT=10202
EXPEDITION_PORT=2010
REPLICATE_ON_START=
REPLICATE_MASTER_SERVLET_HOST=
REPLICATE_MASTER_SERVLET_PORT=
REPLICATE_MASTER_QUEUE_HOST=
REPLICATE_MASTER_QUEUE_PORT=
INSTALL_FROM_RELEASE=
USE_ENVIRONMENT=
After your instance has been started (and build and tests are through) it will be publicly reachable if you chose a port between 8880 and 8950. If you filled the BUILD_COMPLETE_NOTIFY field then you will get an email once the server has been built. You can also add your email address to the field SERVER_STARTUP_NOTIFY to get an email whenever the server has been started. You can now access this instance by either using the Administrator key (for root User) or the Sailing User key (for user sailing):
ssh -i .ssh/Administrator.pem root@ec2-54-246-247-194.eu-west-1.compute.amazonaws.comor
ssh -i .ssh/SailingUser.pem sailing@ec2-54-246-247-194.eu-west-1.compute.amazonaws.comIf you want to connect your instance to a subdomain then log onto the main webserver with the Administrator key as root, open the file `/etc/httpd/conf.d/001-events.conf` and put something like this there. As you can see you have to specify the IP address and the port the java server is running on. Make sure to always use the internal IP.
Use Event idm.sapsailing.com "<uuid-of-event-object>" 172.31.22.12 8888### Testing code on a server Starting a test is as easy as starting up a new instance. Just make sure that you fill the field RUN_TESTS and set it to `True`. Also set the field BUILD_FROM to a gitspec that matches the code branch that you want to test. After tests has been run and the server has been started you will get an email giving you all the details. You can then access your instance or simply shut it down. ### Build, deploy, start and stop an instance Log on to the instance using ssh as user `sailing`. Change to the `~/code` directory and fetch the latest git branch, e.g., using `git fetch origin; git merge origin/master`. Make sure you have a MongoDB instance running on the default port 27017 (see [here](http://wiki.sapsailing.com/wiki/amazon-ec2#Access-MongoDB-database)). You can then trigger a build. It may be a good idea to do this in a `tmux` session because this will allow you to log off or get disconnected while the build is running. To start a tmux session, simply enter the command `tmux` at the console and you will get a new tmux session. Check the man page of tmux for more details and note that the usual Ctrl-B shortcut has been redefined in our instances to Ctrl-A to mimic the behavior of the old `screen` tool we used before we switched to tmux. Suffice it to say that you can detach from the tmux session by pressing `Ctrl-A d` which will keep the session running. To reconnect, enter `tmux attach` which works as long as you only have one tmux session running. In other cases, refer to the tmux man page again. To launch the build, enter `configuration/buildAndUpdateProduct.sh build` as usual. Used without options, the build script will tell the options available. After the build has completed, use `configuration/buildAndUpdateProduct.sh -s server install` to install the product to ~/servers/server. To launch the instance, change to the `~/servers/server` directory and enter `./start`. The instance will by default launch on port 8888. See `~/servers/server/env.sh` for the instance's settings. To stop the instance again, from that same directory enter `./stop`. To access your instance externally, make sure to use the external Amazon DNS name, such as `ec2-54-72-6-31.eu-west-1.compute.amazonaws.com`. This is required for our Google Maps API key to recognize the domain. The map won't work when you simply use the IP number as the URL. A good URL to start with would therefore look something like `http://ec2-54-72-6-31.eu-west-1.compute.amazonaws.com:8888/gwt/AdminConsole.html`. ### Setup replicated instances with ELB The main concept behind ELB is that there is one instance that you configure in the "Load Balancers" tab that serves as the main entry point for all requests going to your application. This instance can be told to pass through requests from one port to another. In order to make this ELB instance aware of the Analytics EC2 Instances it should balance over you need to add all instances that should be part of the setup to the ELB instance. A closer look reveals that an ELB instance consists itself of many other invisible instances. These are behind a DNS round robin configuration that redirects each incoming request to one of these instances. These invisible instances then decide upon the rules you've created how and where to distribute this request to one of the associated instances. In a live event scenario, the SAP Sailing Analytics are largely bandwidth bound. Adding more users that watch races live doesn't add much CPU load, but it adds traffic linearly. Therefore, as the number of concurrent users grows, a single instance can quickly max out its bandwidth which for usual instances peaks at around 100Mbit/s. It is then essential that an ELB can offload the traffic to multiple instances which are replicas of a common master in our case. To still get the usual logging and URL re-writing features, replicas need to run their local Apache server with a bit of configuration. Luckily, most of the grunt work is done for you automatically. You simply need to tell the replicas in their instance details to start replicating automatically, provide an `EVENT_ID` and set the `SERVER_NAME` variable properly. The Apache configuration on the replica will then automatically be adjusted such that the lower-case version of $SERVER_NAME.sapsailing.com will re-direct users to the event page for the event with ID $EVENT_ID. Amazon puts up limits regarding to the maximum number of rules that an Application Load Balancer (ALB) may have. We use one such ALB as the DNS CNAME target for ``*.sapsailing.com`` (Sailing-eu-west-1-135628335.eu-west-1.elb.amazonaws.com). Adding rules to this ALB is especially convenient because no DNS / Route53 manipulation is necessary at all. New sub-domains can be mapped to target groups this way quite flexibly and quickly. However, as the number of sub-domains we use grows, we also approach the limit of 100 rules for this load balancer. In order to keep this flexibility in particular for event set-ups, we started introducing more ALBs in August 2018 that use dedicated Route 53 DNS CNAME records for sepcific sub-domains. This way, with the current AWS limits for load balancers (see https://docs.aws.amazon.com/elasticloadbalancing/latest/application/load-balancer-limits.html) we will have up to 20 ALBs per region with 100 rules each, giving us 2000 rules per region which should suffice for the foreseeable future. The set-up process needs to distinguish now between only adding a rule to an ALB listener targeted by the ``*.sapsailing.com`` DNS entry, and adding a rule to an ALB listener targeted only by DNS rules for specific sub-domains. In the latter case, a DNS record set needs to be created, providing the CNAME of the ALB that maps the sub-domain to the target group. Here are the steps to create a load balanced setup, assuming there is already an "Application" load balancer defined in the region(s) where you need them: - Add a master+replica target group for the master and its replicas that external users will be directed to, using HTTP port 80 as the protocol settings. Note: as this target group will also be used for the HTTPS listener, "SSL offloading" will take place here. The re-directing from HTTP to HTTPS that shall occur when the user hits the server with an HTTP request will happen in the central instance's Apache server if and only if the `X-Forwarded-Proto` is `http` (https://stackoverflow.com/questions/26620670/apache-httpx-forwarded-proto-in-htaccess-is-causing-redirect-loop-in-dev-envir explains how a. See also http://docs.aws.amazon.com/elasticloadbalancing/latest/classic/x-forwarded-headers.html#x-forwarded-proto.) - Add a rule to the HTTPS listener for the hostname ${SERVER_NAME}.sapsailing.com that forwards traffic to the master+replica target group just created. - Create a master instance holding all data (see http://wiki.sapsailing.com/wiki/amazon-ec2#Setting-up-Master-and-Replica) - Create `n` instances that are configured to connect to the master server, automatically launching replication by using one of the `*...-replica-...*` environment from http://releases.sapsailing.com/environments. - Add master and replicas as targets into the master+replica target group. - Create a second master-only target group that only contains the master server. - Add a rule to the HTTPS listener for the hostname ${SERVER_NAME}-master.sapsailing.com that forwards traffic to the master-only target group just created. - Add the master to the master-only target group. - For both target groups configure the health checks, choosing HTTP as the protocol, using the default "traffic port" and setting the path to /index.html. Lower the interval to 10s and the "Healthy threshold" to 2 to ensure that servers are quickly recognized after adding them to the ELB. With the default settings (30 seconds interval, healthy threshold 10) this would last up to 5 minutes. - When using the Race Committee App (RCApp), make sure the app is configured to send its data to the ${SERVER_NAME}-master.sapsailing.com URL (otherwise, write requests may end up at replicas which then have to reverse-replicate these to the master which adds significant overhead). The steps to register such a sub-domain mapping also in Route53 in case you've chosen an ALB that is not the target of ``*.sapsailing.com`` work as follows: Start by creating a new record set:
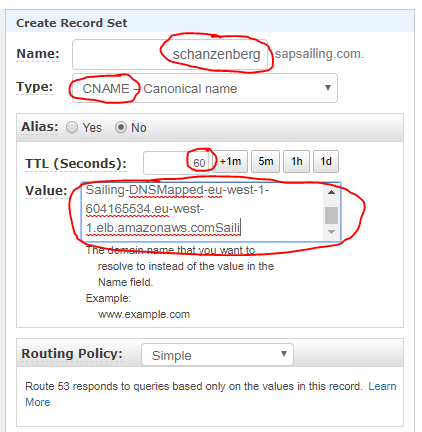
 Then enter the sub-domain name you'd like to map. Choose ``CNAME`` for the type, reduce the default TTL to 60s and paste the DNS name of the ALB you'd like to target:
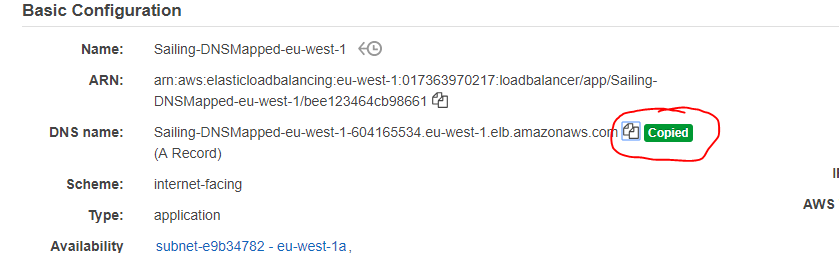
 The DNS name of your load balancer can be copied from the "Basic Configuration" section in the "Description" tab:
 The insertion of the rule into the ALB that maps your sub-domain's name to the corresponding target group works as usual and as described above:
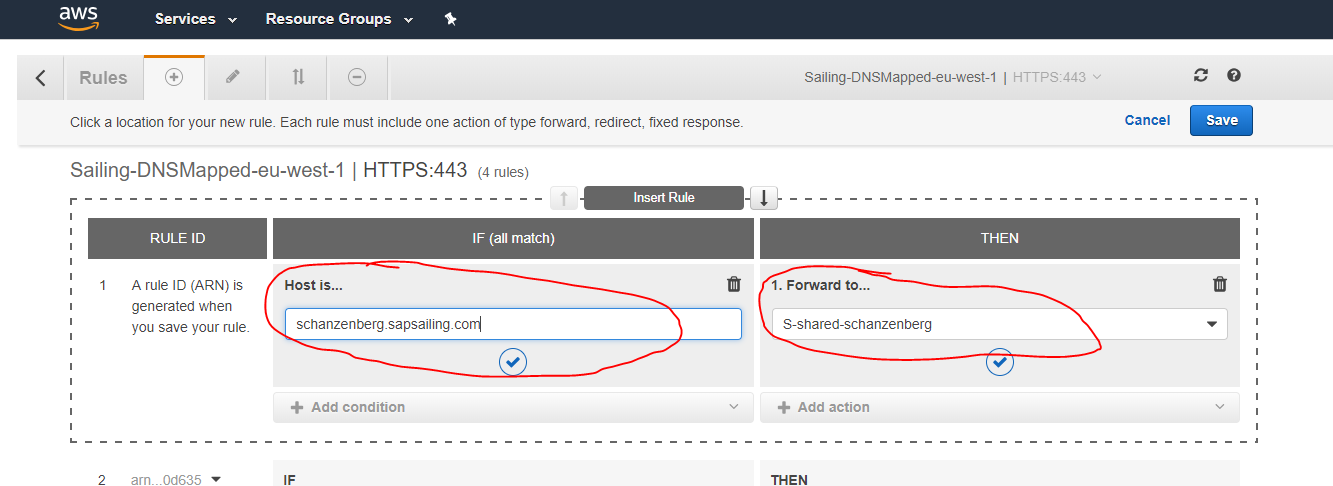 It is important to understand that it wouldn't help to let all traffic run through our central Apache httpd server which usually acts as a reverse proxy with comprehensive URL rewriting rules and macros. This would make the Apache server the bandwidth bottleneck. Instead, the event traffic needs to go straight to the ELB. This is established by the *.sapsailing.com DNS entry pointing to the Application ELB which then applies its filter rules to dispatch to the URL-specific target groups. Other than adding the hostname filter rules in the ELB as described above, no interaction with the Route 53 DNS is generally needed. Neither is it necessary to manually modify any 001-events.conf Apache configuration file.
For testing purposes, however, it may be useful to still have some documentation around that explains how to do the Route 53 DNS setup manually. Remember: this shouldn't be needed for usual operations!
It is important to understand that it wouldn't help to let all traffic run through our central Apache httpd server which usually acts as a reverse proxy with comprehensive URL rewriting rules and macros. This would make the Apache server the bandwidth bottleneck. Instead, the event traffic needs to go straight to the ELB. This is established by the *.sapsailing.com DNS entry pointing to the Application ELB which then applies its filter rules to dispatch to the URL-specific target groups. Other than adding the hostname filter rules in the ELB as described above, no interaction with the Route 53 DNS is generally needed. Neither is it necessary to manually modify any 001-events.conf Apache configuration file.
For testing purposes, however, it may be useful to still have some documentation around that explains how to do the Route 53 DNS setup manually. Remember: this shouldn't be needed for usual operations!
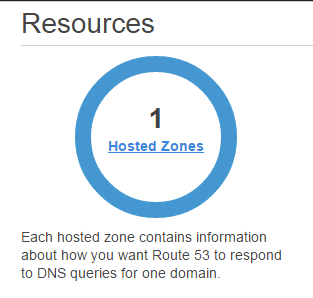
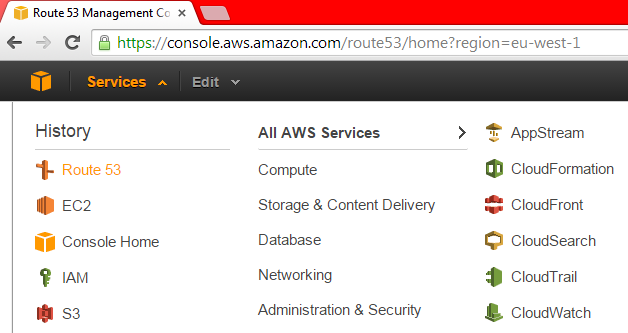 Go to the "Hosted Zones" entry
 and select the `sapsailing.com.` row,
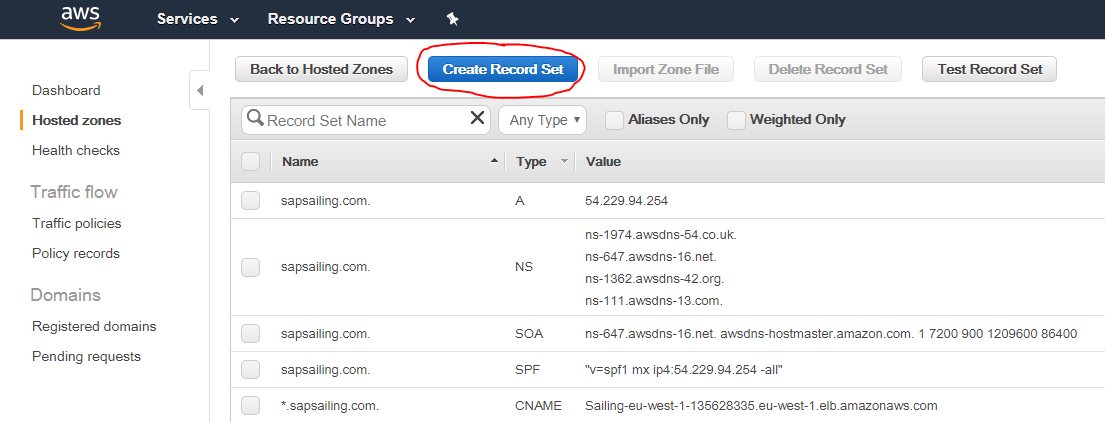
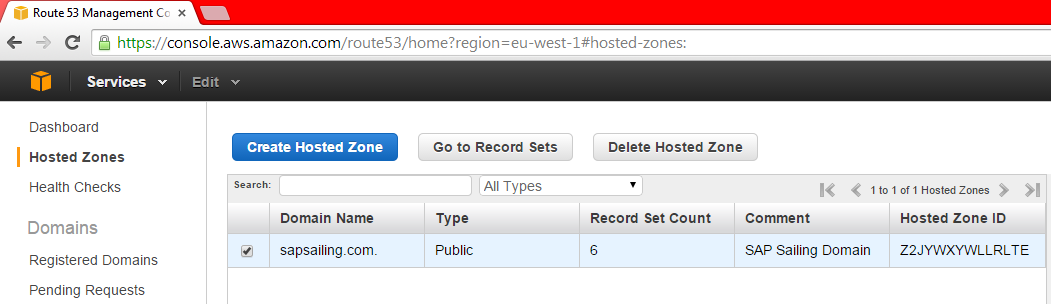 then click on "Go to Record Sets." You will then see the record sets for the `sapsailing.com.` domain:
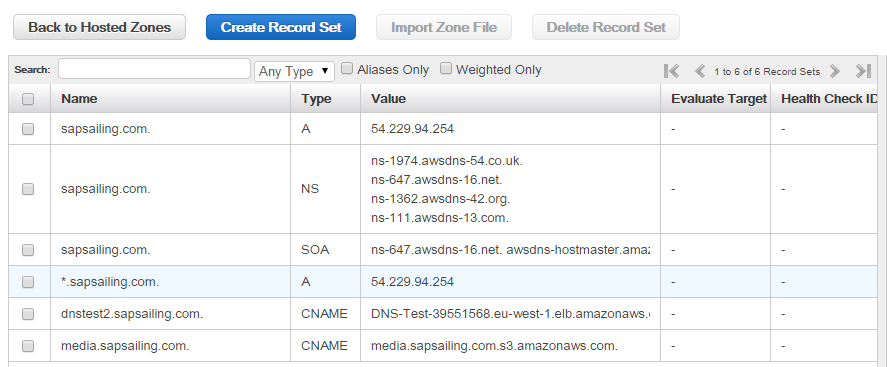 Click on "Create Record Set" and fill in the subdomain name (`myspecificevent` in the example shown below) and as the value use the host name (A-record) of the ELB that you find in the ELB configuration.
 Amazon ELB is designed to handle unlimited concurrent requests per second with “gradually increasing� load pattern (although it's initial capacity is described to reach 20k requests/secs). It is not designed to handle heavy sudden spike of load or flash traffic because of its internal structure where it needs to fire up more instances when load increases. ELB's can be pre-warmed though by writing to the AWS Support Team.
With this set-up, please keep in mind that administration of the sailing server instance always needs to happen through the master instance. A fat, red warning is displayed in the administration console of the replica instances that shall keep you from making administrative changes there. Change them on the master, and the changes will be replicated to the replicas.
You can monitor the central RabbitMQ message queueing system at [http://54.246.250.138:15672/#/exchanges](http://54.246.250.138:15672/#/exchanges). Use `guest/guest` for username and password. You should find the exchange name you configured for you master there and will be able to see the queues bound to the exchange as well as the traffic running through the exchange.
### Using Latency-Based DNS across Regions
ELBs don't work across regions (such as eu-west-1 and ap-southeast-1) but only across the availability zones within one region. Therefore, if you want location and latency-based routing for your event, you have to set up so-called latency-based routing policies using alias record sets that point to your ELBs, one per region. The alias records are all for the same domain name and are each an alias for one ELB in one region. The DNS service will then find out for a requesting client which of the ELBs for the same name will provide the shortest network latency and return that record. Additionally, the DNS service can be configured to evaluate the ELBs health checking status. If the ELB has bad health, DNS requests will subsequently be answered using other alias records, therefore pointing to ELBs in other regions.
Amazon ELB is designed to handle unlimited concurrent requests per second with “gradually increasing� load pattern (although it's initial capacity is described to reach 20k requests/secs). It is not designed to handle heavy sudden spike of load or flash traffic because of its internal structure where it needs to fire up more instances when load increases. ELB's can be pre-warmed though by writing to the AWS Support Team.
With this set-up, please keep in mind that administration of the sailing server instance always needs to happen through the master instance. A fat, red warning is displayed in the administration console of the replica instances that shall keep you from making administrative changes there. Change them on the master, and the changes will be replicated to the replicas.
You can monitor the central RabbitMQ message queueing system at [http://54.246.250.138:15672/#/exchanges](http://54.246.250.138:15672/#/exchanges). Use `guest/guest` for username and password. You should find the exchange name you configured for you master there and will be able to see the queues bound to the exchange as well as the traffic running through the exchange.
### Using Latency-Based DNS across Regions
ELBs don't work across regions (such as eu-west-1 and ap-southeast-1) but only across the availability zones within one region. Therefore, if you want location and latency-based routing for your event, you have to set up so-called latency-based routing policies using alias record sets that point to your ELBs, one per region. The alias records are all for the same domain name and are each an alias for one ELB in one region. The DNS service will then find out for a requesting client which of the ELBs for the same name will provide the shortest network latency and return that record. Additionally, the DNS service can be configured to evaluate the ELBs health checking status. If the ELB has bad health, DNS requests will subsequently be answered using other alias records, therefore pointing to ELBs in other regions.
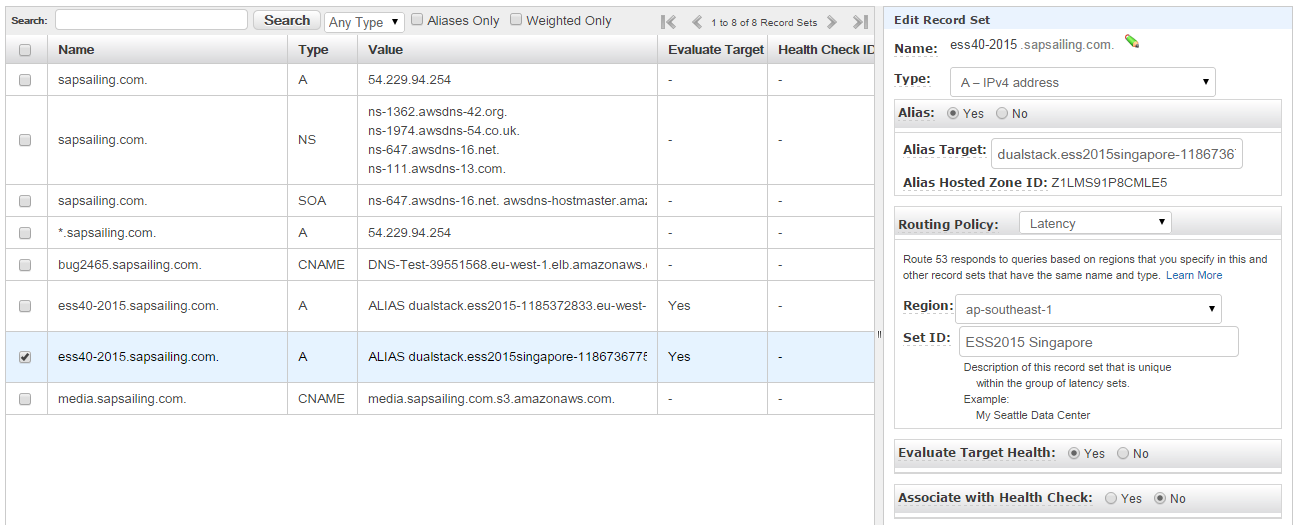 The above image shows what you need to do: After you've set up an ELB in each of the regions as described above, for each of them add an alias record set. Enter the domain name and make sure it's the same for all ELBs. Change the "Alias" radio button to "Yes." The alias target can usually be selected from a drop-down, but in case you aren't offered the ELB you want to add, you can as well copy the ELB DNS name shown in the configuration page of that ELB.
Change the routing policy to "Latency" and select the region in which your ELB is located. A meaninful ID string may be helpful later to identify the record set from a list of record sets.
Select the "Yes" radio button for "Evaluate Target Health" in order to make sure the DNS server checks the ELB's health status and fails over to any of your other latency-based record sets if the ELB has bad health.
Should you be switching from an Apache reverse proxy set-up with a record in `/etc/httpd/conf.d/001-events.conf` for your sub-domain, remember to comment or remove this record and to reload the httpd service on the central web server using `service httpd reload`. Its effects may otherwise interfere with the effects of the DNS entries for that same sub-domain. Conversely, before removing the DNS record sets for the sub-domain, if migrating back to a non-ELB, non-DNS scenario, remember to first re-activate the `001-events.conf` reverse proxy entry before removing the DNS record sets.
### Access MongoDB database
To launch a local MongoDB instance on the default port, enter a command such as `mkdir /home/sailing/mongodb; /opt/mongodb-linux-x86_64-1.8.1/bin/mongod --dbpath /home/sailing/mongodb`. To make sure the process survives log-off, you may want to launch it in a tmux session. See above for how to create a tmux session. In an existing tmux session, a new window can be created using `Ctrl-a c`.
### Upgrade the Sailing Analytics App AMI image
There are a number of use cases that suggest an upgrade of the AMI that we use to start new SAP Sailing Analytics instances. One can be that we want to add or modify the set of SSH keys authorized for access to the root and sailing accounts. Another can be that we would like to upgrade the git contents under `~sailing/code` for an update to the `/etc/init.d/sailing` or the `/home/sailing/code/java/target/refreshInstance.sh` script that is central to the automated launch process of a new instance. Another use case can be applying an upgrade to the underlying operating system (currently CentOS).
Follow these steps to upgrade the AMI:
* Launch a new instance based on the existing AMI
* Log in as user `root`
* Run `yum update` to update the operating system
* Stop the Java instance, e.g., by using `killall -9 java`
* Remove any obsolete logs from `/home/sailing/servers/server/logs`
* Stop the httpd server, e.g., using `service httpd stop`
* Remove httpd logs under `/var/log/httpd`
* Update the git contents (essential for up-to-date versions of `/etc/init.d/sailing` which links to the git, and the `refreshInstance.sh` script used during automatic instance launch), and clean any build artifacts by doing
The above image shows what you need to do: After you've set up an ELB in each of the regions as described above, for each of them add an alias record set. Enter the domain name and make sure it's the same for all ELBs. Change the "Alias" radio button to "Yes." The alias target can usually be selected from a drop-down, but in case you aren't offered the ELB you want to add, you can as well copy the ELB DNS name shown in the configuration page of that ELB.
Change the routing policy to "Latency" and select the region in which your ELB is located. A meaninful ID string may be helpful later to identify the record set from a list of record sets.
Select the "Yes" radio button for "Evaluate Target Health" in order to make sure the DNS server checks the ELB's health status and fails over to any of your other latency-based record sets if the ELB has bad health.
Should you be switching from an Apache reverse proxy set-up with a record in `/etc/httpd/conf.d/001-events.conf` for your sub-domain, remember to comment or remove this record and to reload the httpd service on the central web server using `service httpd reload`. Its effects may otherwise interfere with the effects of the DNS entries for that same sub-domain. Conversely, before removing the DNS record sets for the sub-domain, if migrating back to a non-ELB, non-DNS scenario, remember to first re-activate the `001-events.conf` reverse proxy entry before removing the DNS record sets.
### Access MongoDB database
To launch a local MongoDB instance on the default port, enter a command such as `mkdir /home/sailing/mongodb; /opt/mongodb-linux-x86_64-1.8.1/bin/mongod --dbpath /home/sailing/mongodb`. To make sure the process survives log-off, you may want to launch it in a tmux session. See above for how to create a tmux session. In an existing tmux session, a new window can be created using `Ctrl-a c`.
### Upgrade the Sailing Analytics App AMI image
There are a number of use cases that suggest an upgrade of the AMI that we use to start new SAP Sailing Analytics instances. One can be that we want to add or modify the set of SSH keys authorized for access to the root and sailing accounts. Another can be that we would like to upgrade the git contents under `~sailing/code` for an update to the `/etc/init.d/sailing` or the `/home/sailing/code/java/target/refreshInstance.sh` script that is central to the automated launch process of a new instance. Another use case can be applying an upgrade to the underlying operating system (currently CentOS).
Follow these steps to upgrade the AMI:
* Launch a new instance based on the existing AMI
* Log in as user `root`
* Run `yum update` to update the operating system
* Stop the Java instance, e.g., by using `killall -9 java`
* Remove any obsolete logs from `/home/sailing/servers/server/logs`
* Stop the httpd server, e.g., using `service httpd stop`
* Remove httpd logs under `/var/log/httpd`
* Update the git contents (essential for up-to-date versions of `/etc/init.d/sailing` which links to the git, and the `refreshInstance.sh` script used during automatic instance launch), and clean any build artifacts by doing
  > su - sailing
  > cd code
  > mvn clean
  > git fetch
> git merge origin/mastercp -rf /home/sailing/servers/server/logs/* /var/log/old/<event-name>/<instance-public-ipv4>/# <EVENT> <YEAR>
Use Event-ARCHIVE-SSL-Redirect <EVENT><YEAR>.sapsailing.com "<EVENT-UUID>"# <EVENT> <YEAR>
Use Event-ARCHIVE-SSL-Redirect <EVENT><YEAR>.sapsailing.com "<EVENT-UUID>"cp -rf ~/servers/server/logs/* /var/log/old/<event-name>/<instance-public-ipv4>/| Term | Description |
| Instance | Virtual machine that runs on a Xen host. Such an instance runs forever until it is stopped. It will be billed by hours it ran. Each start will be billed by a full hour. |
| Spot Instance | Instances that run whenever there are free resources. It is not possible to control when or where these instances run. These instances are much cheaper than normal instances. |
| Amazon Machine Image (AMI) | Amazon Machine Image: Image file that contains a filesystem and a preinstalled operating system. One can create AMIs very easily from a stopped Instance by first creating a snapshot and then converting it to an AMI. |
| Volume | An active harddisk that can be associated to one Instance. |
| IOPS | Input/Output operations per second. Metric used to denote the performance of a volume. The higher the IOPS value the better the speed. Be aware of the fact that IOPS is metered by IOPS/h and is very expensive. Use with care! |
| Snapshot | Snapshot of a Volume |
| Elastic IP | IP address that can be associated to an instance. Any Elastic-IP not associated to a running Instance costs some amount of money per hour. |
| Security Group | Firewall configuration that can be associated to an instance. There is no need of configuring iptables or such. One can associate many instances the the same Security Group. |
| Elastic Load Balancer (ELB) | Service that makes it possible to balance over services running on different instances. |
| Network Interfaces | Virtual network interfaces that are mapped to physical network interfaces on instances. |
| Multi instance | App instance that runs along with other app instances on the same EC2 instance |
| Placement Groups | Enables applications to get the full-bisection bandwidth and low-latency network performance required for tightly coupled, node-to-node communication. Placement Groups can only contain HVM instance and have other limitations described here: https://docs.aws.amazon.com/AWSEC2/latest/UserGuide/using_cluster_computing.html |