Amazon EC2 for SAP Sailing Analytics
- Amazon EC2 for SAP Sailing Analytics
- Quickstart
- Important Servers, Hostnames
- Landscape Overview
- Setting up the Central Reverse Proxy
- DNS and Application Load Balancers (ALBs)
- Web Application Firewall (WAF) and Web ACLs for Geoblocking
- MongoDB Replica Sets
- Shared Security and Application Data Across sapsailing.com
- Standard Application Replica Set with Target Groups, Auto-Scaling Group and Launch Configuration
- Dedicated Application Replica Set
- Application Replica Set Using Shared Instances
- Archive Server Set-Up
- Important Amazon Machine Images (AMIs)
- AWS Tags
- Automated Procedures
- Credentials and SSH Key
- Creating a New Application Replica Set
- Moving Application Replica Set from Shared to Dedicated Infrastructure
- Moving Application Replica Set from Dedicated to Shared Infrastructure
- Scaling Replica Instances Up/Down
- Scaling Master Up/Down
- Upgrading Application Replica Set
- Archiving Application Replica Set
- Removing Application Replica Set
- Upgrading AMIs
- Removing an AMI and its Snapshots
- Create mailing list for landscape managers
- Crontab setup and script organisation
- Reverse proxy automation
- Automated SSH Key Management
- Legacy Documentation for Manual Operations
- Costs per month
- General Information and Security
- EC2 Server Architecture for Sailing Analytics
- HowTo
- Terminating AWS Sailing Instances
- Glossary
Quickstart
Our default region in AWS EC2 is eu-west-1 (Ireland). Tests are currently run in the otherwise unused region eu-west-2 (London). Most regular operations can be handled through the AdminConsole's "Advanced / Landscape" tab. See, e.g., https://security-service.sapsailing.com/gwt/AdminConsole.html#LandscapeManagementPlace:. Some operations occurring not so frequently still require more in-depth knowledge of steps, manual execution of commands on the command line and some basic Linux understanding. This also goes for highest-scale set-ups requiring an AWS Global Accelerator with or without Geo-Blocking through AWS Web Application Firewall (WAF) with Web ACLs as used for Tokyo 2020 and Paris 2024.
Important Servers, Hostnames
- Web Server / Central Reverse Proxy: reachable through SSH to sapsailing.com:22
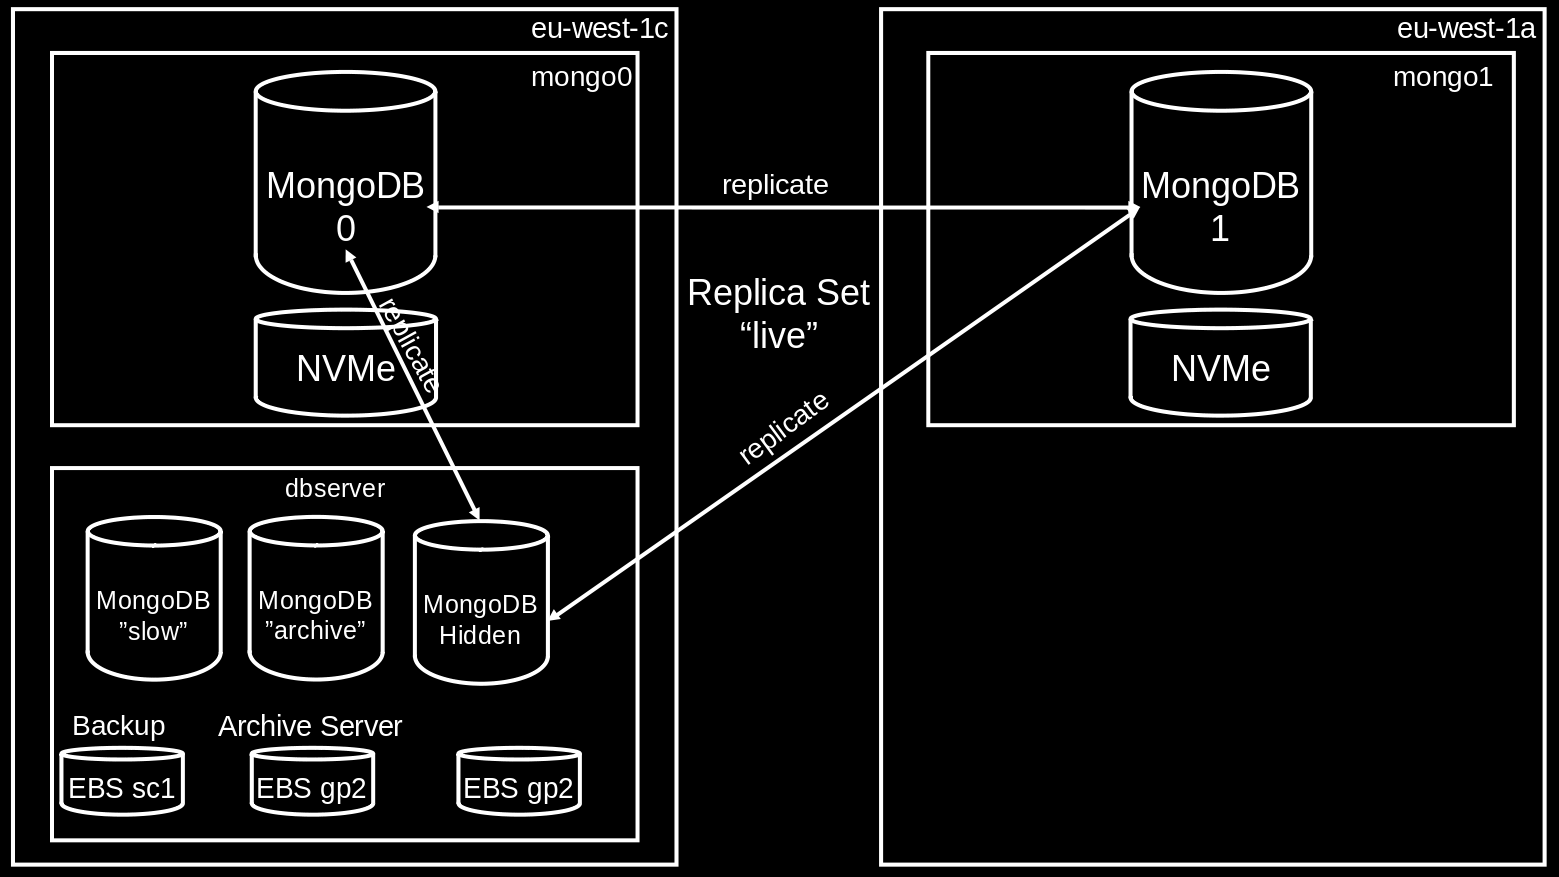
- Database Servers: dbserver.internal.sapsailing.com (archive server winddb on port 10201 and replica set "winddb", all other slow/archived DBs on 10202 for replica set "slow", hidden replica of "live" replica set on 10203), mongo0.internal.sapsailing.com (replica set "live"), mongo1.internal.sapsailing.com (replica set "live")
- RabbitMQ Server: rabbit.internal.sapsailing.com
- MariaDB (mainly for Bugzilla): mysql.internal.sapsailing.com
- Hudson Build Server: called "Build/Dev", running a Hudson instance reachable at
hudson.sapsailing.comand a test instance of the SAP Sailing Analytics available underdev.sapsailing.com - A central sailing application replica set called "security_service" reachable at
security-service.sapsailing.comwhich is the hub for security-related information such as the user and groups database with permissions and roles, entity ownerships, as well as access control lists - Self-service at
my.sapsailing.comwhich currently is the default server name used by the Sail Insight app, as two dedicated hosts running the replica set - Three multi-server instances shared by several sailing application replica sets, spread across all three availability zones (AZs) of eu-west-1
Landscape Overview
In Route53 (the AWS DNS) we have registered the sapsailing.com domain and can manage records for any sub-domains. The "apex" record for sapsailing.com points to a Network Load Balancer (NLB), currently NLB-sapsailing-dot-com-f937a5b33246d221.elb.eu-west-1.amazonaws.com, which does the following things:
- accept SSH connects on port 22; these are forwarded to the internal IP of the central reverse proxy through the target group
SSH-to-sapsailing-dot-com-2; it is important that the target group is configured to preserve client IP addresses; otherwise, thefail2baninstallation on the central reverse proxy would quickly block all SSH traffic, malicious and good, because they all would be identified as having one of the NLB's internal IP addresses as their source IP. - accept HTTP connections for
sapsailing.com:80, forwarding them to the target groupHTTP-to-sapsailing-dot-com-2which is a TCP target group for port 80 with ip-based targets (instance-based was unfortunately not possible for the oldm3instance type of our web server), again pointing to172.31.28.212, the internal IP of our web server - accept HTTPS/TLS connections on port 443, using the ACM-managed certificate for
*.sapsailing.comandsapsailing.comand also forwarding to theHTTP-to-sapsailing-dot-com-2target group - optionally, this NLB could be extended by UDP port mappings in case we see a use case for UDP-based data streams that need forwarding to specific applications, such as the Expedition data typically sent on ports 2010 and following
Additionally, we have created a CNAME record for *.sapsailing.com pointing at a default application load balancer (ALB) (currently DefDynsapsailing-com-1492504005.eu-west-1.elb.amazonaws.com) in our default region (eu-west-1). Thie default ALB is also called our "dynamic ALB" because it doesn't depend on DNS rules other than the default one for *.sapsailing.com, so other than changes to the DNS which can take minutes to hours to propagate through the world-wide DNS, changes to the default ALB's rule set take effect immediately. Like all ALBs, this one also has a default rule that refers all traffic not matched by other rules to a target group that forwards traffic to an (in the future probably multiple) Apache httpd webserver. All these ALBs handle SSL termination by means of an ACM-managed certificate that AWS automatically renews before it expires. The traffic routed to the target groups is always HTTP only.
Further ALBs may exist in addition to the default ALB and the NLB for sapsailing.com. Those will then have to have one or more DNS record(s) pointing to them for which matching rules based on the hostname exist in the ALB listener's rule set. This set-up is specifically appropriate for "longer-lived" content where during archiving or dismantling a DNS lag is not a significant problem.
Apache httpd, the central reverse proxy (Webserver) and disposable reverse proxies
A key pillar of our architecture is the central reverse proxy, which handles traffic for the wiki, bugzilla, awstats, releases, p2, Git, jobs, static and is the target of the catch all rule in the Dynamic ALB.
Any traffic to the Hudson build server subdomain does not go through the central webserver. Instead, it gets directed by route 53 to a DNSMapped load balancer (which all route any port 80 traffic to 443), which has a rule pointing to a target group, that contains only the Hudson server. The setup procedure can be found below.
To improve availability and reliability, we have a "disposable reverse proxy" environment type and AMI (see configuration/environments_scripts/reverse_proxy). The instances from this AMI are only for serving requests to the archive but are lightweight and can be quickly started and shutdown, using the landscape management console.
The IPs for all reverse proxies will automatically be added to ALB target groups with the tag key allReverseProxies, including the CentralWebServerHTTP-Dyn target group (in the dynamic ALB in eu-west-1)
and all the DDNSMapped-x-HTTP (in all the DNSMapped ALBs). These are the target groups for the default rules and it ensures availability to the ARCHIVE especially.
Disposables instances are tagged with DisposableProxy to indicate it hosts no vital services. ReverseProxy also identifies any reverse proxies. The health check for the target groups would change to trigger a script which returns different error codes: healthy/200 if in the same AZ as the archive (or if the failover archive is in use), whilst unhealthy/503 if in different AZs. This will reduce cross-AZ, archive traffic costs, but maintain availability and load balancing.
For security groups of the central reverse proxy, we want Webserver, as well as Reverse Proxy. The disposables just have the latter.
There is hope to also deploy the httpd on already existing instances, which have free resources and a certain tag permitting this co-deployment. Most of sapsailing.com no longer cares about SSL and does not need to have an SSL certificate. Sail-insight still does though. The central reverse proxy offers the following services:
- bugzilla.sapsailing.com - a Bugzilla installation under /usr/lib/bugzilla
- wiki.sapsailing.com - a Gollum-based Wiki served off our git, see /home/wiki
- static.sapsailing.com - static content hosted under /home/trac/static
- releases.sapsailing.com - hub and repository for releases built by our CI infrastructure, hosted at /home/trac/releases
- jobs.sapsailing.com - a static web page, see /home/trac/static/jobs
- sail-insight.com - a static web page, with SSL/HTTPS support, hosted under /home/trac/sail-insight-website
- p2.sapsailing.com - several OSGi p2 repositories relevant for our Tycho/OSGi build and our target platform definition, hosted under /home/trac/p2-repositories
- gitlist.sapsailing.com - for our git at /home/trac/git
- git.sapsailing.com - for git cloning for dedicated users, used among other things for replication into git.wdf.sap.corp
Furthermore, it hosts aliases for sapsailing.com, www.sapsailing.com and all subdomains for archived content, pointing to the archive server which is defined in /etc/httpd/conf.d/000-macros.conf. This is also where the archive server switching has to be configured. Before reloading the configuration, make sure the syntax is correct, or else you may end up killing the web server, leading to downtime. Check by running
apachectl configtestSyntax OK then reload the configuration using
service httpd reloadThe webserver is registered as target in various locations:
- As DNS record with its internal IP address (e.g., 172.31.19.129) for the two DNS entries
logfiles.internal.sapsailing.comused by various NFS mounts, andsmtp.internal.sapsailing.comfor e-mail traffic sent within the landscape and not requiring the AWS SES - as IP target with its internal IP address for the
HTTP-to-sapsailing-dot-com-2target group, accepting the HTTP traffic sent straight tosapsailing.com(notwww.sapsailing.com) - as IP target with its internal IP address for the
SSH-to-sapsailing-dot-com-2target group, accepting the SSH traffic forsapsailing.com - as regular instance target in all load balancers' default rule's target group, such as
DefDynsapsailing-com,DNSMapped-0,DNSMapped-1, and so on; the names of the target groups areCentralWebServerHTTP-Dyn,DDNSMapped-0-HTTP,DDNSMapped-1-HTTP, and so on, respectively - as regular instance target in
DNSMapped-0's target groupDNSMapped0-Central-HTTPto which requests for services available only on the central reverse proxy are forwarded to, such asreleases.sapsailing.com,bugzilla.sapsailing.com, and so on - as target of the elastic IP address
54.229.94.254
Changing the DNS entry especially for logfiles.internal.sapsailing.com requires re-mounting those NFS shares wherever they were used. Go to at least all instances tagged with sailing-analytics-server and, as user root, execute the following commands:
 umount -l -f /var/log/old
 umount -l -f /home/scores
 mount -a
This will re-mount those two essential NFS mounts and avoid, e.g., the set-up of new application processes to hang when trying to create symbolic links into /home/scores for the various file-based result importers.
Note that the elastic IP address 54.229.94.254 is in turn the target of the DNS record mail.sapsailing.com as well as the TXT DNS record for sapsailing.com for SPF e-mail validation.
Furthermore, it is helpful to ensure that the /internal-server-status path will resolve correctly to the Apache httpd server status page. For this, the /etc/httpd/conf.d/001-events.conf file contains three rules at the very beginning:
## SERVER STATUS
Use Status ec2-54-229-94-254.eu-west-1.compute.amazonaws.com internal-server-status
Use Status 172.31.19.129 internal-server-status
Use Status 127.0.0.1 internal-server-status
The second obviously requires maintenance as the internal IP changes, e.g., when instantiating a new Webserver copy by creating an image and restoring from the image. This maintenance is managed by a service unit. When upgrading / moving / copying the webserver you may try to be smart and copy the contents of /etc/ssh, in particular the ssh_host_... files that contain the host keys. As you switch, users will then not have to upgrade their known_hosts file, and even internal accounts such as the Wiki account or the sailing accounts on other hosts that clone the git, or the build infrastructure won't be affected.
After (re-)booting the webserver, check that all services have come up before adding the instance to its respective target groups. For example, ensure that the Wiki "Gollum" service has been launched (see /home/wiki/serve.sh). Furthermore, ensure that the Docker daemon is running and that it runs the Docker registry containers (registry-ui-1 and registry-registry-1). See here for how this is set up.
The webserver must be tagged with key CentralReverseProxy where the value is ignored, but true is a good default.
The following diagram explains the disposable reverse proxies role a little better.
Setting up the Central Reverse Proxy
A lot of the above procedure has since been combined into a series of setup scripts found under configuration/environments_scripts/central_reverse_proxy. The script requires that you have added an SSH key with maximum access to your SSH authentication agent. This can be done with
eval `ssh-agent`
ssh-add
You will also need the AWS CLI and must run ./awsmfalogon.sh before running the first script below, to authenticate and gain a session token. Next, you should notify the community that internal services, such as Bugzilla will temporarily be down (make sure to notify them afterwards too, so they can continue their work).
Using the landscape tab of the admin console, ensure there is a disposable in the same AZ as the archive (this ensures we can still route traffic to the archive).
Next, remove the central reverse proxy from all target groups tagged with allReverseProxies. Then when at the path described above, launch ./setup-central-reverse-proxy.sh and follow the necessary instructions. You
will need to unmount and detach volumes from the old instance and then reattach and mount on the new webserver.
Then setup-central-reverse-proxy-part-2.sh runs to finish any setup that requires these mounts. Finally, target-group-tag-route53-nfs-elasticIP-setup.sh
will run to configure the target groups, tags and route 53. You will need to then remove the old reverse proxy from the target groups tagged with CentralReverseProxy.
DNS and Application Load Balancers (ALBs)
We distinguish between DNS-mapped and non-DNS-mapped content. The basic services offered by the web server as listed above are DNS-mapped, with the DNS entries being CNAME records pointing to an ALB (DNSMapped-0-1286577811.eu-west-1.elb.amazonaws.com) which handles SSL offloading with the Amazon-managed certificate and forwards those requests to the web server. Furthermore, longer-running application replica sets can have a sub-domain declared in Route53's DNS, pointing to an ALB which then forwards to the public and master target groups for this replica set based on hostname, header fields and request method. A default redirect for the / path can also be defined, obsoleting previous Apache httpd reverse proxy redirects for non-archived ALB-mapped content.
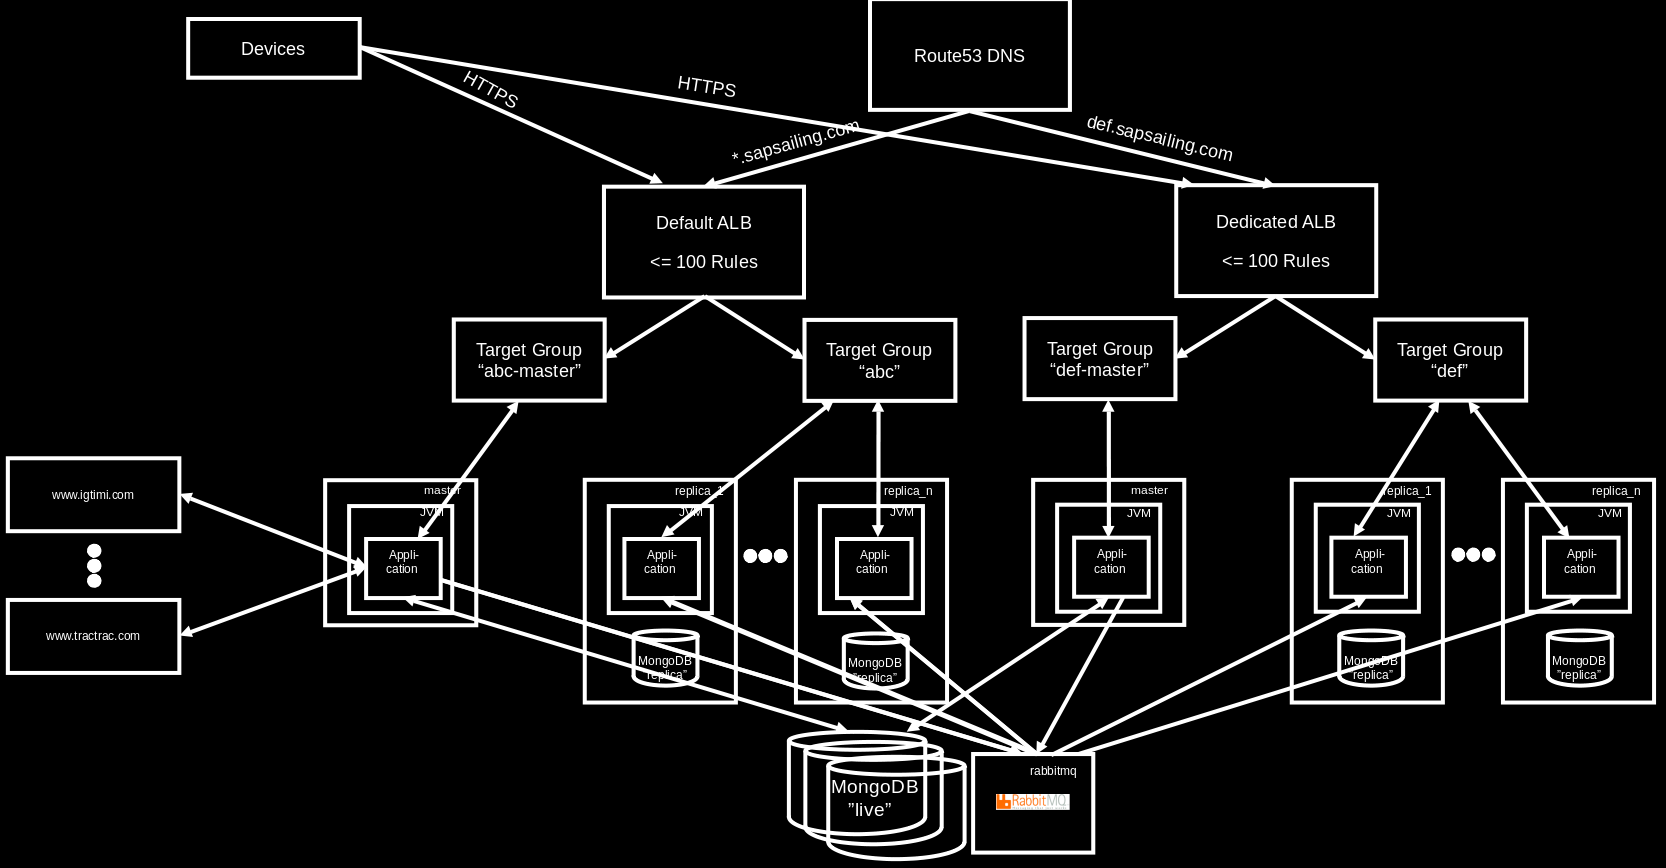
Shorter-running events may not require a DNS record. The ALB DefDynsapsailing-com-1492504005.eu-west-1.elb.amazonaws.com is target for *.sapsailing.com and receives all HTTP/HTTPS requests not otherwise handled. While HTTP immediately redirects to HTTPS, the HTTPS requests will pass through its rules. If application replica sets have their rules declared here, they will fire. Everything else falls through to the default rule which forwards to the web server's target group again. This is how archived events as well as requests for www.sapsailing.com end up.
The requests going straight to sapsailing.com are handled by the NLB (see above), get forwarded to the web server and are re-directed to www.sapsailing.com from there, ending up at the non-DNS-mapped load balancer where by default they are then sent again to the web server / reverse proxy which sends it to the archive server.
In addition to a default re-direct for the "/" path, the following four ALB listener rules for a single application replica set are defined, all requiring the "Host" to match the hostname:
- if the HTTP header
X-SAPSSE-Forward-Request-Toismasterthen forward to the master target group - if the HTTP header
X-SAPSSE-Forward-Request-Toisreplicathen forward to the public target group - if the request method is
GETthen forward to the public target group - forward all other request for the hostname to the master target group
Web Application Firewall (WAF) and Web ACLs for Geoblocking
In order to be able to block requests from certain regions or countries based on sanctions or other bans, as well as to see improved statistics about web requests hitting the site (such as the country from where requests originate, or a classification of bot vs. non-bot requests) across all our application load balancers (ALBs), we can use the AWS Web Application Firewall (WAF) and its Web Access Control Lists (Web ACLs). These Web ACLs are defined per AWS Region, so in case of a cross-region scenarios like the Olympic Summer Games, Web ACLs have to be defined in each region supported.
As of today, we are required to block access from Russia, Belarus, North Korea, and Iran.
Any geo-blocking Web ACL that shall automatically be associated with ALBs that are created through our landscape automation have to be tagged with tag key web-acl-purpose (see LandscapeConstants.WEB_ACL_PURPOSE_TAG) with value geoblocking (see LandscapeConstants.WEB_ACL_GEOBLOCKING_PURPOSE). Tagging a Web ACL, as of this writing, is not possible through the AWS Web Console but only through the command line interface (CLI) or API. A command-line way to tag a Web ACL accordingly would look like this (adjust your Web ACL's ARN…):
aws wafv2 tag-resource \
    --resource-arn arn:aws:wafv2:eu-west-1:017363970217:regional/webacl/GeoBlocking/1f1c421e-994c-4c67-ba15-75375448c5c5 \
--tags Key=web-acl-purpose,Value=geoblocking--region argument if you're trying to tag a Web ACL in a region other than your AWS CLI's default region. Check your ~/.aws/config file. Also see configuration/environments_scripts/repo/usr/local/bin/awsmfalogon.sh for logging on to the AWS CLI.
MongoDB Replica Sets
There are currently three MongoDB replica sets:
-
live: Used by default for any new event or club server. The replica set consists of three nodes, two of which running on instances with fast but ephemeral NVMe storage for high write throughput, thus eligible as primary nodes; and a hidden replica with a slower EBS gp2 SSD volume that has a backup plan. The two NVMe-backed nodes have DNS names pointing to their internal IP addresses:mongo0.internal.sapsailing.comandmongo1.internal.sapsailing.com. Their MongoDB processes run on the default port 27017 each. They run in different availability zones. The hidden replica runs ondbserver.internal.sapsailing.com:10203. -
archive: Used by the ARCHIVE servers (production and failover). It hosts a DB calledwinddb(for historical reasons). This differs to thelive, which has a DB per event. Its primary and by default only node is found ondbserver.internal.sapsailing.com:10201. If an ARCHIVE server is launched it is a good idea to scale thisarchivereplica set by adding one or two secondary nodes that are reasonably sized, such asi3.2xlarge. Note that the ARCHIVE server configuration prefers reading from secondary MongoDB instances, thus will prefer any newly launched node over the primary. -
slow: Used as target for archiving / backing up content from thelivereplica set once it is no longer needed for regular operations. The DB for the event is copied into the winddb of the archive and also to theslowreplica set, which acts as a sort of backup. However, the events remain as separate DBs on theslowreplica set. The default node for this replica set can be found atdbserver.internal.sapsailing.com:10202and has a large (currently 4TB) yet slow and inexpensive sc1 disk attached. One great benefit of this replica set is that in case you want to resurrect an application replica set after it has been archived, you can do so with little effort, simply by launching an instance with a DB configuration pointing at theslowreplica set.
Furthermore, every application server instance hosts a local MongoDB process, configured as a primary of a replica set called replica. It is intended to be used by application replica processes running on the instance, scaling with the number of replicas required, starting clean and empty and getting deleted as the instance is terminated. Yet, being configured as a MongoDB replica set there are powerful options available for attaching more MongoDB instances as needed, or upgrading to a new MongoDB release while remaining fully available, should this ever become an issue for longer-running replicas.
Shared Security and Application Data Across sapsailing.com
Staying logged in and having a common underlying security infrastructure as users roam around the sapsailing.com landscape is an important feature of this architecture. This is achieved by using the same replication scheme that is applied when an application replica set replicates its entire content between its master and all its replicas, with a small modification: the replication between an application replica set's master and a "singleton" security environment is only partial in the sense that not all replicables available are actually replicated. Instead, replication from the central security service is restricted currently to three replicables:
com.sap.sse.security.impl.SecurityServiceImplcom.sap.sailing.shared.server.impl.SharedSailingDataImplcom.sap.sse.landscape.aws.impl.AwsLandscapeStateImpl
The central security service is provided by a small application replica set reachable under the domain name security-service.sapsailing.com. It currently employs only a single master process running on a small dedicated instance. It launches into ready state within just a few seconds, and hence even upgrades may be performed in-place. The replication infrastructure is built such that when the securit-service master comes up again it knows which replicables were replicating it recently. Furthermore, replicas will buffer operations that are to be sent to the master as long as the master is not available. They will re-send them once the master has become available again.
This default replication relationship for any regular application replica set and ARCHIVE servers is encoded currently in the environment https://releases.sapsailing.com/environments/live-master-server and https://releases.sapsailing.com/environments/archive-server.
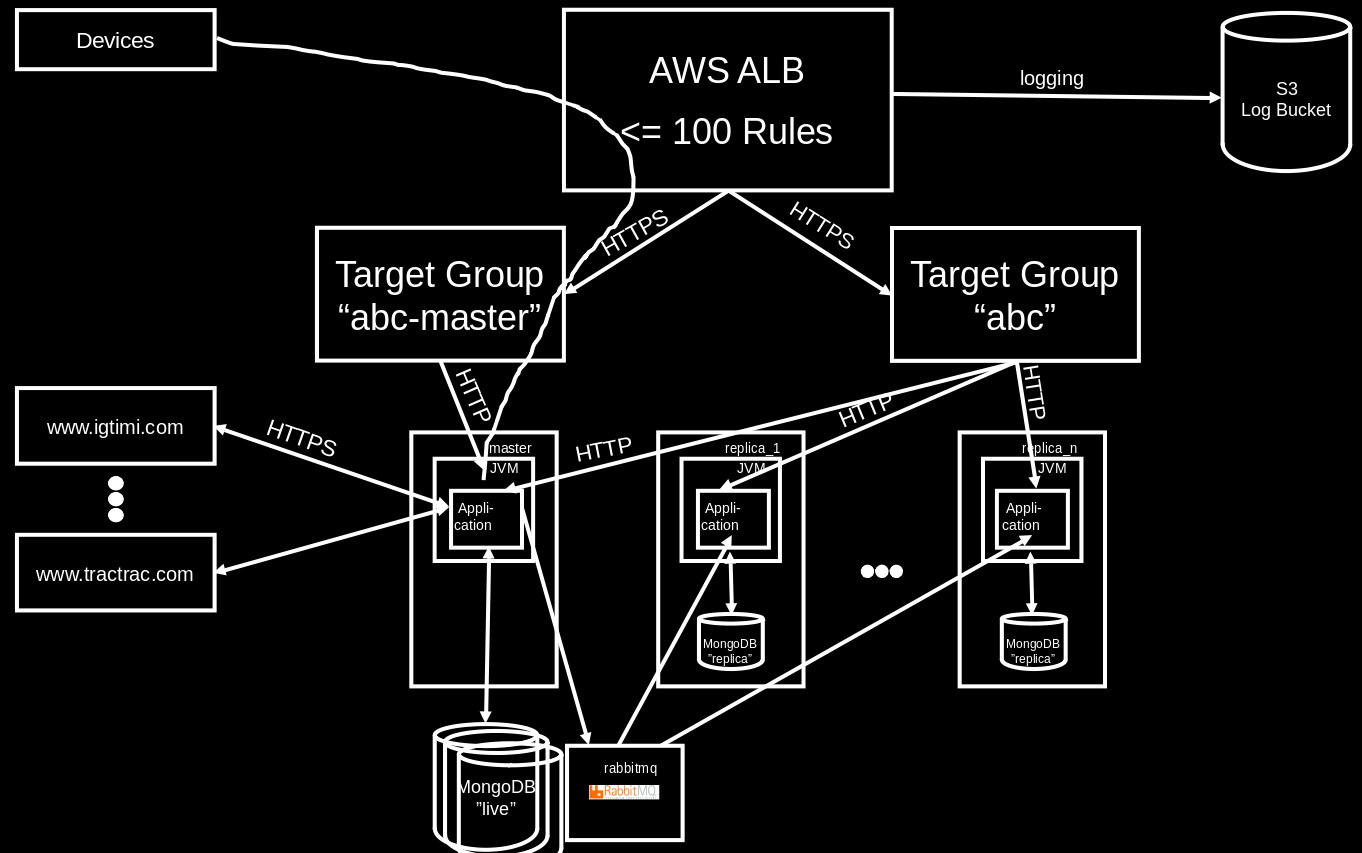
Standard Application Replica Set with Target Groups, Auto-Scaling Group and Launch Configuration
With the exception of legacy, test and archive instances, regular application replica sets are created with the following elements:
- an application load balancer (ALB) is identified or created if needed
- a "master" target group, named like the replica set with a "-m" suffix appended
- a "public" target group, named after the replica set
- five rules for the replica set are created in the load balancer's HTTPS listener, forwarding traffic as needed to the "master" and the "public" target groups
- for a DNS-mapped set-up (not using the default "dynamic" load balancer) a Route53 DNS CNAME record pointing to the ALB is created for the replica set's host name
- an auto-scaling group, named after the replica set with the suffix "-replicas" appended
- a launch template used by the auto-scaling group, named after the replica set with the release name appended, separated by a dash (-), e.g., "abc-build-202202142355"
- a master process, registered in both, the "master" and the "public" target groups
- a replica process, registered in the "public" target group There are different standard deployment choices for the master and the replica process that will be described in the following sections.
Dedicated Application Replica Set
For an event that expects more than a few hundred concurrent viewers the standard set-up includes dedicated instances for master and replica processes. Each application process (a Java VM) can consume most of the physical RAM for its heap size. No memory contention with other application processes will occur, and Java garbage collection will not run into memory swapping issues. All replicas in this set-up are managed by the auto-scaling group. Their instances will be named as "SL {replicaset-name} (Auto-Replica)". The master will be named "SL {replicaset-name} (Master)". The sailing-analytics-server tag on the instance will reflect the replica set's name in its value.
As replicas may get added as the load increases, we would like to avoid them putting additional stress on the MongoDB replica set used by the master process. Therefore, each instance runs its own small MongoDB installation, configured as a replica set replica. The DB content on a replica is said to be "undefined" and it is not intended to be used to read anything reasonable from it. Yet, we're trying to make the launch of a replica robust against reading from such a replica DB with undefined content before the actual initial load is received from the master process.
Application Replica Set Using Shared Instances
When an event is expected to produce less than hundreds of concurrent viewers and when the number of competitors to managed in a single leaderboard is less than approximately 50, master and replica processes of the corresponding application replica set may be deployed on instances shared with other application replica sets. This becomes even more attractive if the application replica sets sharing instances are not expected to produce high workload at the same time. The highest load is to be expected when races are live. For most non-long-distance races the times are constrained to a part of the daylight time in the time zone where the races are happening. Should there be multiple such events in different time zones then those would be good candidates for sharing instances as their load patterns are complementary.
Likewise, if an application replica set is set up for a multi-day event and after the last race is over still has some read load to carry that would be more than would be good for an archive server, yet less than what dedicated instances are required for, leaving the event on an application replica set sharing instances with others may be a good idea. Similarly, event series such as a sailing league's season, are usually configured on an application replica set, and in the times between the events of the series the much lower workload makes the application replica set eligible for moving to shared instances.
In principle, every application instance can host more than one application process. It is, however, essential that their file system directories and port assignments don't overlap. Also, a load balancing target group always routes traffic to the same port on all instances registered. Therefore, the master process and all replica processes of a single application replica set must use the same HTTP port. The default port range for the HTTP ports used by application replica sets starts at 8888. Telnet ports start at 14888, and UDP Expedition ports at 2010.
All replica processes running on the same instance share the instance's local MongoDB (the single-node replica replica set), and for each replica a database named {replicaset-name}-replica will end up on the local MongoDB. The master processes are expected to use a non-local MongoDB replica set, such as the live replica set.
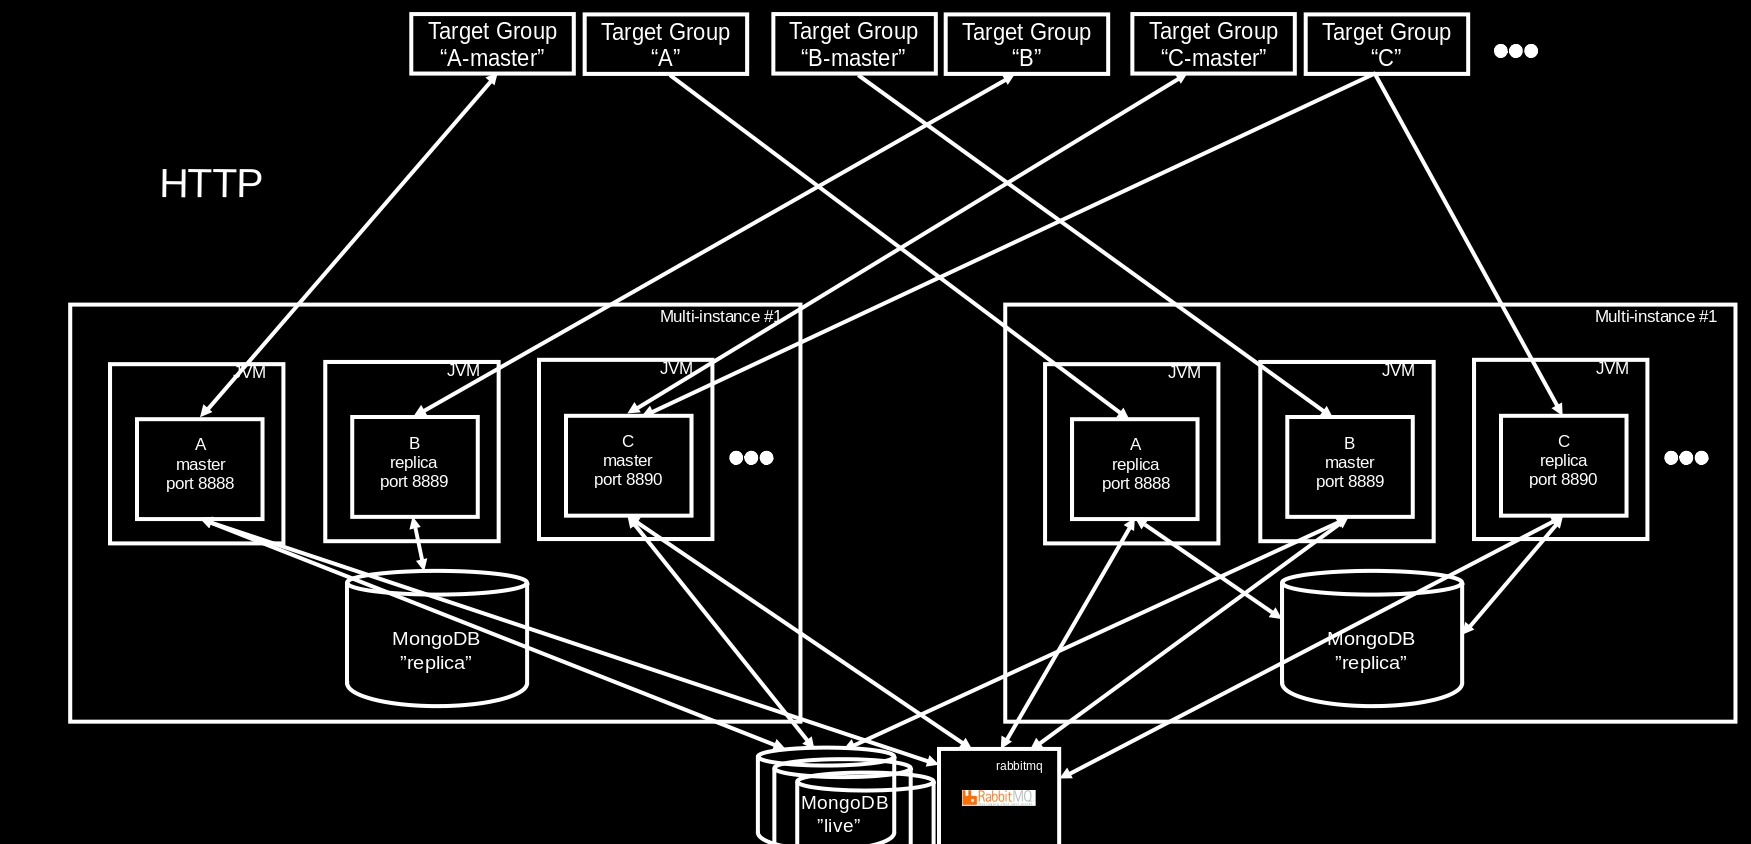
By means of several automation procedures it is possible with a few clicks or a single REST API call to move master and replica processes from one instance to another and to launch instances for dedicated and for shared use. With this, a reasonable degree of elasticity is provided that allows operators to move from shared to dedicated set-ups as an event is expected to generate more CPU load soon, and moving things back to a shared set-up when the load pressure decreases.
Shared instances are usually named "SL Multi-Server" and have the value "multi" for the sailing-analytics-server tag.
Archive Server Set-Up
The set-up for the "ARCHIVE" server differs from the set-up of regular application replica sets. While for the latter we assume that a single sub-domain (such as vsaw.sapsailing.com) will reasonably identify the content of the application replica set, the archive needs to fulfill at least two roles:
- keep content available under the original URL before archiving
- make all content browsable under the landing page
https://sapsailing.com
Furthermore, being the landing page for the entire web site, a concept for availability is required, given that an archive server restart can take up to 24 hours until all content is fully available again. Also, with a growing amount of content archived, more and more hostnames will need to be mapped to specific archived content. While ALBs incur cost and the number of ALBs and the size of their listeners' rule sets are limited, an HTTP reverse proxy such as the Apache httpd server is not limited in the number of rewrite rules it has configured. Archived events are usually not under high access load. The bandwidth required for all typical access to archived events is easily served by a single instance and can easily pass through a single reverse proxy.
For now, we're using the following set-up:
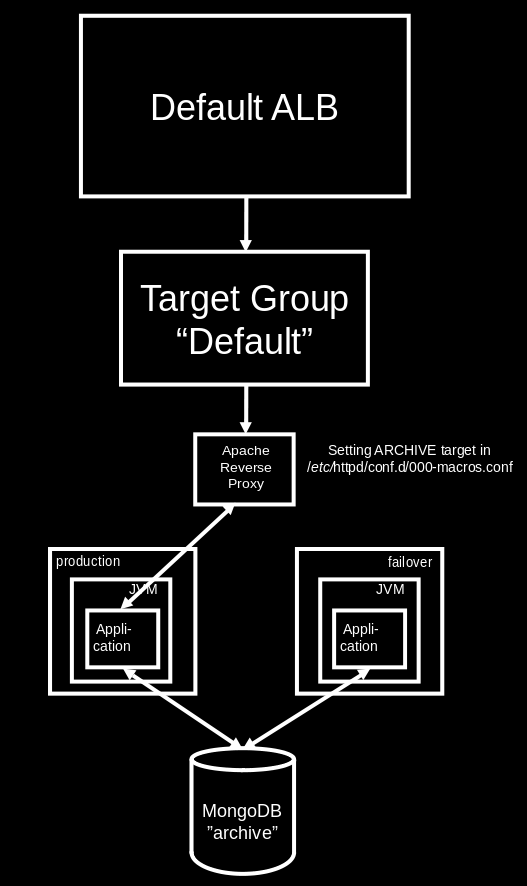
A failover instance is kept ready to switch to in case the primary production archive process is failing. The switching happens in the reverse proxy's configuration, in particular the /etc/httpd/conf.d/000-macros.conf file and its ArchiveRewrite macro telling the IP address of the current production archive server. In case of a failure, change the IP address to the internal IP address of the failover archive server and re-load the httpd configuration:
service httpd reloadImportant Amazon Machine Images (AMIs)
In our default region eu-west-1 there are four Amazon Machine Image (AMI) types that are relevant for the operation of the landscape. They all have a base name to which, separated by a space character, a version number consisting of a major and minor version, separated by a dot, is appended. Each of these AMIs has a tag image-type whose value reflects the type of the image.
- SAP Sailing Analytics,
image-typeissailing-analytics-server, see here - MongoDB Live Replica Set NVMe,
image-typeismongodb-server, see here - Hudson Debian/Ubuntu Slave,
image-typeishudson-slave - Webserver,
image-typeiswebserver, see here
There are furthermore instance types that we can configure automatically, based on a clean Amazon Linux 2 instance launched from the respective default Amazon image:
- Hudson / dev.sapsailing.com server, see here
- MySQL / MariaDB database server holding the data for our
bugzilla.sapsailing.combug/issue tracker, see here - RabbitMQ default instance used by all default sailing servers for replication, see here
We try to maintain setup scripts that help us with setting up those instance types from scratch. See the respective Wiki pages referenced from the lists above for more details.
The SAP Sailing Analytics image is used to launch new instances, shared or dedicated, that host one or more Sailing Analytics application processes. The image contains an installation of the SAP JVM 8 under /opt/sapjvm_8, an Apache httpd service that is not currently used by default for reverse proxying / rewriting / logging activities, an initially empty directory /home/sailing/servers used to host default application process configurations, and an initialization script under /etc/init.d/sailing that handles the instance's initialization with a default application process from the EC2 instance's user data. Instructions for setting up such an image from scratch can be found here.
The user data line image-upgrade will cause the image to ignore all application configuration data and only bring the new instance to an updated state. For this, the Git content under /home/sailing/code is brought to the latest master branch commit, a yum update is carried out to install all operating system package updates available, log directories and the /home/sailing/servers directory are cleared, and the root user's crontab is brought up to date by running . imageupgrade_functions.sh and then build_crontab_and_setup_files, with the appropriate parameters. If the no-shutdown line is provided in the instance's user data, the instance will be left running. Otherwise, it will shut down which would be a good default for creating a new image. See also procedures that automate much of this upgrade process.
The MongoDB Live Replica Set NVMe image is used to scale out or upgrade existing MongoDB replica sets. It also reads the EC2 instance's user data during start-up and can be parameterized by the following variables: REPLICA_SET_NAME, REPLICA_SET_PRIMARY, REPLICA_SET_PRIORITY, and REPLICA_SET_VOTES. An example configuration could look like this:
  REPLICA_SET_NAME="live"
  REPLICA_SET_PRIMARY="172.31.28.93:27017"
  REPLICA_SET_PRIORITY="0"
REPLICA_SET_VOTES="0"image-upgrade and the no-shutdown directives in the user data.
The latest Hudson Ubuntu Slave image is what the Hudson process reachable at https://hudson.sapsailing.com will launch to run a build. See also configuration/launchhudsonslave and configuration/aws-automation/getLatestImageOfType.sh in Git. Like the two other images discussed so far, the image understands the image-upgrade and no-shutdown directives in the instance's EC2 user data which will pull the Git repository's latest master to /home/sailing/code which is also from where the boot scripts are taken; furthermore, the SAP JVM 8 is brought to the latest release. See also here for hints about setting such an image up.
The Webserver image can be used to launch a new web server / reverse proxy in a region. It is mainly a small Linux installation with the following elements
- an Apache httpd and the default macros defined under
/etc/httpd/confand/etc/httpd/conf.d - the Git repository under
/home/trac/git - the folder serving
releases.sapsailing.comunder/home/trac/releases - the p2 OSGi repositories under
/home/trac/p2-repositoriesexposed asp2.sapsailing.com/p2 - the Gollum Wiki set-up under
/home/wikiwith a checked-out Git workspace under/home/wiki/gitwiki - the Bugzilla installation under
/var/lib/bugzillaand/usr/share/bugzillawith a matching Perl installation The process of setting this up from scratch is explained here.
AWS Tags
The landscape is designed to be self-describing so that no additional database is required for managing it. We assign tags to various AWS resources to identify their intended or actual use, function, or type in a way that is more formal than only relying on naming conventions based on the Name default tag.
The AMIs are tagged using the image-type tag key. As explained in the previous section, there are currently the types sailing-analytics-server, hudson-slave, mongodb-server, and webserver.
EC2 instances hosting application processes are tagged using the sailing-analytics-server tag key. For dedicated instances running only a single application process for a single application replica set, the replica set's name is used as the tag's value. For shared instances, the special value ___multi___ is used.
MongoDB instances are tagged with the tag key mongo-replica-sets. The value encodes information about the MongoDB processes running on that instance. Put as a regular expression, the syntax is
[a-zA-Z-]*(:[0-9][0-9]*)(,[a-zA-Z-]*(:[0-9][0-9]*))*or less formally, a comma-separated list of replica set names, optionally extended with the port number in case it is not the default port 27017, where the port number is separated from the replica set name by a colon (:). Example: live:10203,archive:10201,slow:10202
An instance running a RabbitMQ process shall announce this by defining a tag with key RabbitMQEndpoint where the value is the port number on which RabbitMQ is exposed. The value must also be specified for the default port 5672.
If an instance hosts the region's reverse proxy server that in particular is used to dispatch requests to archived events, it shall expose a tag with key CentralReverseProxy and value true (although the value is currently ignored). When an application replica set is archived, the archiving procedure talks to the reverse proxy found via this tag in order to establish re-write rules for the content archived.
Automated Procedures
In order to reduce manual efforts for managing the system landscape and to make errors less likely, various automation procedures have been implemented that are intended to help operators in their daily job. The procedures are made available through two channels: an AdminConsole panel found in the "Advanced" category called "Landscape" (see https://security-service.sapsailing.com/gwt/AdminConsole.html#LandscapeManagementPlace:) and a set of REST APIs (see https://sapsailing.com/sailinglandscape/webservices/api/index.html).
The procedures manage application replica sets, MongoDB replica sets, and the Amazon Machine Images (AMIs) used to run them. They aim at reasonably high availability, at least for read access, while keeping cost low and utilization high. All application replica sets will be created with at least one master and one replica running almost at all times. Managed application replica sets will always have an auto-scaling group for their replicas that will scale the set of replicas elastically, based on the number of requests received per target. The procedures support managing replica processes not launched by the auto-scaling group which is helpful especially when the replica is meant to improve availability and not so much handle excessive load and hence can be launched on a shared instance.
During upgrades and scaling operations the procedures will try to keep approximately as many processes available in the application replica set as there were when the operation started. For example, during a version upgrade first the existing replicas will be detached from their master, the master will be upgraded, then a new set of replicas of the same size as the set of old replicas will be launched on the new version before the old replicas will be replaced by the new ones. This way, the count of processes available to handle user requests will be reduced by one in the worst case, e.g., for temporary master unavailability or while upgrading a single replica in place.
Credentials and SSH Key
All of these operations required a valid AWS IAM account that has the necessary privileges, with multi-factor authentication (MFA) enabled and an MFA token generator at hand. Furthermore, a user account for sapsailing.com is required that has the permission LANDSCAPE:MANAGE:AWS. When going for REST, create valid session credentials from your AWS access key ID and secret plus a current MFA token code using https://www.sapsailing.com/sailinglandscape/webservices/api/createsessioncredentials.html. The session credentials, valid for about twelve hours, will be stored in your user account and will be used for every subsequent request to the AWS API carried out on behalf of your sapsailing.com user account. Likewise, if you're using the AdminConsole's Landscape panel, there is an "AWS Credentials" box where you can do the same.
In addition to AWS credentials it is essential to create or upload an SSH key pair to use for connecting to and configuring the instances. Currently there is no REST API for this step yet (see also https://bugzilla.sapsailing.com/bugzilla/show_bug.cgi?id=5680), so this step needs to be carried out in the Landscape panel of the AdminConsole. Upload an existing key pair or generate one and download public and private key so you can also connect from your local command line if you want. The public key of the key pair generated or uploaded is automatically installed in the AWS region you have selected. If you continue working from the AdminConsole, keep it selected and enter the passphrase to unlock it into the password field below the table listing all your keys. When using the REST API, simply pass the key name as argument of the request with the private key's passphrase in another parameter. See the REST API documentation for details on these parameters.
In all of the following sub-sections the text will assume that you have provided valid AWS credentials, that you have selected a region in which you want to operate, and that you have an SSH key selected, with the passphrase to unlock the private key provided in the passphrase field below the SSH keys table.
In several of the scenarios, both, AdminConsole and REST API, you will have the option to provide security bearer tokens that are used to authenticate requests to processes running the SAP Sailing Analytics. If you omit those, the credentials of the session used to authenticate your sailing user will be used. (Note, that for local test set-ups disconnected from the standard security realm used by all of the sapsailing.com-deployed processes, these credentials may not be accepted by the processes you're trying to control. In this case, please provide explicit bearer tokens instead.) We distinguish between the credentials required to replicate the information shared across the landscape, usually from security-service.sapsailing.com, and those used by a replica in one of your application replica sets to authenticate for credentials to replicate the application replica set's master.
There is now a single point of truth for the various ssh and AWS keys, and possibly others in the future. This can be found at /root/key_vault on the central reverse proxy. There you will find directories for different environments' key setups, named consistently with the environment types under ${GIT_HOME}/configuration/environments_scripts (the directory names are the environment type). One can use the setup_keys function in imageupgrade_functions.sh to setup the keys. There is 1 parameter, the environment type.
The structure of the vault is important for the efficacy of the script and should appear as below. There is an explanation afterwards.
.
├── aws_credentials
│   ├── axel-central-reverse-proxy-credentials
│   └── disposable-reverse-proxy-automation
├── central_reverse_proxy
│   ├── httpdConf
│   │   ├── aws
│   │   │   └── credentials
│   │   │       └── disposable-reverse-proxy-automation -> ../../../../aws_credentials/disposable-reverse-proxy-automation
│   │   └── ssh
│   │       ├── authorized_keys
│   │       │   ├── id_ed25519.pub@root@central_reverse_proxy -> ../../../root/ssh/id_ed25519.pub
│   │       │   └── id_ed25519.pub@root@reverse_proxy -> ../../../../reverse_proxy/root/ssh/id_ed25519.pub
│   │       ├── id_ed25519
│   │       └── id_ed25519.pub
│   ├── root
│   │   ├── aws
│   │   │   ├── config
│   │   │   │   └── axel
│   │   │   └── credentials
│   │   │       ├── axel-central-reverse-proxy-credentials -> ../../../../aws_credentials/axel-central-reverse-proxy-credentials
│   │   │       └── disposable-reverse-proxy-automation -> ../../../../aws_credentials/disposable-reverse-proxy-automation
│   │   └── ssh
│   │       ├── authorized_keys
│   │       │   └── id_ed25519.pub@httpdConf@central_reverse_proxy -> ../../../httpdConf/ssh/id_ed25519.pub
│   │       ├── id_ed25519
│   │       └── id_ed25519.pub
│   └── wiki
│       └── ssh
│           └── authorized_keys
│               └── id_ed25519.pub@root@reverse_proxy -> ../../../../reverse_proxy/root/ssh/id_ed25519.pub
├── README
...-
So we have the aws_credentials directory, storing the credentials for specific AWS users.
-
We also have directories named after the environment types (matching the directory names in GIT_HOME/configuration/environments_scripts).
-
Nested within these, we have directories for each user that will require some keys, for the given environment type.
-
For each user, we have optional directories "ssh" & "aws" (the naming is important).
-
The aws folder can contain a config and credentials folder. The credentials folder contains sym links to aws_credentials, whilst the config folder contains config header and format.
-
If the setup_keys script is run, the contents of the credentials and config folders are concatenated into the credentials and config file respectively, which are found in .aws home dir of the user that the folders are nested within. The region is automatically added and so shouldn't be defined in the config. Note, that the general idea is to use the "default" header and define access control for that instance type through AWS credentials, reducing the number of different profiles, as well as complexity of scripts.
-
The ssh folder will contain the ssh keys of the user; they are named based on the type of the key.
-
Furthermore, the folder will contain an authorized_keys directory, which holds references to the keys (elsewhere in the vault), which should be authorized to access the user. In the above example, the symbolic link named
id_ed25519.pub@httpdConf@central_reverse_proxymeans that the key referenced will be in the authorized keys for root, so the id_ed25519 key of the httpdConf user on the central reverse proxy will be able to access the root user. -
The name of these links doesn't matter, but by convention we will use the format used in the image above (
key_type@user@env_type), using @ as a separator. -
The script will copy across the keys in the ssh folder (ignoring sym links or directories).
-
The script will append every public key that is linked in the authorized_keys folder, to the authorized_keys file of the respective user.
Creating a New Application Replica Set
In the Application Replica Sets table click the "Add" button and provide the replica set name. You may already now press the OK button and will receive a new application replica set with a master process running on a new dedicated host, and a single replica process running on a new instance launched by the application replica set's auto-scaling group.
The dialog allows you to change several aspects of the application replica set creation process:
- You can pick a different release. Should you, for any reason, not want the latest master build, use the "Release" field which provides suggestions based on the releases found at
releases.sapsailing.com. The release you pick will be used for all master and replica processes for this application replica set until upgraded. - You can choose to create a shared instead of a dedicated instance to deploy the master process to. In this case, a new "SL Multi-Server" instance tagged with the "multi" tag value for the "sailing-analytics-server" tag key will be created, and the new application replica set's master process will be deployed as the first process.
- You can choose to deploy the first replica on a shared instance instead of having the auto-scaling group provide a dedicated instance for it. If you do so, an eligible instance based on the port number (default 8888) that lives in an availability zone different from that of the instance hosting the master process will be selected or launched if necessary.
- You can choose the types of instances to launch for shared and for dedicated instances. If an eligible instance for a replica on a shared instance is found, the instance type will not be considered for the replica.
- If deploying to the default region
eu-west-1you are given the option to use the dynamic load balancer instead of a DNS-mapped one. This way, no DNS record needs to be created, and when archiving the application replica set at a later point in time, no DNS propagation lag needs to be considered. - You may choose a domain different from the default sapsailing.com as long as Route53 has a hosted zone for it.
- You may specify non-standard memory options for the processes launched. By default, all processes launched will obtain a Java VM heap size occupying 75% of the instance's total physical RAM reduced by 1.5GB to leave space for the VM itself, the operating system and the MongoDB process running on the instance (relevant for replicas only). The minimum size alloted to a VM's heap is 2GB currently. While this set-up gives good results for dedicated instances, it may not be ideal for an archive server or a shared instance. For an archive, for example, you may want to use one of the
i3.*instance types where ample fast swap space is available and may be used for large amounts of archived content. In this case you wouldn't want to restrict your Java VM heap size to only the physical RAM or less but rather you would want to exceed this by several factors. For an archive server running on ani3.2xlarge-type instance with 61GB of RAM and 2TB of swap you may want to provide 300GB of heap space to the VM instead of the 50 or so GB it would be getting assigned by default. For this, use the "Memory (MB)" field. Alternatively, for example in case you want to configure a non-standard memory layout for a shared instance, you may rather want to think in terms of how many of your application process VMs would fit into the instance's physical RAM at the same time. This is what the "Memory as factor to total memory" text field allows you to choose. Enter, e.g., "4" there, and the space allocated to the process will be chosen such that approximately four similarly-equipped processes will fit into the instance's physical memory at the same time. Note: an absolute memory specification takes precedence over the relative specification which is why the field for the relative specification is disabled as soon as you enter a valid value into the absolute field.
Moving Application Replica Set from Shared to Dedicated Infrastructure
When an application replica set has been launched such that it uses a replica on a shared instance, with an auto-scaling group minimum size of 0, this can be changed such that the replica on the shared instance is replaced by one running on a dedicated instance provided by the auto-scaling group. For this, the Application Replica Sets area in the Landscape panel of the AdminConsole has an action icon (tooltip text "Switch to auto-scaling replicas only") as well as an action button capable of handling multi-selections: "Switch to auto-scaling replicas only". When this action is triggered for one or more application replica sets, the auto-scaling group is asked to set its minimum size to 1 in case it was 0 at the time. As soon as an auto-scaling replica is ready, the replica process on the shared instance is stopped, and if it was the last on that instance, the instance is terminated as well.
Furthermore, in a separate action, a master process running on a shared instance can be moved to a dedicated instance by using the action icon with tooltip "Move master process to other instance". The pop-up dialog displayed allows you to choose between a shared and a dedicated instance, so here you want to go with the default and leave the "Use a shared instance for master process" checkbox unticked. The type for the new instance can be selected, as can the memory configuration (see above).
This action can be useful if an event moves from a "dormant" low-workload scenario to a "hot/live" setting, e.g., a few hours before live action is assumed to start. The processes on shared instances may not be able to handle high CPU workloads, and the dedicated instances can even be scaled up or down dynamically as needed which would not be possible on a shared instance.
Moving Application Replica Set from Dedicated to Shared Infrastructure
For the master process, use again the "Move master process to other instance" action and tick the "Use a shared instance for master process" checkbox. An eligible instance will be found or created, based on the instance type specification if needed. The existing replicas will be detached from the current master which will then be stopped. The new master spins up, and one by one all existing replicas will be re-started so they re-sync to the new master. Target group assignments are managed accordingly.
For the replicas, use the "Switch to replica on shared instance" action or button. It brings up a dialog where you can select the type of shared instance to launch if no eligible one can be found. When the shared instance has been identified or launched, a replica process will be started on it, replicating the master. When ready, the new replica will be added to the public target group while the auto-scaling group's minimum size is set to 0, leading to all auto-scaling replicas to get stopped and terminated over time.
This way, as an event starts to "cool down" and load decreases, the more expensive dedicated set-up can be reverted to a less expensive shared set-up while remaining available in at least two availability zones.
Scaling Replica Instances Up/Down
When an application replica set's replica processes are provided by the auto-scaling group, the corresponding launch template specifies the instance type used for the dedicated instances used to host the replica processes. If this instance type turns out to be inadequate for the situation, e.g., because the event hosted in the application replica set produces more CPU load than expected or produces more tracking data than assumed, the instance type can be changed for the launch template, with a rolling update being performed for all replica instances managed by the auto-scaling group.
Click on the "Scale auto-scaling replicas up/down" action icon or the corresponding button in the button bar and select the new instance type.
Scaling Master Up/Down
With the same "Move master to other instance" that can be used to change from shared to dedicated master instances and back you can also change a master's instance type, especially if you opt against a shared master instance. You can then select the new instance type and process memory configuration. All replicas will be detached from the current master, and the current master process will be removed from both target groups. Then the master process will be stopped, terminating the instance if it was the last application process, and a new master instance with the type selected will be launched, deploying the new master process to it. When ready, the master process is registered with both target groups, and all existing replicas are re-started in place one by one, re-synchronizing on the new master.
Upgrading Application Replica Set
When a different (not even necessarily newer) release is to be deployed to an application replica set, an important aspect during the upgrade process is that at no point processes with different releases should be available to clients if possible. Although the target groups are configured for session stickiness, in particular master and replicas should really be of the same version. To a lesser degree this would also apply for an application replica set's master process and the security-service.sapsailing.com replica set from which the master replicates the security service and a few other things; however, these core replicable usually don't change incompatibly, and if they do, an entire and consistent landscape upgrade will be required anyway.
Use the action icon entitled "Upgrade" or the corresponding multi-selection-enabled button and select the release to which to change. When you confirm the action, all replicas will be detached from the master process, the master will be removed from both target groups, and an in-place upgrade of the master process is performed. Then, the master is re-started. When the master process is ready again, a new set of temporary replica processes of the same size of the previous set of replicas is launched on dedicated instances, using the new release and replicating the master by its IP address because it is not yet registered with the master target group. Only when they are all ready, the old set of replicas is removed from the public target group, the temporary upgraded replicas are added to it, and the master is added to both target groups. Then, the previous auto-scaling replica processes are stopped, whereas replicas not managed by the auto-scaling group are upgraded in place. As the auto-scaling group reacts to the termination of the old replicas, it launches new ones until it has reached its desired capacity again. When those are available, the temporary upgrade replicas are de-registered from the public target group and are stopped and terminated. With this, the upgrade of the application replica set is complete.
Archiving Application Replica Set
When the event or season or whatever you chose to assign an application replica set to has come to the end of its live workload with races and other updates no longer taking place, the application replica set is up for archiving. This will help save cost due to better resource utilization. The auto-scaling group, its launch template, its DNS record (unless the "dynamic" load balancing scenario in the default region eu-west-1 was used), its target groups and its load balancer listener rules can all be removed which frees up capacity for new or other live events. Furthermore, the processes can be stopped, freeing up memory and disk space on the instances they ran on, or even allowing for the termination of entire instances. Lastly, storage space in the live MongoDB replica set is more expensive than in the slow replica set that can be used for backup and archiving of DB content.
To archive an application replica set, decide whether you want to move the MongoDB content away from the current (usually live) replica set to free up space there. To do so, select any MongoDB endpoint from the "MongoDB Endpoints" table that you'd like to move the application replica set's database content to. If you want to keep it in the live environment, de-select all MongoDB endpoints in the table.
Then use the action icon entitled "Archive". If your current user account with which you start the archiving process is not entitled to create content in the archive server (having the SERVER:CAN_IMPORT_MASTERDATA:ARCHIVE permission), you need to provide a bearer token authenticating a user that does. Usually, you will want to remove the archived application replica set if the archiving procedure succeeded. You have to confirm this by ticking the corresponding check-box in the pop-up dialog.
When confirmed, the archiving procedure will start by identifying the ARCHIVE server in the region you're using, based on the sailing-analytics-server tag value on the instances in the region. If multiple such instances are found, the one that hosts the application process with the latest start time is selected, assuming it is the production server. The archive process identified this way is then asked to run a "master data import" from the application replica set to archive, importing all leaderboard groups found there. Only leaderboard groups READable by your logged-in user will be considered. The progress of the import process is tracked, and when complete, after a waiting period you can adjust in the archiving pop-up dialog a content comparison for the leaderboard groups imported is attempted, comparing the content in the ARCHIVE server with those in the application replica set being archived. If differences are found, the procedure assumes that no all calculations that take place after the races have been loaded in the archive server have completed yet. For example, maneuver calculations and wind estimations may influence whether a race is said to have valid wind fixes; not having valid wind fixes for races in the archive while the same race in the original application replica set does have wind fixes would be reported as a difference during the comparison. Hence, the comparison will be repeated a configurable number of times after waiting again for the same configured duration as before the first comparison attempt. If after the configured number of comparison attempts there are still differences found, the archiving process is considered failed and no further steps will be carried out. In particular, no database archiving and no removal of the application replica set will take place. You will need to inspect manually in which state the archived content is and what the differences are in detail. (Future versions should do better here; see bug 5681.)
After successful import and comparison, if you selected a MongoDB endpoint from the table then the MongoDB database used by the application replica set being archived will be copied to the MongoDB endpoint selected. After copying, the original and the copy will be compared by hashing their contents and comparing the hashes. Only if the two hashes are equal, the original database will be removed, freeing up the space in what usually would be the live MongoDB replica set.
Finally, if you ticked the "Remove archive replica set after successful verification", the application replica set will be completely removed by stopping its master and replica processes, removing all its load balancer rules, removing its two target groups, removing the auto-scaling group and the corresponding launch template and, if a DNS-based load balancer was used, removing its DNS record.
Removing Application Replica Set
This action is really only useful for application replica sets that were created for development, testing or debugging purposes. While its MongoDB database is left untouched, all other resources pertinent to the application replica set will be removed, including its load balancing rules, target groups, auto-scaling group, launch template, application processes and potentially the instances they ran on in case the processes were the last on their instance, and the optional DNS record.
Note that due to the database remaining in place, re-surrecting an application replica set removed this way is usually easy. If you use the "Add" button or the "+" action icon in case you'd like a shared master instance set-up, the application replica set launched will use the same database if it is launched with exactly the same name (case-sensitive).
Upgrading AMIs
Currently the three AMI types sailing-analytics-server, mongodb-server and hudson-slave can be upgraded automatically. Upgrading an AMI for which this is supported is as simple as clicking the "Upgrade"-entitled action icon for an AMI shown in the "Amazon Machine Images (AMIs)" table at the bottom of the "Landscape" panel in the AdminConsole. As a result, a new AMI will be created based on the old one. An instance will be launched based on the old AMI, using the image-upgrade user data line which asks the instance to run various upgrading steps at the end of the start-up sequence. The steps can include pulling latest content from the Git repository, updating all operating system packages including the kernel itself, cleaning up old logs and caches, and marking the images a "first-time boot."
Then, a shutdown is triggered automatically, and when complete, a new AMI is created, the AMI is tagged with the same image-type tag that the original image has, and the minor version number is increased by one. All volume snapshots are labeled accordingly, using the new version number.
You can then start testing or using the new image. It is recommended to keep the old image around for a while until the new image has been proven to work properly.
Upgrading the Sailing Analytics Application AMI
When upgrading the sailing-analytics-server AMI there is a good chance that the AMI you start with is used by one or more launch templates that belong to auto-scaling groups and are used to launch new instances. Unfortunately, AWS doesn't keep you from removing old AMIs despite the fact that they are still referenced by one or more launch templates that are in active use by their respective auto-scaling groups. So at some point you would want to upgrade those auto-scaling groups to use updated launch templates which refer to the new AMI that results from the upgrade.
After the AMI upgrade succeeds, you will see a pop-up dialog prompting you with a choice of whether you would like to update launch templates for application replica sets that you selected in the table before upgrading the AMI, or in case you didn't pick any application replica sets suggesting all of them that currently use the AMI you just upgraded in their launch templates. If you choose "OK" then all those auto-scaling groups will be updated so they point to new launch templates copied from the previous ones, referencing the new AMI. The old launch templates will be deleted. The names for the new launch templates is constructed from the replica set name with the ID of the AMI appended to it. Note that running replicas are not affected by this.
You can also manually trigger the upgrade of the AMI used by an auto-scaling group by using the "Update machine image for auto-scaling replicas" button or the action icon entitled correspondingly. It will use the lastest sailing-analytics-server-tagged image available.
Removing an AMI and its Snapshots
In the "Amazon Machine Images (AMIs)" table each row offers an action icon for removing the image. Use this with great care. After confirming the pop-up dialog shown, the AMI as well as its volume snapshots will be removed unrecoverably.
Create mailing list for landscape managers
We now have a script to automatically create a mailing list of all the landscape managers, that is stored in /var/cache. It is updated via a cronjob. We have to be careful to write atomically, so the mailing list isn't missing any email addresses, if the notify-operators script is called midway through a write.
Crontab setup and script organisation
We previously relied on lots of symbolic links to the various architecture scripts, which were scattered throughout the configuration directory of our Git repo. This made it easy to propagate changes, but also led to moments of chaos, as we had to find every single dependency, for every change pushed to the git repo repo (stored by the trac user), in case it was the target of a symbolic link.
We now have a well defined structure (detailed below) for the different environment types, such as the central reverse proxy, the disposables, the build server, sailing server, etc.. and a method for updating instances in a controlled manner.
configuration
├── crontabs
│   ├── crontab-update-trac-trac-urls
│   └── crontab-syncgit
└── environments_scripts
    ├── build-crontab-and-cp-files
    ├── build_server
    │   ├── files
    │   │   ├── etc
    │   │   │   ├── sysconfig
    │   │   │   │   └── hudson
    │   │   │   └── systemd
    │   │   │       └── system
    │   │   .           ├── hudson.service
    │   │   .           └── mountnvmeswap.service -> ../../../../../repo/etc/systemd/system/mountnvmeswap.service
    │   └── users
    │       └── root
    │           └── crontab-update-authorized-keys -> ../../../../crontabs/crontab-update-authorized-keys
    └── repo
        ├── etc
└── varbuild-crontab-and-cp-files for the aforementioned "controlled building", which is explained further below. Then we have directories for each environment type as well as a general purpose repo for storing files common to multiple instances. Within each environment type directory, should be a setup script, for creating an instance, of the environment type, from scratch (used if there is no image yet or the image upgrade didn't clean up unwanted scripts or content). There is also an optional users and files folder.
The users folder is for organising crontabs: there is a folder for each user that should have a crontab and, within these username folders, are symbolic links
to the crontabs folder, which contains files named crontab-"function", each one containing a one-line crontab.
The files folder is for organising files that should reside on the environment type. Within the directory, is a mimicked UNIX filesystem. Files in, say /etc/awstats of reverse_proxy's files dir, should be found on the reverse proxy instances at /etc/awstats.
Any scripts common to multiple environment scripts, may be found in the "repo", which is at the same level as the environment types directory, and contains only a mimicked file system (no users folder). These common scripts are added to an environment type, by creating symbolic links from the intended destination on the environment type to the script in the repo. In the example above, the mountnvmeswap.service link indicates the intended location and the contents of the file is the target of the symbolic link.
The build-crontab-and-cp-files uses this structure to help setup an environment
type. It builds the crontab file, by combining all the referenced crontab
one-liners, storing a copy in the user's home directory and installing it to the specified user. It also copies across the contents of "files" to the corresponding location, de-refencing any symbolic links.
The script should ideally be triggered using a function in imageupgrade_functions.sh, titled build_crontab_and_setup_files, that takes an environment type (see other arguments below), and temporarily copies (via scp) the environments_scripts folder. It then calls the build-crontab-and-cp-files script.
This script has a couple of arguments and options. The most important are the arguments.
- Environment type.
Some crontabs require references to specific users' files, so we have the string PATH_OF_HOME_DIR_TO_REPLACE, in the crontabs, as placeholders for the paths the string itself describes, which the
build-crontab-and-cp-filesscript replaces with the right path. Have a look at the script itself for more details on the options and arguments.
Reverse proxy automation
Spinning around (spinning up and spinning down Disposable Reverse Proxies)
Within the admin console -> Advanced -> landscape, one can launch a new disposable, with the option to customise the region, name and availability zone. The default AZ is the availability zone with the fewest reverse proxies (at the last time of refresh). Users can also rotate the httpd logs here. The automated launch process uses the AMI with the tag key
image-type and corresponding value disposable-reverse-proxy. The security group of the disposables is selected by tags too: the key is reverse-proxy-sg. This sg allows http (on port 80) on the private network as well as ssh (on port 22) from anywhere.
After an instance is in the RUNNING state, the automation procedure adds the instance to all target groups with the allReverseProxy tag, including the NLB. Any time the instance starts up or shuts down, the instance will automatically be removed from the instance
based target groups and a service unit will attempt to remove it from the NLB target group.
Upon starting up, the disposables also get the latest httpd configuration from the httpdConf user on the central reverse proxy. And virtual hosts are created for the private IP and localhost, so the internal server status and main healthcheck can function (see below).
Healthcheck
On the topic of healthchecks, we have the important reverseProxyHealthcheck.sh, which can be found on the central and disposables. It is used to reduce costly cross-AZ traffic between our instances, whilst also ensuring reliability and availability.
The general idea of this ALB target group healthcheck, is to make instances healthy only if in the same AZ as the archive (the correct AZ). However, availability takes priority over cost saving, so if there is no healthy instance in the "correct" AZ, the healthcheck returns healthy.
All the target groups, tagged with allReverseProxies, have this healthcheck:
/cgi-bin/reverseProxyHealthcheck.sh?arn=TARGET_GROUP_ARNThe script can be found under configuration/environments_scripts/repo/var/www/cgi-bin to where the environments for reverse_proxy (the disposables) and central_reverse_proxy link symbolically.
The healthcheck works by first checking whether another instance of the healthcheck is already running. The PID of a running process is stored under /var/run/reverseProxyHealthcheck which is a folder created by a directive in /etc/tmpfiles.d/reverseProxyHealthcheck.conf upon boot. A healthcheck records its exit status and output in files under /var/run/reverseProxyHealthcheck which are removed after 10s by a background job again. If a health check is started while another is already running, the new one waits for the exit status of the already running one to be written to /var/run/reverseProxyHealthcheck, then picks up that exit status and output to use it as exit status and output of the health check started concurrently. This way, we avoid congestion and clogging of reverse proxies by health checks which at times may be long-running, especially if the AWS CLI takes unusually long to discover the target groups and target health checks. Without the mechanics that shortcut these concurrent executions, we've see hundreds of concurrently executing health checks, even leading to out-of-memory situations at times.
Then it checks the internal-server-status. If genuinely unhealthy, then unhealthy is returned to the ELB (elastic load balancer) health checker. Otherwise, the instance uses cached CIDR masks (which correspond to AZ definitions) and nmap to check if in the same AZ as the archive.
If in the same AZ, then "healthy" is returned to the ELB health checker. If not, then the target group ARN, passed as a parameter
to the healthcheck, is used to get the private IPs of the other instances in the target group, via a describe-target-health call to the AWS API. This is the most costly part of the check, so these values are cached.
We then use the same nmap/CIDR method, to check which of the discovered instances is in the same AZ as the archive. Finally, we use the internal-server-status, of those instances in the same AZ as the archive, to check if they are healthy. If there are no healthy instances in the "correct" AZ, then we return healthy, otherwise unhealthy.
Httpd configuration Git automation
Because we have changing httpd configurations and different setups for the central and disposables, we decided to use version control and some post-receive hooks to ensure synchronisation and ease of use. We also decided not to store the httpd configuration in the main Git because the post-receive hook automation would allow those with Git access, to influence the production landscape. We have a larger set of contributors than landscape managers and want to maintain this distinction.
The setup involves a repo on the central reverse proxy, in the httpdConf user. The httpdConf user also has a checked out copy for branch manipulation, by the post-receive hook. The repo has 3 branches: a shared configuration branch, a central configuration branch and a disposable configuration branch. The shared configuration stores content that both the central and disposables have. Changes to different branches cause different parts of the post-receive hook to be triggered:
-
Any pushes to the central or disposable branch trigger the sync-repo-and-execute-cmd script on instances tagged with CentralReverseProxy and DisposableProxy respectively, to get the changes made on the other instances.
-
Any pushes to the "shared" configuration branch are merged into both of the other branches (using the checked out workspace), and everything is pushed. This push then propagates to the centrals and disposables via method 1 above.
If you wish to make persistent changes to the httpd configuration, you must ALWAYS pull the latest changes before committing your changes as follows. If you commit and push changes in the disposable branch, then only the disposables will pull the changes; if you commit and push changes to the central branch, then only the central proxy will pull the changes. If you want to make alterations to the "shared" configuration of the disposables and central, you have two options:
-
Fetch the latest changes for all the branches. Test the changes locally, without committing. Run httpd -t (to check the config syntax). Reload and confirm that all is well. Checkout the main branch. Commit the changes and push. Make sure to check out the correct branch afterwards and that they have the latest changes.
-
Fetch the latest changes to the branches in the httpdConf user's checked out copy. Make the edits in the httpdConf user's checked out workspace, in the correct branch. Commit and push. HttpdConf is currently a user on the central proxy.
After pushing you should automatically end up in the correct branch too.
Automating archive failover
We have a production archive and a failover that the disposables and the central route traffic to. Both the central and disposables, have a cronjob that checks whether the main archive is healthy and automatically switches to the failover if unhealthy (and back again if the main returns to a healthy state).
We have a script in our git repo called switchoverArchive.sh, which takes a path to the macros file and two timeout values (in seconds). It checks the macros file and checks if the following lines are present:
Define ARCHIVE_IP 172.31.7.12
Define ARCHIVE_FAILOVER_IP 172.31.43.140
Define PRODUCTION_ARCHIVE ${ARCHIVE_IP} /gwt/status (with the first timeout value) and, if healthy, sets the production value to the definition of the archive; however, if unhealthy, a
second curl occurs (with the second timeout value) and if this again returns unhealthy then the production value above is this time set to be the value of the failover definition.
After these changes, key admins are notified and the apache config is reloaded. This only happens though if the new value differs from the currently known value:
ie. if already healthy, and the health checks pass, then no reload or email occurs.
To install, enter crontab -e; set the frequency to say * * * * *; add the path to the script; parameterise it with the path to the macros file, the first timeout value and the second timeout value (both seconds); and then
write and quit, to install the cronjob.
# Example crontab
* * * * * /home/wiki/gitwiki/configuration/switchoverArchive.sh "/etc/httpd/conf.d/000-macros.conf" 2 9
If you want to quickly run this script, consider installing it in /usr/local/bin, via ln -s TARGET_PATH LINK_NAME.
You can use the build_crontab_and_setup_files (see below) to get these changes.
Automated SSH Key Management
AWS by default adds the public key of the key pair used when launching an EC2 instance to the default user's .ssh/authorized_keys file. For a typical Amazon Linux machine, the default user is the ec2-user user. For Ubuntu, it's the ubuntu user, for Debian it's admin. The problem with this approach is that other users with landscape management permissions could not get at this instance with an SSH connection. In the past we worked around this problem by deploying those landscape-managing users' public SSH keys into the root user's .ssh/authorized_keys file already in the Amazon Machine Image (AMI) off which the instances were launched. The problem with this, however, is obviously that we have been slow to adjust for changes in the set of users permitted to manage the landscape.
We decided early 2021 to change this so that things would be based on our own user and security sub-system (see here). We introduced LANDSCAPE as a secured object type, with a special permission MANAGE and a special object identifier AWS such that the permission LANDSCAPE:MANAGE:AWS would permit users to manage all aspects of the AWS landscape, given they can present a valid AWS access key/secret. To keep the EC2 instances' SSH public key infrastructure in line, we made the instances poll the SSH public keys of those users with permissions, once per minute, updating the default user's .ssh/authorized_keys file accordingly.
The REST end point /landscape/api/landscape/get_time_point_of_last_change_in_ssh_keys_of_aws_landscape_managers has been implemented which is based on state managed in the com.sap.sse.landscape.aws bundle's Activator. This activator registers SSH key pair listeners on any AwsLandscape object created by any of the AwsLandscape.obtain methods and uses those to update the time stamp returned by get_time_point_of_last_change_in_ssh_keys_of_aws_landscape_managers each time SSH keys are added or removed. Furthermore, the activator listens for changes regarding the LANDSCAPE:MANAGE:AWS permission using the new PermissionChangeListener observer pattern offered by SecurityService. The activator tracks the SecurityService, and the listener registration would be renewed even if the SecurityService was replaced in the OSGi registry. The actual mapping of changes to SecurityService to listener notifications is implemented by the new class PermissionChangeListeners.
With this, the three REST API end points /landscape/api/landscape/get_time_point_of_last_change_in_ssh_keys_of_aws_landscape_managers, /security/api/restsecurity/users_with_permission?permission=LANDSCAPE:MANAGE:AWS, and /landscape/api/landscape/get_ssh_keys_owned_by_user?username[]=... allow clients to efficiently find out whether the set of users with AWS landscape management permission and/or their set of SSH key pairs may have changed, and if so, poll the actual changes which requires a bit more computational effort.
Two new scripts and a crontab snippet are provided under the configuration/ folder:
environments_scripts/repo/usr/local/bin/update_authorized_keys_for_landscape_managers_if_changedenvironments_scripts/repo/usr/local/bin/update_authorized_keys_for_landscape_managerscrontabs/crontab-update-authorized-keys@HOME_DIR
These files are intended to be used in specific environments_scripts/ sub-folders to be deployed to a server for a given environment. The crontab snippet should be symbolically linked to, providing the home directory where to update the .ssh/authorized_keys in the symbolic link's name, such as crontab-update-authorized-keys@HOME_DIR=_root (where the '_' will get replaced by a '/' while compiling the crontab file from the snippets).
The first makes a call to /landscape/api/landscape/get_time_point_of_last_change_in_ssh_keys_of_aws_landscape_managers (currently coded to https://security-service.sapsailing.com in the crontab file). If no previous time stamp for the last change exists under /var/run/last_change_aws_landscape_managers_ssh_keys or the time stamp received in the response is newer, the update_authorized_keys_for_landscape_managers script is invoked using the bearer token provided in /root/ssh-key-reader.token as argument, granting the script READ access to the user list and their SSH key pairs. That script first asks for /security/api/restsecurity/users_with_permission?permission=LANDSCAPE:MANAGE:AWS and then uses /landscape/api/landscape/get_ssh_keys_owned_by_user?username[]=... to obtain the actual SSH public key information for the landscape managers. The original /root/.ssh/authorized_keys file is copied to /root/.ssh/authorized_keys.org once and then used to insert the single public SSH key inserted by AWS, then appending all public keys received for the landscape-managing users.
The crontab-update-authorized-keys@HOME_DIR snippet has a randomized sleeping period within a one minute duration after which it calls the update_authorized_keys_for_landscape_managers_if_changed script which transitively invokes update_authorized_keys_for_landscape_managers in case of changes possible.
Legacy Documentation for Manual Operations
Most of the things that follow should be obsolete by now because the automated procedures should avoid the need for manual steps. Yet, should automatic procedures fail or should a deeper understanding of the things that have been automated become necessary, the following documentation may still be of value.
Starting an instance
To start with, your user account needs to have sufficient permissions to create a new server group {NEWSERVERNAME}-server up-front so that you have at least the permissions granted by the user role for all objects owned by that group. Change the group's group ownership so that the new group is its own group owner. Additionally, in order to have the new server participate in the shared security service and shared sailing data service on security-service.sapsailing.com your user needs SERVER:REPLICATE:security-service. Your user should also have the SERVER:*:{NEWSERVERNAME} permission (e.g., implied by the more general SERVER:* permission), e.g., granted by the server_admin role. The latter permission is helpful in order to be able to configure the resulting server and to set up replication for it. If your user account currently does not have those permissions, find an administrator who has at least SERVER:* which is implied in particular by having role server_admin:*. Such an administrator will be able to grant you the SERVER-related permissions described here.
Now start by creating the new server group, named {NEWSERVERNAME}-server. So for example, if your server will use SERVER_NAME=abc then create a user group called abc-server. You will yourself be a member of that new group automatically. Add role user to the group, enabling it only for the members of the group ("Enabled for all users" set to "No"). This way, all members of the group will gain permissions for objects owned by that server as if they owned them themselves. This also goes for the new SERVER object, but owners only obtain permissions for default actions, not the dedicated SERVER actions.
Now choose the instance type to start. For example:
- Archive server: i3.2xlarge
- Live event: c4.2xlarge
You may need to select "All generations" instead of "Current generation" to see these instance configurations. Of course, you may choose variations of those as you feel is appropriate for your use case.
Using a release, set the following in the instance's user data, replacing myspecificevent by a unique name of the event or series you'll be running on that instance, such as kielerwoche2014 or similar. Note that when you select to install an environment using the USE_ENVIRONMENT variable, any other variable that you specify in the user data, such as the MONGODB_URI or REPLICATION_CHANNEL properties in the example above, these additional user data properties will override whatever comes from the environment specified by the USE_ENVIRONMENT parameter.
A typical set-up for a master node could look like this:
INSTALL_FROM_RELEASE=(name-of-release)
USE_ENVIRONMENT=live-master-server
SERVER_NAME=myspecificevent
# Provide authentication credentials for a user on security-service.sapsailing.com permitted to replicate, either by username/password...
#REPLICATE_MASTER_USERNAME=(user for replicator login on security-service.sapsailing.com server having SERVER:REPLICATE:<server-name> permission)
#REPLICATE_MASTER_PASSWORD=(password of the user for replication login on security-service.sapsailing.com)
# Or by bearer token, obtained, e.g., through
#   curl -d "username=myuser&password=mysecretpassword" "https://security-service.sapsailing.com/security/api/restsecurity/access_token" | jq .access_token
# or by logging in to the security-service.sapsailing.com server using your web browser and then navigating to
#     https://security-service.sapsailing.com/security/api/restsecurity/access_token
REPLICATE_MASTER_BEARER_TOKEN=(a bearer token allowing this master to replicate from security-service.sapsailing.com)
EVENT_ID={some-uuid-of-an-event-you-want-to-feature}
SERVER_STARTUP_NOTIFY=you@email.com
This will use the default "live" MongoDB replica set with a database named after the SERVER_NAME variable, and with an outbound RabbitMQ exchange also named after the SERVER_NAME variable, using the default RabbitMQ instance in the landscape for replication purposes, and based on the live-master-server environment will start replicating the SecurityService as well as the SharedSailingData service from the central security-service.sapsailing.com instance. Furthermore, a reverse proxy setting for your EVENT_ID will be created, using ${SERVER_NAME}.sapsailing.com as the hostname for the mapping.
More variables are available, and some variables—if not set in the environment specified by USE_ENVIRONMENT nor in the user data provided when launching the instance—have default values which may be constants or may be computed based on values of other variables, most notably the SERVER_NAME variable. Here is the list:
-
SERVER_NAMEused to define the server's name. This is relevant in particular for the user group created/used for all new server-specific objects such as theSERVERobject itself. The group's name is constructed by appending "-server" to the server name. This variable furthermore provides the default value for a few other settings, including the default hostname mapping${SERVER_NAME}.sapsailing.comfor any series or event specified, the database name in the defaultMONGODB_URI, as well as the default name for the outbound RabbitMQ replication exchangeREPLICATION_CHANNEL. -
INSTALL_FROM_RELEASEThe user data variable to use to specify the release to install and run on the host. Typical values arelive-master-serverandlive-replica-server, used to start a master or a replica server, respectively, orarchive-serverfor launching an "ARCHIVE" server. -
MONGODB_URIused to specify the MongoDB connection URI; if neither this variable norMONGODB_HOSTare specified, a default MongoDB URI will be constructed asmongodb://mongo0.internal.sapsailing.com,mongo1.internal.sapsailing.com/${SERVER_NAME}?replicaSet=live&retryWrites=true&readPreference=nearestfor a server that does not set theAUTO_REPLICATEvariable, and tomongodb://mongo0.internal.sapsailing.com,mongo1.internal.sapsailing.com/${SERVER_NAME}-replica?replicaSet=live&retryWrites=true&readPreference=nearestfor a server that does set theAUTO_REPLICATEvariable to a non-empty value such astrue. -
REPLICATION_CHANNELused to define the name of the RabbitMQ exchange to which this master node will send its operations bound for its replica nodes. The replica-side counterpart for this isREPLICATE_MASTER_EXCHANGE_NAME. Defaults to${SERVER_NAME}if no automatic replication is requested using theAUTO_REPLICATEvariable, otherwise to${SERVER_NAME}-${INSTANCE_NAME}which provides a separate "transitive" replication channel for each replica. -
REPLICATION_HOSThostname or IP address of the RabbitMQ node that this master process will use for outbound replication. Defaults torabbit.internal.sapsailing.com. -
REPLICATION_PORTthe port used by this master process to connect to RabbitMQ for outbound replication. Using 0 (the default) will use the default port as encoded in the RabbitMQ driver. -
SERVER_PORTThe port on which the built-in web server of an application server process can be reached using HTTP. Defaults to 8888. -
TELNET_PORTThe port on which the OSGi console of a server process can be reached. Defaults to 14888. -
EXPEDITION_PORTThe port on which the application server will listen for incoming UDP packets, usually then forwarded to the Expedition receiver for wind and other Expedition-based sensor data. Defaults to 2010. -
SERVER_STARTUP_NOTIFYdefines one or more comma-separated e-mail addresses to which a notification will be sent after the server has started successfully. -
USE_ENVIRONMENTdefines the environment file (stored athttp://releases.sapsailing.com/environments) which provides default combinations of variables. The most frequently used environments are probablylive-master-serverwhich configures the replication of theSecurityServiceandSharedSailingDatafromsecurity-service.sapsailing.com, leading to a centralized user management and allows for sharing sailing-related data across server clusters such as course templates. Thelive-replica-serverenvironment will pre-configure replication from a master for all replicable services required for the SAP Sailing Analytics, by setting theAUTO_REPLICATEvariable totrue. Thearchive-serverenvironment contains pre-configured memory and database settings for the archive server set-up and, like a regular master server, replicates the central security service. -
REPLICATE_MASTER_SERVLET_HOSTthe host name or IP address where a replica can reach the master node in order to request the initial load, register, un-register, and send operations for reverse replication to. The value is always combined with that of theREPLICATE_MASTER_SERVLET_PORTvariable which provides the port for this communication. Defaults to${SERVER_NAME}.sapsailing.com, assuming that this maps to a load balancer that identifies requests bound for the master instance of an application server replica set and routes them to the master accordingly. Note in this context how withEVENT_HOSTNAMEandSERIES_HOSTNAMEthe reverse proxy mappings may be adjusted to use alternative or additional hostname mappings. -
REPLICATE_MASTER_SERVLET_PORTthe port number where a replica can reach the master node in order to request the initial load, register, un-register, and send operations for reverse replication to. The value is always combined with that of theREPLICATE_MASTER_SERVLET_HOSTvariable which provides the host name / IP address for this communication. Defaults to 443. -
REPLICATE_MASTER_EXCHANGE_NAMEthe name of the RabbitMQ exchange to which the master sends operations for fan-out distribution to all replicas, and that therefore a replica has to attach a queue to in order to receive those operations. Specified on a replica. The master-side counterpart isREPLICATION_CHANNEL. Defaults to${SERVER_NAME}which has been the default for the corresponding master based on its${SERVER_NAME}which is assumed to be equal to the${SERVER_NAME}setting used to launch this replica. -
REPLICATE_MASTER_QUEUE_HOSTthe RabbitMQ host name that this replica will connect to in order to connect a queue to the fan-out exchange whose name is provided by theREPLICATE_MASTER_EXCHANGE_NAMEvariable. Used in conjunction with theREPLICATE_MASTER_QUEUE_PORTvariable. Defaults torabbit.internal.sapsailing.com. -
REPLICATE_MASTER_QUEUE_PORTthe RabbitMQ port that this replica will connect to in order to connect a queue to the fan-out exchange whose name is provided by theREPLICATE_MASTER_EXCHANGE_NAMEvariable. Defaults to 0 which instructs the driver to use the Rabbit default port (usually 5672) for connecting. Used in conjunction with theREPLICATE_MASTER_QUEUE_HOSTvariable. -
REPLICATE_ON_STARTspecifies the IDs (basically the fully-qualified class names) of those Replicables to start replicating when the server process starts. The process using this will become a replica for those replicables specified with this variable, and it will replicate the master node described byREPLICATE_MASTER_SERVLET_HOSTandREPLICATE_MASTER_SERVLET_PORTand receive the operation feed through the RabbitMQ exchange configured byREPLICATE_MASTER_EXCHANGE_NAME. -
AUTO_REPLICATEIf this variable has a non-empty value (e.g., "true"),REPLICATE_ON_STARTwill default to the set of replicable IDs required by an SAP Sailing Analytics replica instance. Any value provided forREPLICATE_ON_STARTin the environment selected byUSE_ENVIRONMENTor in the user data provided at instance start-up will take precedence, though. -
REPLICATE_MASTER_BEARER_TOKENused to specify which bearer token to use to authenticate at the master in case this is to become a replica of some sort, e.g., replicating the SecurityService and the SharedSailingData service. Use alternatively toREPLICATE_MASTER_USERNAME/REPLICATE_MASTER_PASSWORD. -
REPLICATE_MASTER_USERNAME, REPLICATE_MASTER_PASSWORDused to specify the user name and password for authenticating at the master in case this is to become a replica of some sort, e.g., replicating the SecurityService and the SharedSailingData service. Use alternatively toREPLICATE_MASTER_BEARER_TOKEN. -
MEMORYSpecifies the value to which both, minimum and maximum heap size for the Java VM used to run the application will be set. As of this writing it defaults to "6000m" (6GB). During instance boot-up, a default value is calculated based on the instance's physical memory available, not considering swap space, and appended to the env.sh file. Therefore, auto-installed application processes will never use this "6000m" default. SpecifyingMEMORYin the user data will override the default size computed by the boot script. -
MAIL_FROMThe address to use in the "From:" header field when the application sends e-mail. -
MAIL_SMTP_HOSTThe SMTP host to use for sending e-mail. The standard image has a pre-defined file under/root/mail.propertieswhich contains credentials and configuration for our standard Amazon Simple Email Service (AWS SES) configuration. It is copied to theconfiguration/folder of a default server process installed during start-up by thesailinginit script. -
MAIL_SMTP_PORTThe SMTP port to use for sending e-mail. The standard image has a pre-defined file under/root/mail.propertieswhich contains credentials and configuration for our standard Amazon Simple Email Service (AWS SES) configuration. It is copied to theconfiguration/folder of a default server process installed during start-up by thesailinginit script. -
MAIL_SMTP_AUTHtrueorfalse; defaults tofalseand tells whether or not to authenticate a user to the SMTP server using theMAIL_SMTP_USERandMAIL_SMTP_PASSWORDvariables. The standard image has a pre-defined file under/root/mail.propertieswhich contains credentials and configuration for our standard Amazon Simple Email Service (AWS SES) configuration and hence defaults this variable totrue. It is copied to theconfiguration/folder of a default server process installed during start-up by thesailinginit script. -
MAIL_SMTP_USERUsername for SMTP authentication; used ifMAIL_SMTP_AUTHistrue. The standard image has a pre-defined file under/root/mail.propertieswhich contains credentials and configuration for our standard Amazon Simple Email Service (AWS SES) configuration. It is copied to theconfiguration/folder of a default server process installed during start-up by thesailinginit script. -
MAIL_SMTP_PASSWORDPassword for SMTP authentication; used ifMAIL_SMTP_AUTHistrue. The standard image has a pre-defined file under/root/mail.propertieswhich contains credentials and configuration for our standard Amazon Simple Email Service (AWS SES) configuration. It is copied to theconfiguration/folder of a default server process installed during start-up by thesailinginit script. -
EVENT_IDUsed to specify one or more UUIDs of events for which to create a reverse proxy mapping in/etc/httpd/conf.d/${SERVER_NAME}.conf. If only a single event ID is specified, as inEVENT_ID=34ebf96f-594b-4948-b9ea-e6074107b3e0then the${EVENT_HOSTNAME}is used as the hostname, or ifEVENT_HOSTNAMEis not specified, defaulting to${SERVER_NAME}.sapsailing.com, and a mapping using theEvent-SSLmacro is performed. The variable can also be used in Bash Array notation to specify more than one event ID, as inEVENT_ID[0]=34ebf96f-594b-4948-b9ea-e6074107b3e0and thenEVENT_HOSTNAME[0]=...would specify the corresponding hostname (again defaulting to${SERVER_NAME}.sapsailing.com), followed byEVENT_ID[1]=...and then optionallyEVENT_HOSTNAME[1]=..., and so on. If neitherEVENT_IDnorSERIES_IDis specified, a default reverse proxy mapping for the server process will be created using theHome-SSLmacro which redirects requests for the base URL (${SERVER_NAME}.sapsailing.com) to the/gwt/Home.htmlentry point. -
EVENT_HOSTNAMEIf specified, overrides the${SERVER_NAME}.sapsailing.comdefault for reverse proxy mappings requested by providing event IDs in theEVENT_IDvariable. If array notation is used forEVENT_IDthen so should it forEVENT_HOSTNAME. -
SERIES_IDUsed to specify one or more UUIDs of event series (league seasons) for which to create a reverse proxy mapping in/etc/httpd/conf.d/${SERVER_NAME}.conf. If only a single event ID is specified, as inSERIES_ID=34ebf96f-594b-4948-b9ea-e6074107b3e0then the${SERIES_HOSTNAME}is used as the hostname, or ifSERIES_HOSTNAMEis not specified, defaulting to${SERVER_NAME}.sapsailing.com, and a mapping using theSeries-SSLmacro is performed. The variable can also be used in Bash Array notation to specify more than one event ID, as inSERIES_ID[0]=34ebf96f-594b-4948-b9ea-e6074107b3e0and thenSERIES_HOSTNAME[0]=...would specify the corresponding hostname (again defaulting to${SERVER_NAME}.sapsailing.com), followed bySERIES_ID[1]=...and then optionallySERIES_HOSTNAME[1]=..., and so on. If neitherEVENT_IDnorSERIES_IDis specified, a default reverse proxy mapping for the server process will be created using theHome-SSLmacro which redirects requests for the base URL (${SERVER_NAME}.sapsailing.com) to the/gwt/Home.htmlentry point. -
SERIES_HOSTNAMEIf specified, overrides the${SERVER_NAME}.sapsailing.comdefault for reverse proxy mappings requested by providing event IDs in theSERIES_IDvariable. If array notation is used forSERIES_IDthen so should it forSERIES_HOSTNAME. -
BUILD_COMPLETE_NOTIFYThe comma-separated list of e-mail addresses to send a notification message to after a release has been installed or built from sources (this happens within therefreshInstance.shscript). -
SERVER_STARTUP_NOTIFYThe comma-separated list of e-mail addresses to send a notification message to after a server process has been launched. -
image-upgradeIf provided in a line of its own, thehttpdserver on the instance will be stopped, no application server release will be installed, the operating system packages will be updated, the git repository under/home/sailing/codewill be pulled for the branch that the workspace is checked out on for the image launched (usuallymaster) which will update various scripts relevant for the bootstrapping process, all log directories forhttpdand the application server will be cleared, and by default the instance will then be shut down for a new AMI to be created for it. See also theno-shutdownuser data option. -
no-shutdownIf provided in conjunction with theimage-upgradeoption, also on a line of its own, after performing theimage-upgradeactions the instance will be kept running. This way, you may still log on using SSH and make further adjustments if needed before you create the new image.
Have at least a public-facing target group ready. If you want to expose the master to the public (single-instance scenario or master-replica scenario where the master also handles reading client requests) add the master to the public target group. Either ensure that your add rules to the "default" dynamic Application Load Balancer (ALB) to which the wildcard DNS rule points (*.sapsailing.com), or add the rules to a dedicated ALB and create a Route53 DNS CNAME entry pointing to that ALB's DNS name.
If you want to launch one or more replicas, ensure you have a dedicated ...-master target group to which you add your master instance, and a load balancer rule that forwards your replica's requests directed to the master to that ...-master target group, for example, by using a dedicated ...-master hostname rule in your load balancer which then forwards to the ...-master target group.
After your master server is ready, route the replica requests to the master through the load balancer again. This is also the default if you set up a replica. If you don't want to use the credentials of your own user account (which is expected to have permission SERVER:REPLICATE:{SERVERNAME} already because as described above you need this for configuring the new server), e.g., because you then have to expose an access token in the environment that anyone with SSH access to the instance may be able to see, set up a new user account, such as {SERVERNAME}-replicator, that has the following permission: SERVER:REPLICATE:{SERVERNAME} where {SERVERNAME} is what you provided above for the SERVER_NAME environment variable. You will be able to grant this permission to the new user because your own user account is expected to have this permission. You will need your own or this new user's credentials to authenticate your replicas for replication.
Make sure to use the preconfigured environment from http://releases.sapsailing.com/environments/live-replica-server. If you don't add the line REPLICATE_MASTER_SERVLET_HOST to the user-data and adjust the myspecificevent master exchange name in the replica's REPLICATE_MASTER_EXCHANGE_NAME variable to the value of the REPLICATION_CHANNEL setting you used for the master configuration, all default to the ${SERVER_NAME}.sapsailing.com and ${SERVER_NAME}, respectively. Also ensure that you provide the REPLICATE_MASTER_BEARER_TOKEN value (or, alternatively REPLICATE_MASTER_USERNAME and REPLICATE_MASTER_PASSWORD) to grant the replica the permissions it needs to successfully register with the master as a replica.
INSTALL_FROM_RELEASE=(name-of-release)
USE_ENVIRONMENT=live-replica-server
# Provide authentication credentials for a user on the master permitted to replicate, either by username/password...
#REPLICATE_MASTER_USERNAME=(user for replicator login on master server having SERVER:REPLICATE:<server-name> permission)
#REPLICATE_MASTER_PASSWORD=(password of the user for replication login on master)
# Or by bearer token, obtained, e.g., through
#   curl -d "username=myuser&password=mysecretpassword" "https://master-server.sapsailing.com/security/api/restsecurity/access_token" | jq .access_token
# or by logging in to the master server using your web browser and then navigating to
#     https://master-server.sapsailing.com/security/api/restsecurity/access_token
REPLICATE_MASTER_BEARER_TOKEN=(a bearer token allowing this master to replicate from your master)
SERVER_NAME=myspecificevent
EVENT_ID={some-uuid-of-an-event-you-want-to-feature}
SERVER_STARTUP_NOTIFY=you@email.com
This will automatically start replication from your master which is assumed to be reachable at ${SERVER_NAME}.sapsailing.com. Adjust REPLICATE_MASTER_SERVLET_HOST and REPLICATE_MASTER_SERVLET_PORT accordingly if this is not the case. The RabbitMQ exchange to subscribe to is also defaulted with the ${SERVER_NAME}, just like is the case for the outbound side on the master, defining this exchange. Each replica gets its own outbound RabbitMQ exchange by default, using the ${SERVER_NAME} to which the replica's Amazon instance ID is appended, in case transitive replication should become a need. The database connection string (MONGODB_URI) defaults to master's DB with the database name extended by the suffix -replica.
Upgrading an application server replica set with Auto-Scaling Group and Launch Configuration in Place
- prepare local
/etc/hosts(on Windowsc:/windows/system32/drivers/etc/hosts) entries for master and replica with an.sapsailing.comsuffix in order to allow for logging in to the respective server's admin console - if your master will need to reload a lot of tracking data from MongoDB, spin up MongoDB replicas as needed and wait for them to leave the
STARTUP2phase, becomingSECONDARYreplicas in their replica set - remove master from public target group
- ssh to master, invoke
refreshInstance.shto prepare for master upgrade - remove master from master target group
- log on to replica's
/gwt/AdminConsole.htmlpage, go to "Advanced" / "Replication" and stop replication; to this manually for all replicas in this application server replica set - restart the master's application process (
./stop; sleep 5; ./start) - while your master spins up, follow its
/gwt/statuspage - while your master spins up, prepare a new Launch Configuration for the replicas that uses the new release; for this, find out which release your new master is running (e.g.,
build-202012211912), copy your existing Launch Configuration to one with a new name that reflects the new release, and edit the new Launch Configuration's "User Data" section, adjusting theINSTALL_FROM_RELEASEvariable to the new release name. You find the "User Data" in the section "Additional configuration - optional" after expanding the "Advanced details" drop-down. Acknowledge your key at the bottom and save the new launch template. - as your new master's
/gwt/statusresponse tells you that the new master process is available again, add it to the master target group and the public target group again; in times of low load where you may afford going to zero replicas in your public target group, remove all replicas from the public target group; otherwise, before this step you would first need to spin up one or more replicas for your new release to replace all old replicas in the public target group in one transaction. - update the Auto-Scaling Group so it uses your new Launch Configuration
- you may want to wait until your master's
/gwt/statusshows it has finished loading all races before starting new replicas on it; this way you can avoid huge numbers of replication operations that would be necessary to replicate the loading process fix by fix from the master to all replicas; it is a lot more efficient to transfer the result of loading all races in one sweep during the initial load process when a replica attaches after loading has completed - terminate all existing replicas running the old release; the Auto-Scaling Group will launch as many replicas as you configured after a minute or two and will automatically assign them to the public target group
- don't forget to terminate the MongoDB replicas again that you spun up before specifically for this process
Receiving wind from Expedition
- To receive and forward wind with an Expedition connector, log into webserver as user trac and switch to $HOME/servers/udpmirror. Start the mirror and forward it to the instance you want. In order to receive wind through the Igtimi connector, this step is not required as the wind data is received directly from the Igtimi server.
Setting up a Multi Instance
To set up a multi instance for a server with name "SSV", subdomain "ssv.sapsailing.com" and description "Schwartauer Segler-Verein, www.ssv-net.de, Alexander Probst, webmaster@alexprobst.de" perform the following steps:
Instance configuration
-
Connect to the EC2 instance where your multi instance should be deployed. For example: Connect to the instance "SL Multi-Instance Sailing Server" with dns name "ec2-34-250-136-229.eu-west-1.compute.amazonaws.com" in region Ireland via SSH.
ssh sailing@ec2-34-250-136-229.eu-west-1.compute.amazonaws.com
-
Navigate to the directory /home/sailing/servers.
cd /home/sailing/servers
-
Create a new directory with name "ssv".
mkdir ssv
-
Copy the file /home/sailing/code/java/target/refreshInstance.sh to your new directory.
cp /home/sailing/code/java/target/refreshInstance.sh ssv
-
Initialize a new environment variable "DEPLOY_TO" with the name of the directory.
export DEPLOY_TO=ssv
-
Execute the refreshInstance.sh script with your desired release build version from releases.sapsailing.com.
./refreshInstance.sh install-release build-201712270844
-
Once the script finished, uncomment the following lines in your env.sh file.
# Uncomment for use with SAP JVM only:

ADDITIONAL_JAVA_ARGS="$ADDITIONAL_JAVA_ARGS-XX:+GCHistory -XX:GCHistoryFilename=logs/sapjvm_gc@PID.prf"
Afterwards comment out the line where it says "JAVA_HOME=/opt/jdk1.8.0_20"
# JAVA_HOME=/opt/jdk1.8.0_20
Optional: setup event management URL by setting <pre>com.sap.sailing.eventmanagement.url</pre> system property. See ADDITIONAL_JAVA_ARGS at <pre>env.sh</pre>.
- White label switch, uncomment this line in env.sh
#ADDITIONAL_JAVA_ARGS="$ADDITIONAL_JAVA_ARGS -Dcom.sap.sse.branding=SAP"
to enable white labeling.
- Anniversary switch, uncomment this line in env.sh
#ADDITIONAL_JAVA_ARGS="$ADDITIONAL_JAVA_ARGS -DAnniversaryRaceDeterminator.enabled=true"
to enable anniversary calculation.
- Find the next unused ports for the variables SERVER_PORT, TELNET_PORT and EXPEDITION_PORT. You can do this by extracting all existing variable assignments from all env.sh files within the /home/sailing/servers directory.
for i in /home/sailing/servers/*/env.sh; do cat $i | grep "^ *SERVER_PORT=" | tail -1 | tr -d "SERVER_PORT="; done | sort -n
Do this for TELNET_PORT and EXPEDITION_PORT likewise.
If this is the first multi instance on the server, use the values SERVER_PORT=8888, TELNET_PORT=14888, EXPEDITION_PORT=2010.
- Append the following variable assignments to your env.sh file.
   SERVER_NAME=SSV
   TELNET_PORT=14888
   SERVER_PORT=8888
   MONGODB_NAME=SSV
   EXPEDITION_PORT=2010
   MONGODB_HOST=dbserver.internal.sapsailing.com
   MONGODB_PORT=10202
   DEPLOY_TO=ssv
- Append the following description to the /home/sailing/servers/README file.
  # ssv (Schwartauer Segler-Verein, www.ssv-net.de, Alexander Probst, webmaster@alexprobst.de)
  SERVER_NAME=SSV
  TELNET_PORT=14900
  SERVER_PORT=8888
  MONGODB_NAME=SSV
  EXPEDITION_PORT=2000
- Start the multi instance.
cd /home/sailing/servers/ssv
./start
-
Change the admin password now and create a new user with admin role.
- Your multi instance is now configured and started. It can be reached over ec2-34-250-136-229.eu-west-1.compute.amazonaws.com:8888.
Reachability
To reach your multi instance via "ssv.sapsailing.com", perform the following steps within the AWS Web Console inside region Ireland.
-
Create a new target group with the following details, where the name "S-shared-ssv" is created as follows: "S" for "Sailing", "shared" because it's a shared instance, and "ssv" represents the server instance name:
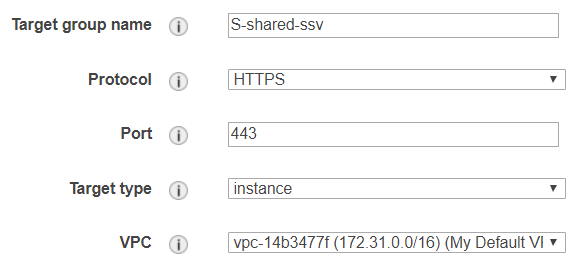
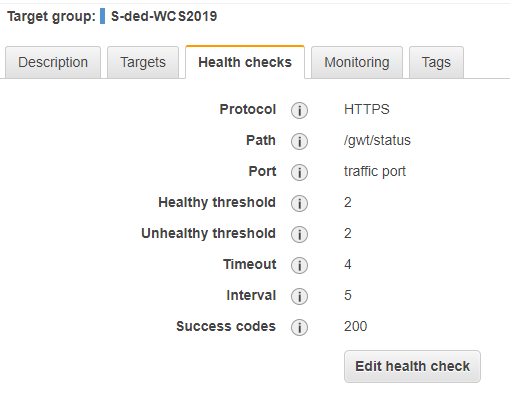
Notice the overwritten health check port that is now pointing directly to the instance with its
SERVER_PORT8888.
BE CAREFUL please use for a live-server and live-master-server the traffic port for Health Checks.
- Add the "SL Multi-Instance Sailing Server" instance to the target group.
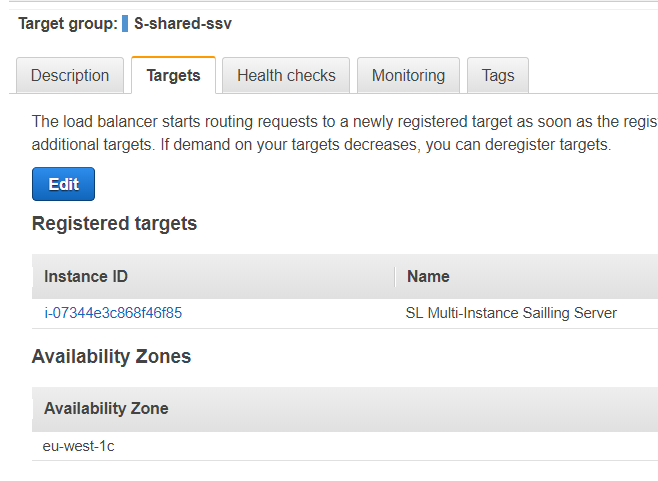
- Create a rule within the application load balancer that is forwarding ssv.sapsailing.com to your created target group. Choose "Load Balancers" from the sidebar an select the load balancer with the name "Sailing-eu-west-1". Click on the tab "Listeners" and then on "View/edit rules" inside the row of the HTTPS Listener.
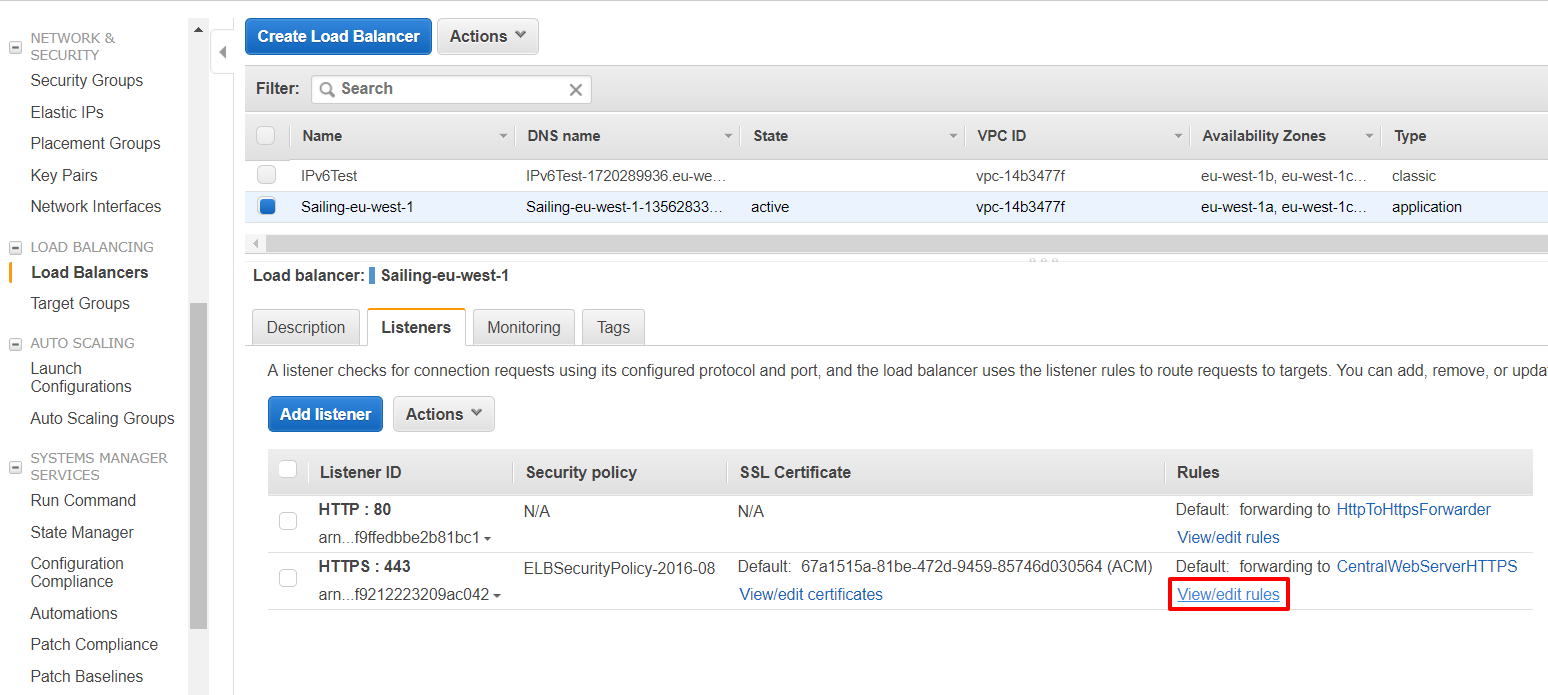
Click on the plus sign and insert the new rule at the very top. Enter "ssv.sapsailing.com" into the host-header field and select the target group "S-shared-ssv" under "forward". Then click on "Save".
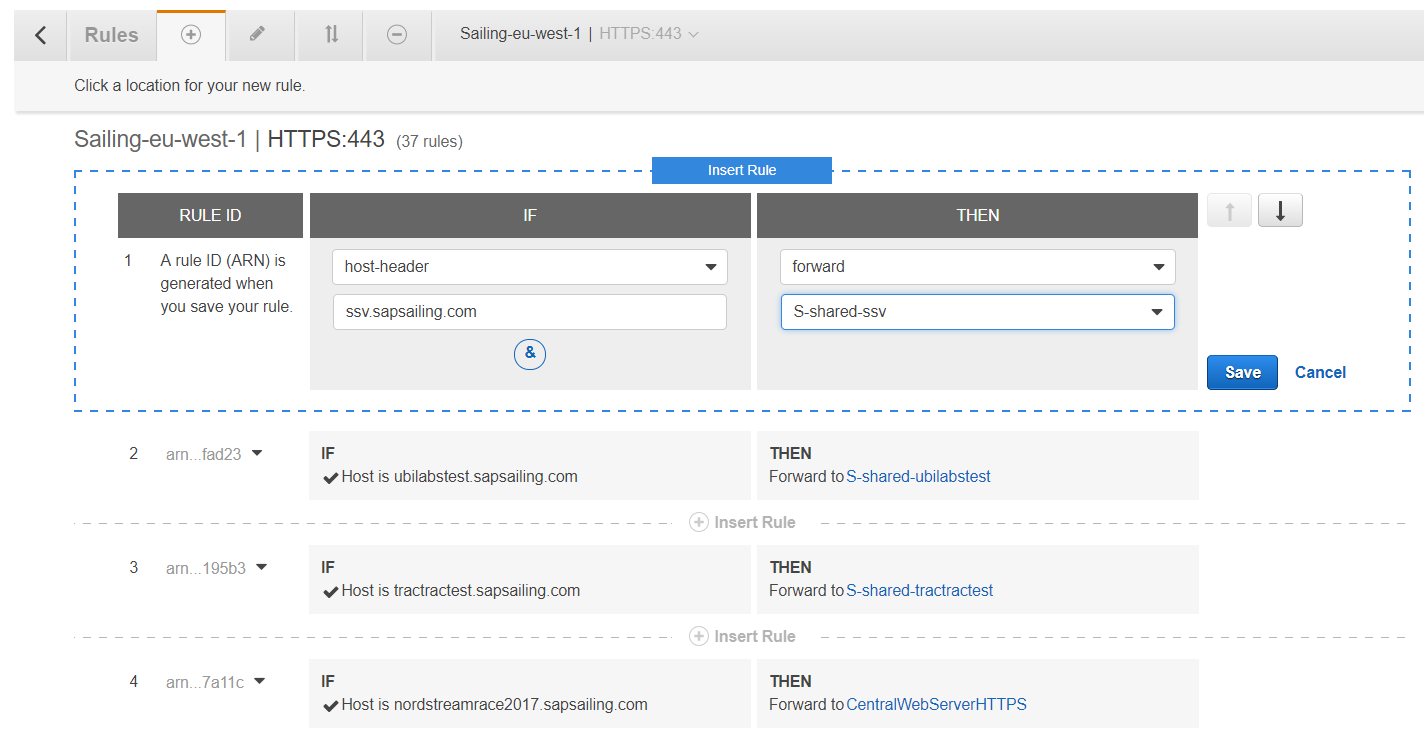
Your application load balancer is now configured to redirect all requests with host-header "ssv.sapsailing.com" to the target group "S-shared-ssv". That means all requests will now be routed to the "SL Multi-Instance Sailing Server" instance inside this target group using HTTPS and port 443 as specified in the configuration of the target group. To establish a connection on port 8888 (the SERVER_PORT property from above), where our multi instance is listening, we have to modify the apache configuration on the "SL Multi-Instance Sailing Server" instance.
-
Connect to the "SL Multi-Instance Sailing Server" instance via SSH as user
root. Navigate to the directory /etc/httpd/conf.d. Open up the file "001-events.conf" and append the following line.Use Plain-SSL ssv.sapsailing.com 127.0.0.1 8888
where 8888 is again the
SERVER_PORTfrom before. -
Save the file and run a configuration file syntax check.
apachectl configtest
If it reports "Syntax OK", continue with reloading the httpd configuration.
-
Reload the httpd configuration.
service httpd reload
You should now be able to reach your multi instance with the dns name "ssv.sapsailing.com".
S3 Storage, media.sapsailing.com and CloudFront
In order to serve content from media.sapsailing.com publicly through HTTPS connections with an Amazon-provided SSL certificate, we created a CloudFront distribution E2YEQ22MXCKC5R. See also https://console.aws.amazon.com/cloudfront/home?region=us-east-1#distribution-settings:E2YEQ22MXCKC5R. CloudFront distributions can use AWS-provided certificates only from region us-east-1, so we created a certificate for *.sapsailing.com with additional name sapsailing.com there (https://console.aws.amazon.com/acm/home?region=us-east-1#/?id=arn:aws:acm:us-east-1:017363970217:certificate%2Fb05e7e2b-a5ad-45e7-91c7-e9cc13e5ed4a). A CloudFront distribution has a DNS name; this one has dieqc457smgus.cloudfront.net. We made media.sapsailing.com an "Alias" DNS record in Route53 to point to this CloudFront distribution's DNS name, as an A-record with "Simple" routing policy. Logging for the CloudFront distribution has been enabled and set to the S3 bucket sapsailing-access-logs.s3.amazonaws.com, prefix media-sapsailing-com. As CloudFront distribution origin domain name we set media.sapsailing.com.s3.amazonaws.com with Origin Type set to S3 Origin. We activated HTTP to HTTPS redirection.
Costs per month
To give you a feeling about the costs you can refer to the following table. To get all details go to http://www.awsnow.info/
| Server Type | Cost per Month | Cost per Month (Reserved instance for 12 months) |
| m2.2xlarge (Archive) | $800 | $400 |
| c1.xlarge (Build and Live) | $500 | $350 |
General Information and Security
Since XXX 2013 this project is using EC2 as the server provider. Amazon Elastic Compute Cloud (EC2) is a central part of Amazon.com's cloud computing platform, Amazon Web Services (AWS). EC2 allows users to rent virtual computers on which to run their own computer applications. EC2 allows scalable deployment of applications by providing a Web service through which a user can boot an Amazon Machine Image to create a virtual machine, which Amazon calls an "instance", containing any software desired. A user can create, launch, and terminate server instances as needed, paying by the hour for active servers, hence the term "elastic".
This project is associated with an SAP Sailing Analytics account that, for billing purposes, is a subsidiary of a main SAP billing account. The Analytics account number is "0173-6397-0217 (simon.marcel.pamies@sap.com)" and connected to "SAP CMC Production (hagen.stanek@sap.com)". It has "Dr. Axel Uhl (axel.uhl@sap.com)" configured as operations officer that can be contacted by Amazon in case of problems with the instances.
The main entry point for the account is https://console.aws.amazon.com/. There you can only log in using the root account. You will then have access to not only the EC2 Console but also to the main account details (including billing details).
Associated to the root account are n users that can be configured using the IAM (User Management, https://console.aws.amazon.com/iam/home). Each of these users can belong to different groups that have different rights associated. Currently two groups exist:
-
Administrators: Users belonging to this group have access to all EC2 services (including IAM). They do not have the right to manage main account information (like billing).
-
Seniors: Everyone belonging to this group can not access IAM but everything else.
Users configured in the IAM and at least belonging to the group Seniors can log in using the following url https://017363970217.signin.aws.amazon.com/console. All users that belong to one of these groups absolutely need to have MFA activated. MFA (Multi-Factor-Authentication) can be compared to the RSA token that needs to be input every time one wants to access the SAP network. After activation users need to synchronize their device using a barcode that is displayed in IAM. The device can be a software (Google Authenticator for iOS and Android) or a physical device.
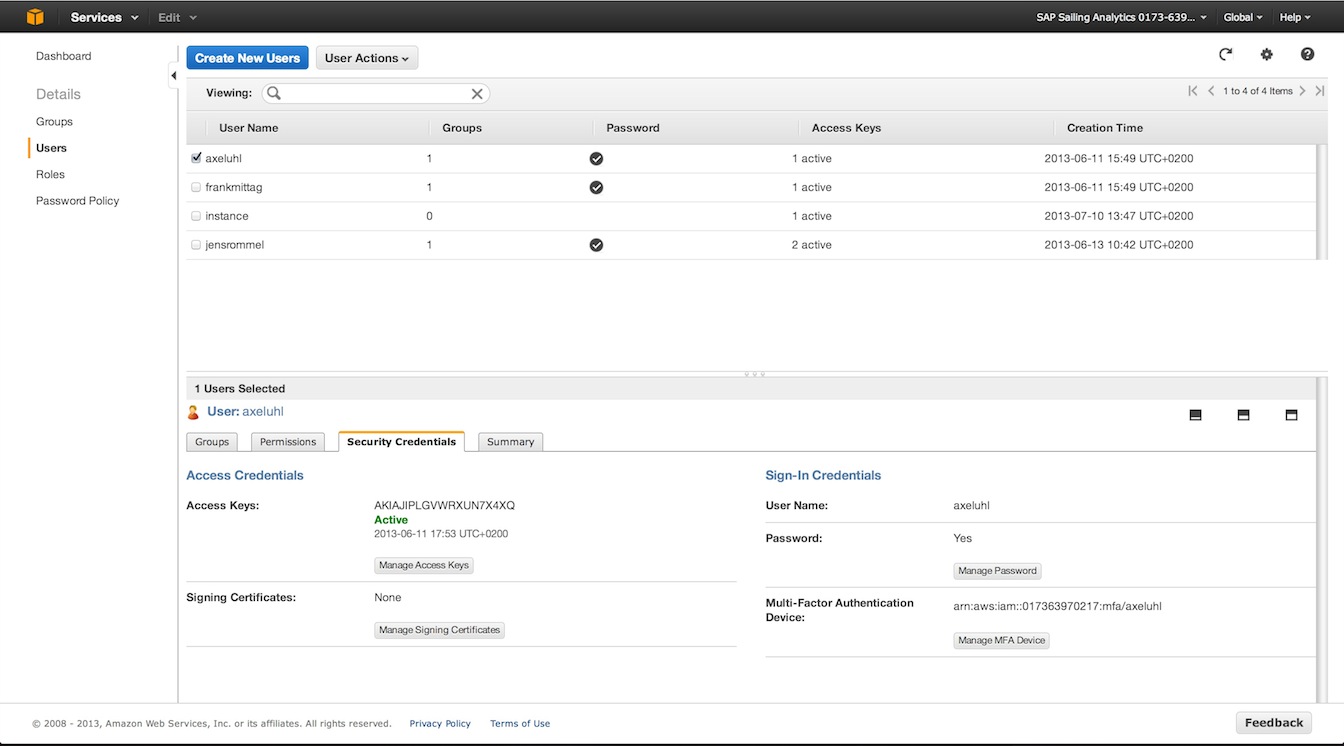
In addition to having a password and MFA set for one user one can activate "Access Keys". These keys are a combination of hashed username ("ID") and a password ("Key"). These are needed in case of API related access (e.g. S3 uploader scripts). One user should not have more than 1 access key active because of security concerns and never distribute them over insecure channels.
EC2 Server Architecture for Sailing Analytics
The architecture is divided into logical tiers. These are represented by firewall configurations (Security Groups) that can be associated to Instances. Each tier can contain one or more instances. The following image depicts the parts of the architecture.
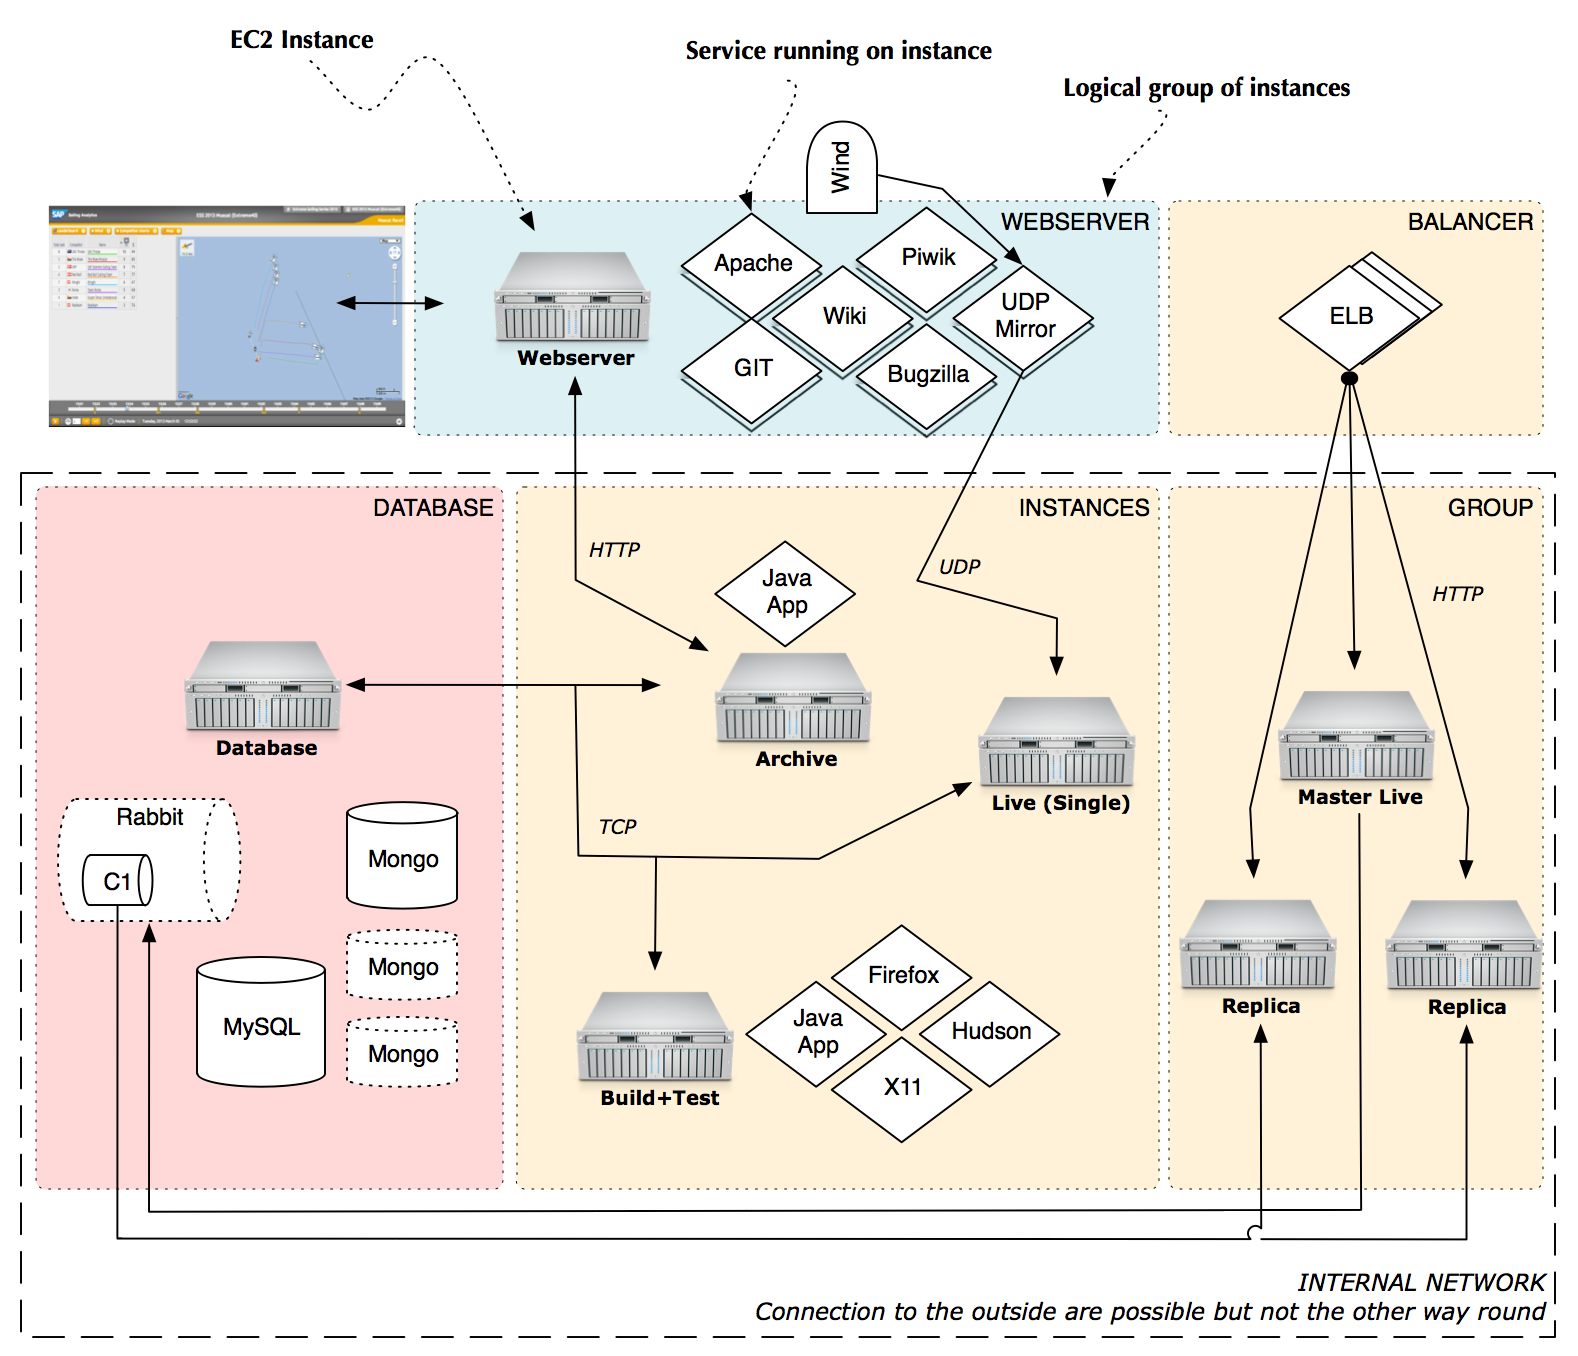
Tiers
- Webserver: Holds one or more webserver instances that represent the public facing part of the architecture. Only instances running in this tier should have an Elastic IP assigned. In the image you can see one configured instance that delivers content for sapsailing.com. It has some services running on it like an Apache, the GIT repository and the UDP mirror. The Apache is configured to proxy HTTP(S) connections to an Archive or Live server.
- Balancer: Features an Elastic Load Balancer. Such balancers can be configured to distribute traffic among many other running instances. Internally an ELB consists of multiple balancing instances on which load is distributed by a DNS round robin so that bandwidth is not a limiting factor.
- Database: Instances handling all operations related to persistence. Must be reachable by the "Instance" and "Balancer+Group" tier. In the standard setup this tier only contains one database server that handles connections to MongoDB, MySQL and RabbitMQ.
- Instances: Space where all instances, that are not logically grouped, live. In the image one can see three running instances. One serving archived data, one serving a live event and one for build and test purposes.
- Balancer+Group: Analytics instances grouped and managed by an Elastic Load Balancer. A group is just a term describing multiple instances replicating from one master instance. The word "group" does in this context not refer to the so called "Placement Groups".
Instances
| Name | Access Key(s) | Security Group | Services | Description |
| Webserver (Elastic IP: 54.229.94.254) | Administrator | Webserver | Apache, GIT, Piwik, Bugzilla, Wiki | This tier holds one instance that has one public Elastic IP associated. This instance manages all domains and subdomains associated with this project. It also contains the public GIT repository. |
| DB & Messaging | Administrator | Database and Messaging | MongoDB, MySQL, RabbitMQ | All databases needed by either the Analytics applications or tools like Piwik and Bugzilla are managed by this instance. |
| Archive | Administrator, Sailing User | Sailing Analytics App | Java App | Instance handling the access to all historical races. |
| Build and Test | Administrator, Sailing User | Sailing Analytics App | X11,Firefox,Hudson | Instance that can be used to run tests |
HowTo
Create a new Analytics application instance ready for production
Create a new Analytics instance as described in detail here wiki/info/landscape/amazon-ec2-create-new-app-instance. You should use a configuration like the following. You have two possibilities of making sure that the server uses code from a specific branch.
- First you can use a release file. These files can be usually found at http://releases.sapsailing.com/ and represent a certain point in time. These files can be built by using the buildAndUpdateProduct.sh with the parameter release. In addition to the release file you can specify an environment configuration. These usually can be found here http://releases.sapsailing.com/environments. A configuration then could look like this:
INSTALL_FROM_RELEASE=master-201311062138
USE_ENVIRONMENT=live-server
BUILD_COMPLETE_NOTIFY=simon.marcel.pamies@sap.com
SERVER_STARTUP_NOTIFY=simon.marcel.pamies@sap.com
- The second option is to let the instance build itself from a specified branch. It is currently not supported to then specify an environment file. Attention: You can not start the building process on t1.micro instances having less than 1.5 GB of RAM! The configuration then looks like this:
BUILD_BEFORE_START=True
BUILD_FROM=master
RUN_TESTS=False
COMPILE_GWT=True
BUILD_COMPLETE_NOTIFY=simon.marcel.pamies@sap.com
SERVER_STARTUP_NOTIFY=
SERVER_NAME=LIVE1
MEMORY=2048m
REPLICATION_HOST=rabbit.internal.sapsailing.com
REPLICATION_CHANNEL=sapsailinganalytics-live
TELNET_PORT=14888
SERVER_PORT=8888
MONGODB_HOST=dbserver.internal.sapsailing.com
MONGODB_PORT=10202
EXPEDITION_PORT=2010
REPLICATE_ON_START=
REPLICATE_MASTER_SERVLET_HOST=
REPLICATE_MASTER_SERVLET_PORT=
REPLICATE_MASTER_QUEUE_HOST=
REPLICATE_MASTER_QUEUE_PORT=
INSTALL_FROM_RELEASE=
USE_ENVIRONMENT=
After your instance has been started (and build and tests are through) it will be publicly reachable if you chose a port between 8880 and 8950. If you filled the BUILD_COMPLETE_NOTIFY field then you will get an email once the server has been built. You can also add your email address to the field SERVER_STARTUP_NOTIFY to get an email whenever the server has been started.
You can now access this instance by either using the Administrator key (for root User) or the Sailing User key (for user sailing):
ssh -i .ssh/Administrator.pem root@ec2-54-246-247-194.eu-west-1.compute.amazonaws.com
or
ssh -i .ssh/SailingUser.pem sailing@ec2-54-246-247-194.eu-west-1.compute.amazonaws.com
If you want to connect your instance to a subdomain then log onto the main webserver with the Administrator key as root, open the file /etc/httpd/conf.d/001-events.conf and put something like this there. As you can see you have to specify the IP address and the port the java server is running on. Make sure to always use the internal IP.
Use Event idm.sapsailing.com "<uuid-of-event-object>" 172.31.22.12 8888
Testing code on a server
Starting a test is as easy as starting up a new instance. Just make sure that you fill the field RUN_TESTS and set it to True. Also set the field BUILD_FROM to a gitspec that matches the code branch that you want to test. After tests has been run and the server has been started you will get an email giving you all the details. You can then access your instance or simply shut it down.
Build, deploy, start and stop an instance
Log on to the instance using ssh as user sailing. Change to the ~/code directory and fetch the latest git branch, e.g., using git fetch origin; git merge origin/master. Make sure you have a MongoDB instance running on the default port 27017 (see here). You can then trigger a build. It may be a good idea to do this in a tmux session because this will allow you to log off or get disconnected while the build is running. To start a tmux session, simply enter the command tmux at the console and you will get a new tmux session. Check the man page of tmux for more details and note that the usual Ctrl-B shortcut has been redefined in our instances to Ctrl-A to mimic the behavior of the old screen tool we used before we switched to tmux. Suffice it to say that you can detach from the tmux session by pressing Ctrl-A d which will keep the session running. To reconnect, enter tmux attach which works as long as you only have one tmux session running. In other cases, refer to the tmux man page again.
To launch the build, enter configuration/buildAndUpdateProduct.sh build as usual. Used without options, the build script will tell the options available. After the build has completed, use configuration/buildAndUpdateProduct.sh -s server install to install the product to ~/servers/server.
To launch the instance, change to the ~/servers/server directory and enter ./start. The instance will by default launch on port 8888. See ~/servers/server/env.sh for the instance's settings. To stop the instance again, from that same directory enter ./stop.
To access your instance externally, make sure to use the external Amazon DNS name, such as ec2-54-72-6-31.eu-west-1.compute.amazonaws.com. This is required for our Google Maps API key to recognize the domain. The map won't work when you simply use the IP number as the URL. A good URL to start with would therefore look something like http://ec2-54-72-6-31.eu-west-1.compute.amazonaws.com:8888/gwt/AdminConsole.html.
Setup replicated instances with ELB
The main concept behind ELB is that there is one instance that you configure in the "Load Balancers" tab that serves as the main entry point for all requests going to your application. This instance can be told to pass through requests from one port to another. In order to make this ELB instance aware of the Analytics EC2 Instances it should balance over you need to add all instances that should be part of the setup to the ELB instance.
A closer look reveals that an ELB instance consists itself of many other invisible instances. These are behind a DNS round robin configuration that redirects each incoming request to one of these instances. These invisible instances then decide upon the rules you've created how and where to distribute this request to one of the associated instances.
In a live event scenario, the SAP Sailing Analytics are largely bandwidth bound. Adding more users that watch races live doesn't add much CPU load, but it adds traffic linearly. Therefore, as the number of concurrent users grows, a single instance can quickly max out its bandwidth which for usual instances peaks at around 100Mbit/s. It is then essential that an ELB can offload the traffic to multiple instances which are replicas of a common master in our case.
To still get the usual logging and URL re-writing features, replicas need to run their local Apache server with a bit of configuration. Luckily, most of the grunt work is done for you automatically. You simply need to tell the replicas in their instance details to start replicating automatically, provide an EVENT_ID and set the SERVER_NAME variable properly. The Apache configuration on the replica will then automatically be adjusted such that the lower-case version of $SERVER_NAME.sapsailing.com will re-direct users to the event page for the event with ID $EVENT_ID.
Amazon puts up limits regarding to the maximum number of rules that an Application Load Balancer (ALB) may have. We use one such ALB as the DNS CNAME target for *.sapsailing.com (Sailing-eu-west-1-135628335.eu-west-1.elb.amazonaws.com). Adding rules to this ALB is especially convenient because no DNS / Route53 manipulation is necessary at all. New sub-domains can be mapped to target groups this way quite flexibly and quickly.
However, as the number of sub-domains we use grows, we also approach the limit of 100 rules for this load balancer. In order to keep this flexibility in particular for event set-ups, we started introducing more ALBs in August 2018 that use dedicated Route 53 DNS CNAME records for sepcific sub-domains. This way, with the current AWS limits for load balancers (see https://docs.aws.amazon.com/elasticloadbalancing/latest/application/load-balancer-limits.html) we will have up to 20 ALBs per region with 100 rules each, giving us 2000 rules per region which should suffice for the foreseeable future.
The set-up process needs to distinguish now between only adding a rule to an ALB listener targeted by the *.sapsailing.com DNS entry, and adding a rule to an ALB listener targeted only by DNS rules for specific sub-domains. In the latter case, a DNS record set needs to be created, providing the CNAME of the ALB that maps the sub-domain to the target group.
Here are the steps to create a load balanced setup, assuming there is already an "Application" load balancer defined in the region(s) where you need them:
- Add a master+replica target group for the master and its replicas that external users will be directed to, using HTTP port 80 as the protocol settings. Note: as this target group will also be used for the HTTPS listener, "SSL offloading" will take place here. The re-directing from HTTP to HTTPS that shall occur when the user hits the server with an HTTP request will happen in the central instance's Apache server if and only if the
X-Forwarded-Protoishttp(https://stackoverflow.com/questions/26620670/apache-httpx-forwarded-proto-in-htaccess-is-causing-redirect-loop-in-dev-envir explains how a. See also http://docs.aws.amazon.com/elasticloadbalancing/latest/classic/x-forwarded-headers.html#x-forwarded-proto.) - Add a rule to the HTTPS listener for the hostname ${SERVER_NAME}.sapsailing.com that forwards traffic to the master+replica target group just created.
- Create a master instance holding all data (see http://wiki.sapsailing.com/wiki/amazon-ec2#Setting-up-Master-and-Replica)
- Create
ninstances that are configured to connect to the master server, automatically launching replication by using one of the*...-replica-...*environment from http://releases.sapsailing.com/environments. - Add master and replicas as targets into the master+replica target group.
- Create a second master-only target group that only contains the master server.
- Add a rule to the HTTPS listener for the hostname ${SERVER_NAME}-master.sapsailing.com that forwards traffic to the master-only target group just created.
- Add the master to the master-only target group.
- For both target groups configure the health checks, choosing HTTP as the protocol, using the default "traffic port" and setting the path to /index.html. Lower the interval to 10s and the "Healthy threshold" to 2 to ensure that servers are quickly recognized after adding them to the ELB. With the default settings (30 seconds interval, healthy threshold 10) this would last up to 5 minutes.
- When using the Race Committee App (RCApp), make sure the app is configured to send its data to the ${SERVER_NAME}-master.sapsailing.com URL (otherwise, write requests may end up at replicas which then have to reverse-replicate these to the master which adds significant overhead).
The steps to register such a sub-domain mapping also in Route53 in case you've chosen an ALB that is not the target of *.sapsailing.com work as follows:
Start by creating a new record set:
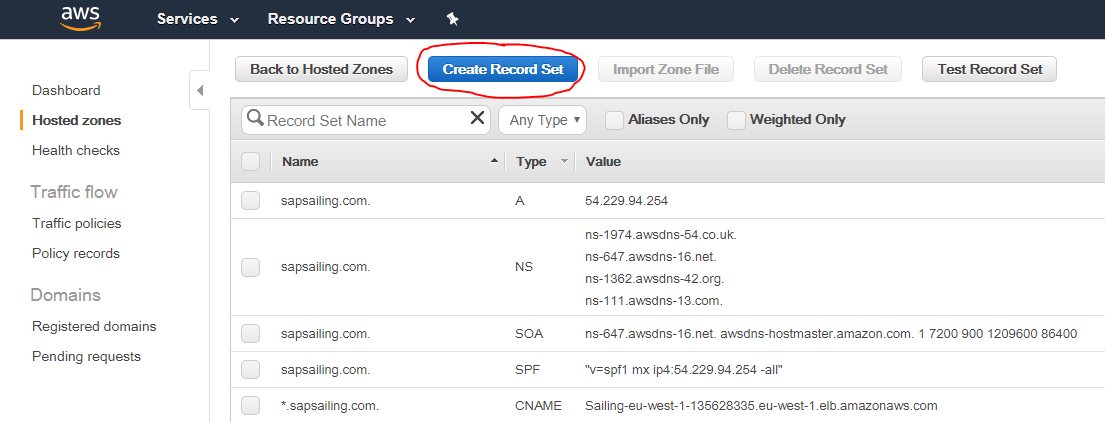
Then enter the sub-domain name you'd like to map. Choose CNAME for the type, reduce the default TTL to 60s and paste the DNS name of the ALB you'd like to target:
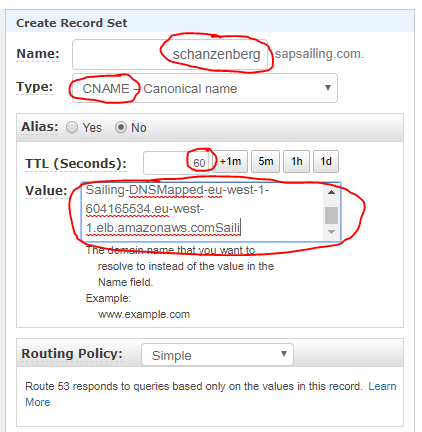
The DNS name of your load balancer can be copied from the "Basic Configuration" section in the "Description" tab:
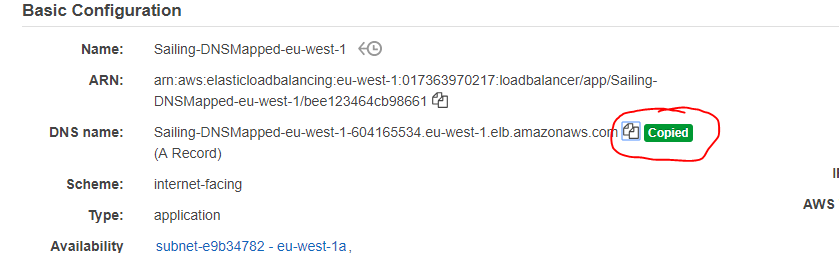
The insertion of the rule into the ALB that maps your sub-domain's name to the corresponding target group works as usual and as described above:
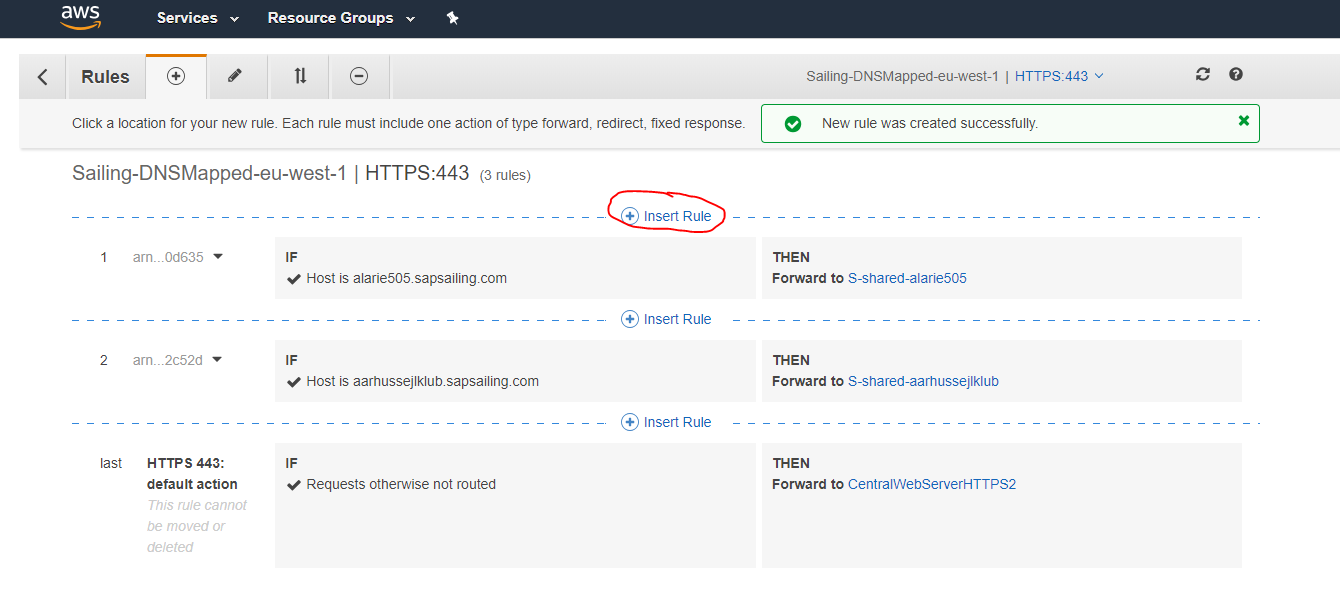
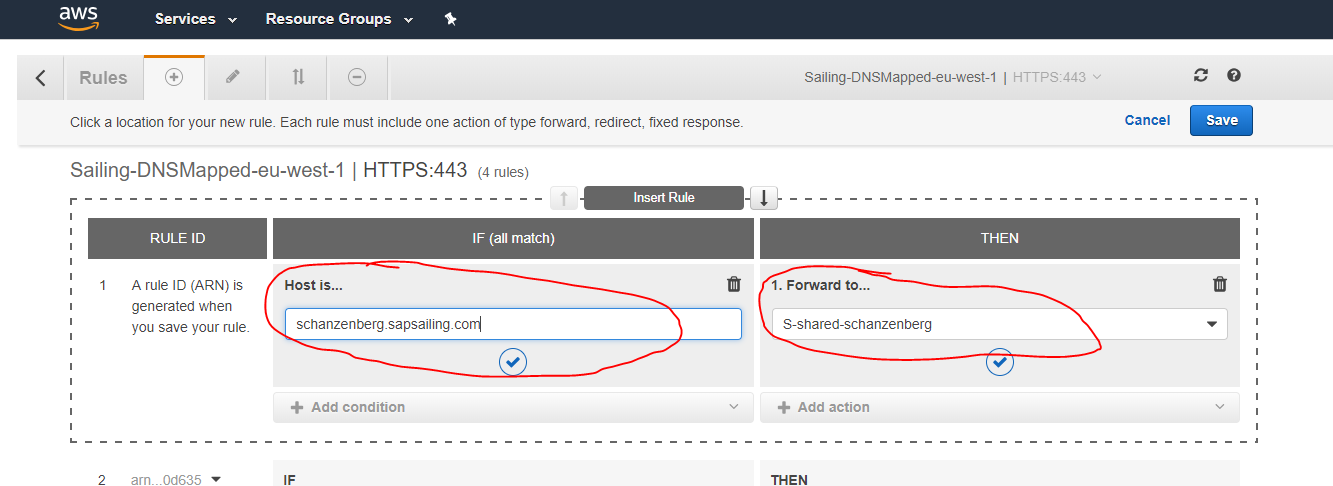
It is important to understand that it wouldn't help to let all traffic run through our central Apache httpd server which usually acts as a reverse proxy with comprehensive URL rewriting rules and macros. This would make the Apache server the bandwidth bottleneck. Instead, the event traffic needs to go straight to the ELB. This is established by the *.sapsailing.com DNS entry pointing to the Application ELB which then applies its filter rules to dispatch to the URL-specific target groups. Other than adding the hostname filter rules in the ELB as described above, no interaction with the Route 53 DNS is generally needed. Neither is it necessary to manually modify any 001-events.conf Apache configuration file.
For testing purposes, however, it may be useful to still have some documentation around that explains how to do the Route 53 DNS setup manually. Remember: this shouldn't be needed for usual operations!
Go to the "Hosted Zones" entry
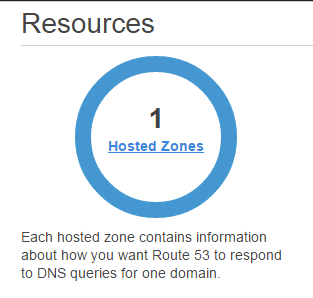
and select the sapsailing.com. row,
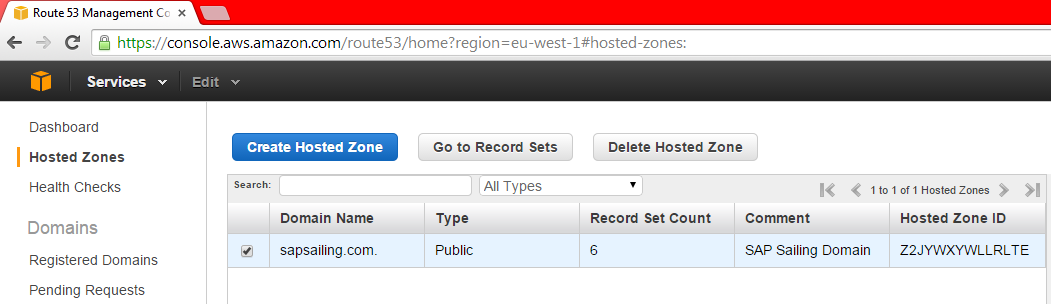
then click on "Go to Record Sets." You will then see the record sets for the sapsailing.com. domain:
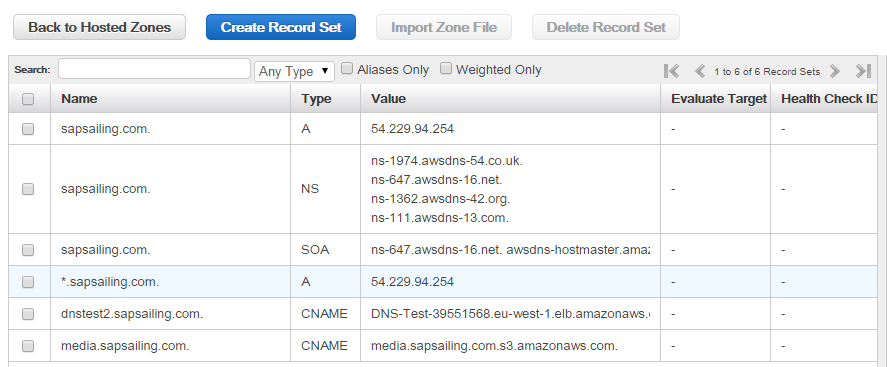
Click on "Create Record Set" and fill in the subdomain name (myspecificevent in the example shown below) and as the value use the host name (A-record) of the ELB that you find in the ELB configuration.

Amazon ELB is designed to handle unlimited concurrent requests per second with “gradually increasing� load pattern (although it's initial capacity is described to reach 20k requests/secs). It is not designed to handle heavy sudden spike of load or flash traffic because of its internal structure where it needs to fire up more instances when load increases. ELB's can be pre-warmed though by writing to the AWS Support Team.
With this set-up, please keep in mind that administration of the sailing server instance always needs to happen through the master instance. A fat, red warning is displayed in the administration console of the replica instances that shall keep you from making administrative changes there. Change them on the master, and the changes will be replicated to the replicas.
You can monitor the central RabbitMQ message queueing system at http://54.246.250.138:15672/#/exchanges. Use guest/guest for username and password. You should find the exchange name you configured for you master there and will be able to see the queues bound to the exchange as well as the traffic running through the exchange.
Using Latency-Based DNS across Regions
ELBs don't work across regions (such as eu-west-1 and ap-southeast-1) but only across the availability zones within one region. Therefore, if you want location and latency-based routing for your event, you have to set up so-called latency-based routing policies using alias record sets that point to your ELBs, one per region. The alias records are all for the same domain name and are each an alias for one ELB in one region. The DNS service will then find out for a requesting client which of the ELBs for the same name will provide the shortest network latency and return that record. Additionally, the DNS service can be configured to evaluate the ELBs health checking status. If the ELB has bad health, DNS requests will subsequently be answered using other alias records, therefore pointing to ELBs in other regions.
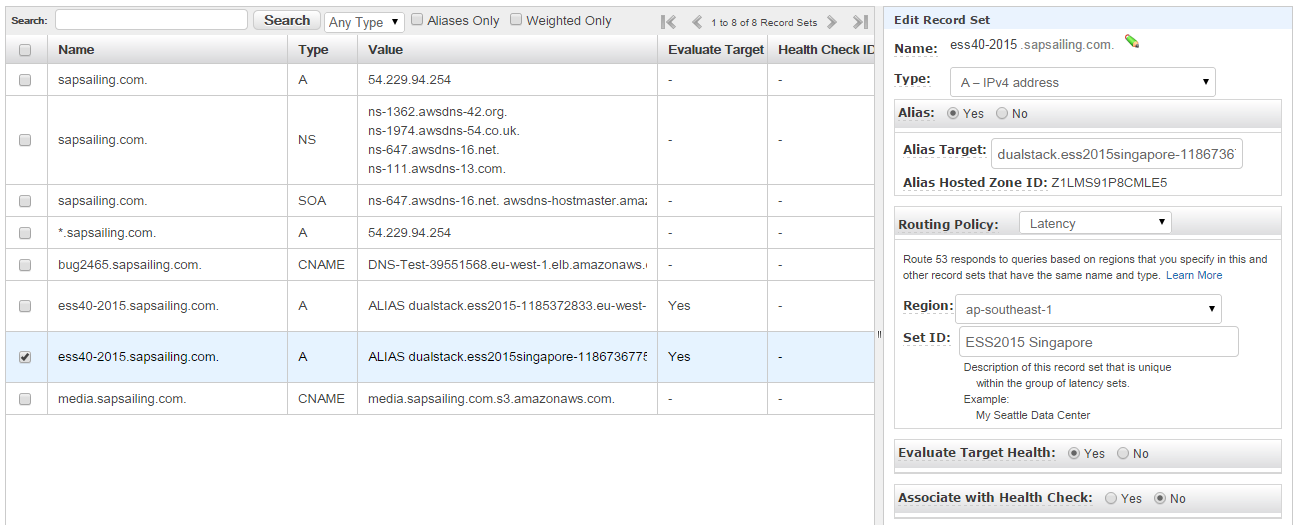
The above image shows what you need to do: After you've set up an ELB in each of the regions as described above, for each of them add an alias record set. Enter the domain name and make sure it's the same for all ELBs. Change the "Alias" radio button to "Yes." The alias target can usually be selected from a drop-down, but in case you aren't offered the ELB you want to add, you can as well copy the ELB DNS name shown in the configuration page of that ELB.
Change the routing policy to "Latency" and select the region in which your ELB is located. A meaninful ID string may be helpful later to identify the record set from a list of record sets.
Select the "Yes" radio button for "Evaluate Target Health" in order to make sure the DNS server checks the ELB's health status and fails over to any of your other latency-based record sets if the ELB has bad health.
Should you be switching from an Apache reverse proxy set-up with a record in /etc/httpd/conf.d/001-events.conf for your sub-domain, remember to comment or remove this record and to reload the httpd service on the central web server using service httpd reload. Its effects may otherwise interfere with the effects of the DNS entries for that same sub-domain. Conversely, before removing the DNS record sets for the sub-domain, if migrating back to a non-ELB, non-DNS scenario, remember to first re-activate the 001-events.conf reverse proxy entry before removing the DNS record sets.
Access MongoDB database
To launch a local MongoDB instance on the default port, enter a command such as mkdir /home/sailing/mongodb; /opt/mongodb-linux-x86_64-1.8.1/bin/mongod --dbpath /home/sailing/mongodb. To make sure the process survives log-off, you may want to launch it in a tmux session. See above for how to create a tmux session. In an existing tmux session, a new window can be created using Ctrl-a c.
Upgrade the Sailing Analytics App AMI image
There are a number of use cases that suggest an upgrade of the AMI that we use to start new SAP Sailing Analytics instances. One can be that we want to add or modify the set of SSH keys authorized for access to the root and sailing accounts. Another can be that we would like to upgrade the git contents under ~sailing/code for an update to the /etc/init.d/sailing or the /home/sailing/code/java/target/refreshInstance.sh script that is central to the automated launch process of a new instance. Another use case can be applying an upgrade to the underlying operating system (currently CentOS).
Follow these steps to upgrade the AMI:
- Launch a new instance based on the existing AMI
- Log in as user
root - Run
yum updateto update the operating system - Stop the Java instance, e.g., by using
killall -9 java - Remove any obsolete logs from
/home/sailing/servers/server/logs - Stop the httpd server, e.g., using
service httpd stop - Remove httpd logs under
/var/log/httpd - Update the git contents (essential for up-to-date versions of
/etc/init.d/sailingwhich links to the git, and therefreshInstance.shscript used during automatic instance launch), and clean any build artifacts by doing> su - sailing > cd code > mvn clean > git fetch > git merge origin/master - Then, still as user
sailing, edit~sailing/servers/server/env.shand remove everything after the line# **** Overwritten environment variables ****as this will then be the place where any downloaded environment and the EC2 user data variables will be appended later during automatic installation upon reboot. - Check the sizes of the mounted partitions by doing
df; swapon -s. These will come in handy after creating the new AMI in order to tag the new volume snapshots accordingly - Update any keys in
/root/.ssh/authorized_keysand/home/sailing/.ssh/authorized_keys - Remove created http rewrite entries in
/etc/httpd/conf.d/001-events.conf - Edit /etc/update-motd.d/30-banner to set the current version
- In the EC2 administration console go to the "Instances" tab, select your running instance and from the "Actions" drop-down select "Create Image". Give the image the name "SAP Sailing Analytics App x.y" where "x.y" is the updated version number of the image. Just make sure it's greater than the previous one. If you feel like it, you may provide a short description telling the most important features of the image.
- Once the image creation has completed, go to the Snapshots list in the "Elastic Block Store" category and name the new snapshots appropriately. Now the information about the device sizes obtained earlier from the
dfandswaponcommands will help you to identify which snapshot is which. Usually, the three snapshots would be something like AMI Analytics Home x.y, AMI Analytics System x.y and AMI Analytics Swap x.y with "x.y" being the version number matching that of your image. - Now you can remove any earlier Sailing Server AMI version and the corresponding snapshots.
Terminating AWS Sailing Instances
Automated approach
A lot of the below has been automated and you can archive from the admin console's landscape panel. It automates much of the procedure,
including the creation of a httpd .conf file in the conf.d folder on the reverse proxies, via JSCH/SSH. The file produced is named
after the domain for the event and it contains
Use Event-ARCHIVE 49erEuros2022.sapsailing.com bee070d1-605c-4fff-9d71-7688452abe63 # last part is event uuid.post-receive hook is triggered (found in httpdHookScript.sh) which connects to all reverse proxy instances and runs
configuration/sync-repo-and-execute-cmd.sh. This script fetches changes and merges them, whilst trying to best preserve any changes.
This is done because live changes can occur to some files such as the 000-macros.conf by the configuration/switchoverArchive.sh script, which is installed on each reverse proxy (see the cloud orchestrator page for more details).
ELB Setup with replication server(s)
- Remove all Replica's from the ELB and wait at least 2 minutes until no request reaches their Apache webservers anymore. You can check this with looking at
apachetopon the respective instances. Let only the Master server live inside the ELB. - Login to each server instance as
root-user and stop the java instance with/home/sailing/servers/server/stop; - As soon as the instance is successfully stopped (verify with
ps -ef | grep "java") copy all server logs towards/var/log/old/<event-name>/<instance-public-ipv4/with following commandcp -rf /home/sailing/servers/server/logs/* /var/log/old/<event-name>/<instance-public-ipv4>/ - Once this is done, make sure all HTTP logs are also copied to the above location
- Either you wait now for the next day, then the http logrotate script ran through
- Or you manually force a logrotate run with
logrotate --force /etc/logrotate.d/httpd, which copies/var/log/httpd/towards/var/log/old/<event-name>/<instance-public-ipv4>
- Please verify that there are no open queues left on RabbitMQ for that particular replication server. In case purge the queue of this replica.
- Once all replica's are terminated and only the Master server is running inside the ELB, go ahead with a master data import on sapsailing.com for the event, grabbing the data from your master server
- Once the master data import is done, make sure you track the corresponding races (be careful to also track the smartphone tracked regattas)
- Once this is done, remember to remove any entries on sapsailing.com regarding "remote sailing instances", otherwise the event will appear two times on the public events list
- at the same time, you need to modify or add an entry on the central Apache server to point the event URL towards the Archive server. Make sure you have removed the
-masterevent URL, as you don't need this one anymore# <EVENT> <YEAR> Use Event-ARCHIVE-SSL-Redirect <EVENT><YEAR>.sapsailing.com "<EVENT-UUID>" - Check the Apache config is correct before reloading it via
apachectl configtest - When
SYNTAX OKgo ahead with reload/etc/init.d/httpd reload - Now let us point the public towards the Archive server with removing the Route53 DNS entry for the event
- Make sure that you keep running ELB and Master server in it for at least 12 hours, as DNS servers around the world will cache the old entry. If you would already remove ELB and Master, this would result in people may not reaching your event anymore
- When the 12 hours are over, you can go ahead with the above steps (java instance stop, log savings,..) for the last master instance
- Afterwards simply terminate ELB + the Master instance, after you made sure all logs are correctly saved to
/var/log/old/<event-name>/<instance-public-ipv4>
Single server with central Apache redirection
- Do a Master Data import of the event towards sapsailing.com
- Track all corresponding races (don't forget the smartphone tracked ones)
- Once verified the event looks ok on sapsailing.com, make sure to remove the "remote server entry" on sapsailing.com, so that the event will not appear twice on the public event list
- Go ahead and change the central Apache config in regards to point the event URL toward the archive event via
# <EVENT> <YEAR> Use Event-ARCHIVE-SSL-Redirect <EVENT><YEAR>.sapsailing.com "<EVENT-UUID>" - Check the Apache config is correct before reloading it via
apachtctl configtest - When
SYNTAX OKgo ahead with reload/etc/init.d/httpd reload - After that is done, make sure to stop the java instance on your event server
- As soon as the instance is successfully stopped (verify with
ps -ef |grep "java") copy all sailing logs towards/var/log/old/<event-name>/<instance-public-ipv4/with following commandcp -rf ~/servers/server/logs/* /var/log/old/<event-name>/<instance-public-ipv4>/ - Once this is done, make sure all HTTP logs are also copied to the above location
- Either you wait now for the next day, then the http logrotate script ran through
- Or you manually force a logrotate run with
logrotate --force /etc/logrotate.d/httpd, which copies/var/log/httpd/towards/var/log/old/<event-name>/<instance-public-ipv4>
- Once all this is done, you can go ahead and terminate the instance via AWS
Comparing Server Content after Master Data Import
The script java/target/compareServers helps comparing server content after master data import. Run with two server URLs you want to compare, ideally in an empty directory where file downloads can be stored. Run initially with the -elv option to get verbose output. Make sure you have your http_proxy and https_proxy environment variables set or unset, depending on your network environment. Should the initial comparison fail, analyze the differences and continue by using -cel as command line arguments, telling the script to continue where it left off, exiting when hitting a difference and listing the leaderboard groups currently being compared. Repeat until done.
Should you want to compare servers of which you know they have different sets of leaderboard groups, start with compareServers -elv and then manually adjust the leaderboardgroups.new.sed and leaderboardgroups.old.sed files according to your needs, then continue with the -cel switches to restrict comparisons to what you left in the leaderboardgroups.*.sed files.
Glossary
| Term | Description |
| Instance | Virtual machine that runs on a Xen host. Such an instance runs forever until it is stopped. It will be billed by hours it ran. Each start will be billed by a full hour. |
| Spot Instance | Instances that run whenever there are free resources. It is not possible to control when or where these instances run. These instances are much cheaper than normal instances. |
| Amazon Machine Image (AMI) | Amazon Machine Image: Image file that contains a filesystem and a preinstalled operating system. One can create AMIs very easily from a stopped Instance by first creating a snapshot and then converting it to an AMI. |
| Volume | An active harddisk that can be associated to one Instance. |
| IOPS | Input/Output operations per second. Metric used to denote the performance of a volume. The higher the IOPS value the better the speed. Be aware of the fact that IOPS is metered by IOPS/h and is very expensive. Use with care! |
| Snapshot | Snapshot of a Volume |
| Elastic IP | IP address that can be associated to an instance. Any Elastic-IP not associated to a running Instance costs some amount of money per hour. |
| Security Group | Firewall configuration that can be associated to an instance. There is no need of configuring iptables or such. One can associate many instances the the same Security Group. |
| Elastic Load Balancer (ELB) | Service that makes it possible to balance over services running on different instances. |
| Network Interfaces | Virtual network interfaces that are mapped to physical network interfaces on instances. |
| Multi instance | App instance that runs along with other app instances on the same EC2 instance |
| Placement Groups | Enables applications to get the full-bisection bandwidth and low-latency network performance required for tightly coupled, node-to-node communication. Placement Groups can only contain HVM instance and have other limitations described here: https://docs.aws.amazon.com/AWSEC2/latest/UserGuide/using_cluster_computing.html |