User Management and Security
This document describes the basics of how the Shiro framework has been selected and is being used to implement role-based access control. See Permission Concept to understand how, based on Shiro, a security architecture with user groups, users, qualified roles, ownerships and access control lists works.
As a feature of the Sports Sponsorships Engine (SSE) which underlies the SAP Sailing Analytics, our Tennis engagements, parts of the Equestrian contributions and in the future perhaps more, we are about to introduce user management to the platform. Based on Benjamin Ebling's Bachelor thesis we are introducing Apache Shiro to the platform. Our Bugzilla has a separate component for User and Account Management that documents the open issues.
Shiro Integration into SSE
Bundle Structure
The following bundles implement the Shiro-based security features for SSE:
com.sap.sse.security
This bundle contains the core Shiro libraries which so far are not yet part of the target platform. It provides basic services such as the SecurityService and utilities such as SessionUtils and ClientUtils. The SecurityService instance is created by the bundle activator and registered with the OSGi service registry.
UsernamePasswordRealm and OAuthRealm are two realm implementations provided by the bundle that can be used in shiro.ini configuration files. Both realms store and obtain user-specific data including the roles and permissions in a UserStore (see the com.sap.sse.security.userstore.mongodb section) which is an instance shared by the realm objects as well as the SecurityService.
A web bundle that wants to use Shiro-based security and user management features should declare the following in its WEB-INF/web.xml descriptor:
<context-param>
	<param-name>shiroEnvironmentClass</param-name>
	<param-value>org.apache.shiro.web.env.IniWebEnvironment</param-value>
</context-param>
<listener>
	<listener-class>org.apache.shiro.web.env.EnvironmentLoaderListener</listener-class>
</listener>
<filter>
	<filter-name>ShiroFilter</filter-name>
	<filter-class>org.apache.shiro.web.servlet.ShiroFilter</filter-class>
</filter>
<!--	Make sure any request you want accessible to Shiro is filtered. "/*"
	catches all requests. Usually this filter mapping is defined first (before all
	others) to ensure that Shiro works in subsequent filters in the filter chain: -->
<filter-mapping>
	<filter-name>ShiroFilter</filter-name>
	<url-pattern>/*</url-pattern>
	<dispatcher>REQUEST</dispatcher>
	<dispatcher>FORWARD</dispatcher>
	<dispatcher>INCLUDE</dispatcher>
	<dispatcher>ERROR</dispatcher>
</filter-mapping>
It is then the shiro.ini configuration file which needs to be in the using bundle's classpath root that configures Shiro to use the elements provided by the com.sap.sse.security bundle. A typical shiro.ini configuration file using the com.sap.sse.security bundle could look like this:
[main]
shiro.loginUrl = /security/ui/Login.html
shiro.successUrl = /UserManagement.html
anyofroles = com.sap.sse.security.AnyOfRolesFilter
anyofroles.loginUrl = ../security/ui/Login.html

credentialsMatcher = org.apache.shiro.authc.credential.Sha256CredentialsMatcher
# base64 encoding, not hex in this example:
credentialsMatcher.storedCredentialsHexEncoded = false
credentialsMatcher.hashIterations = 1024

# configure the username/password realm:
upRealm = com.sap.sse.security.UsernamePasswordRealm
upRealm.credentialsMatcher = $credentialsMatcher

# configure the OAuth realm:
oauthRealm = com.sap.sse.security.OAuthRealm

securityManager.realms = $upRealm, $oauthRealm

sessionManager = com.sap.sse.security.SecurityWebSessionManager
securityManager.sessionManager = $sessionManager

authc = com.sap.sse.security.CustomFilter
authc.loginUrl = ../security/ui/Login.html
authc.successUrl  = /security/ui/UserManagement.html

roles.loginUrl = ../security/ui/Login.html

sessionDAO = org.apache.shiro.session.mgt.eis.EnterpriseCacheSessionDAO
securityManager.sessionManager.sessionDAO = $sessionDAO

cacheManager = com.sap.sse.security.SessionCacheManager
securityManager.cacheManager = $cacheManager

[urls]
/security/ui/UserManagement.html = roles[admin]
/YourFantasyURL.html = anyofroles[admin,eventmanager]
In addition to URL-based security that is configured in shiro.ini, using bundles can do two more things:
- Use
SecurityUtils.getSubject()in server-side code to obtain the current subject on whose behalf the call is being executed. This allows the application to check for roles and permissions, as in
    if (SecurityUtils.getSubject().checkRole("some-role")) {
        ... // do something for which the subject must have role "some-role"
    } else {
        ... // throw some security exception or simply don't carry out the transaction
    }
- Use the
SecurityServiceAPI to store and retrieve data such as preferences or settings and work with the user base, including creating, modifying and deleting user accounts and manipulating their roles. TheSecurityServiceregisters itself with the OSGi registry upon bundle activation.
    ServiceTracker<SecurityService, SecurityService> tracker = new ServiceTracker<>(context, SecurityService.class, /* customizer */ null);
    tracker.open();
    SecurityService securityService = tracker.waitForService(0);
The security service offers methods such as addSetting, setSetting and getSetting to manage name/value pairs. The settings API is typed in the sense that when registering a setting
com.sap.sse.security.userstore.mongodb
The UserStore interface has an implementation provided by this bundle: UserStoreImpl. It uses MongoDB for persistence of all user store entries including the credentials for the UsernamePasswordRealm and all global and user-specific settings.
The UserStoreImpl is created by the bundle activator and is registered under the UserStore interface in the OSGi service registry. The com.sap.sse.security bundle activator is implemented such that it waits for a service to appear for the UserStore interface in the service registry before it takes this service and passes it to the SecurityServiceImpl constructor, resulting in the SecurityService instance that is in turn registered with the OSGi service registry.
The standard MongoDBService is used to obtain a configuration for the persistence layer. In particular, during test execution, the winddbTest DB will be used instead of the default database.
com.sap.sse.security.ui
This GWT web bundle provides a number of UI-related components and a number of entry points which implement basic user management and security features. Additionally, a GWT RPC service UserManagementService exposing user management services to GWT clients and a class UserService helping client-side applications to track, sign in and sign out the current user is provided.
A GWT application that only wants to know what the currently signed-in user is (if any), which roles and permissions that user has and being notified about changes of the currently signed-in user (e.g., if the user signs out or if the set of roles and permissions change) uses the UserService class in conjunction with an instance of the UserManagementServiceAsync interface. Typical code in an entry point could look like this:
        UserManagementServiceAsync userManagementService = GWT.create(UserManagementService.class);
        EntryPointHelper.registerASyncService((ServiceDefTarget) userManagementService,
                RemoteServiceMappingConstants.userManagementServiceRemotePath);
        UserService userService = new UserService(userManagementService);
The entry points, as of this writing, offer a simple sign-in form (Login.html), a sign-up form (Register.html), a form to edit the signed-in user's profile (EditProfile.html), an entry point linked to by e-mail bodies used for address validation (EmailValidation.html) and a page to be used by administrators to edit user accounts (UserManagement.html).
The LoginPanel component may be used by applications to display sign-up/sign-in/sign-out features. Its styling is adjustable by a CSS resource which can be passed to the component's constructor, this way adjusting the component's style to that of the application using and embedding it.
We plan to turn the UserManagementPanel which is the widget behind the UserManagementEntryPoint into a drop-in component for a generalized administration console concept. So, when the AdminConsole becomes an SSE concept then the user management tab can be made available to all applications using the AdminConsole concept. See also bugs 2424 and 2425.
Sample Session
When you try to reach a protected resource without having the necessary permissions, Shiro will redirect you to the sign-in page.
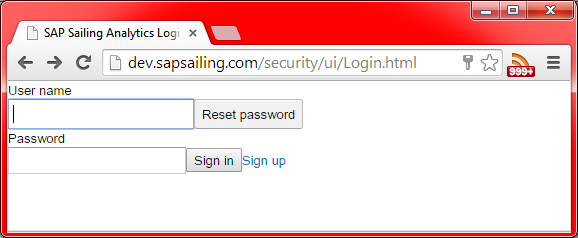
When a system is still in its initial state, the default credentials are admin as the user name and admin as the password. When the sign-in was successful, you will be redirected to the protected page you originally wanted to visit (or stay on the sign-in page in case that was the URL you explicitly visited).
To edit your user profile, visit /security/ui/EditProfile.html.
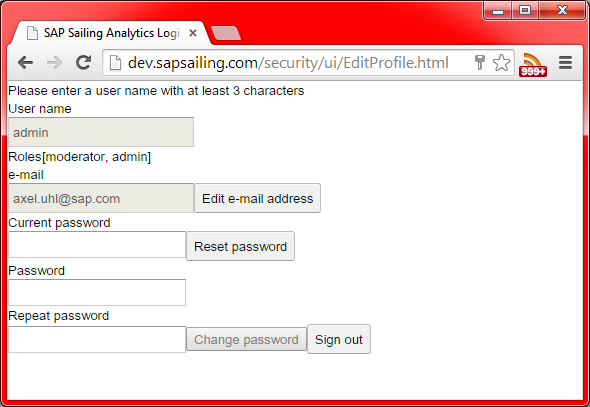
It allows the signed-in user to change the e-mail address and reset or update the password. Changing the e-mail address will result in a validation e-mail sent to the new e-mail address provided. Until the user has confirmed the e-mail by clicking on the embedded link, the new e-mail address will be considered not validated.
The password reset feature is only available for users whose e-mail address has successfully been validated. Otherwise, users who do not have the admin role need to provide their current password and the new password, including a confirmation of the new password. An e-mail notification will be sent to the user's e-mail address about the password change. Administrators can simply provide the new password and confirm it, leaving the field for the current password empty.
A new user can sign up by visiting the /security/ui/Register.html page.
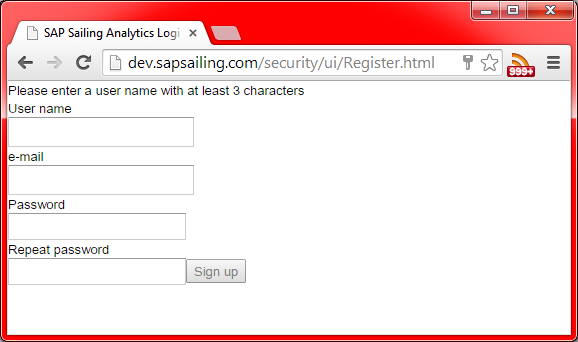
New users need to provide a unique name. Providing an e-mail address is optional, but if no validated e-mail address exists, certain services will not be made available to that user, in particular the password reset feature.
A mail is sent out to the e-mail address provided, asking the user to confirm the e-mail address by clicking on a link embedded in the e-mail. Complying to do so will mark the e-mail address as validated, and features requiring a validated e-mail address will be made available to the user from then on.
Administrators (users with role admin) can use the /security/ui/UserManagement.html entry point (future versions will probably integrate this into the AdminConsole framework as a standard tab).
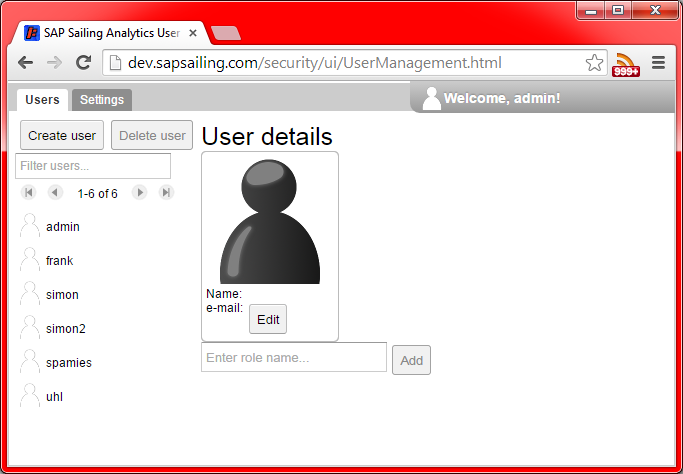
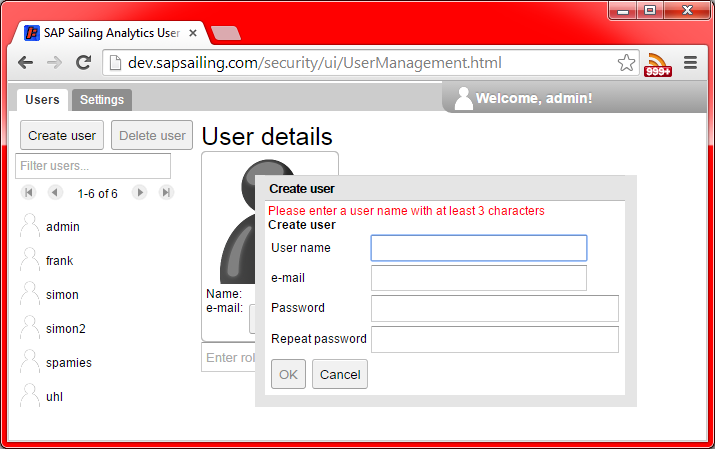
The user management page offers administrators to create and delete users, search for users and change their settings. Creating a new user works pretty much as in the /security/ui/Register.html entry point:
To delete a user, find it in the list on the left side of the page, using the filter text box above the list and the paging buttons.
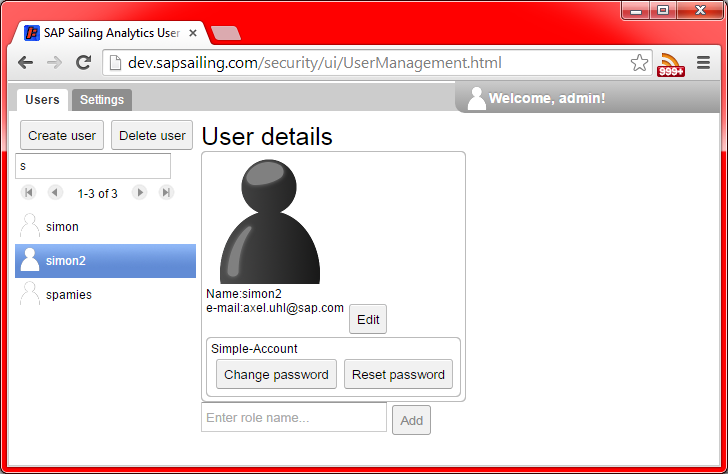
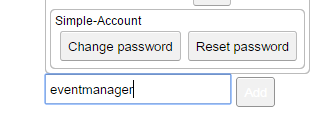
The right-hand side of the view shows the user details and allows administrators to edit them, very similar to the /security/ui/EditProfile.html page. At the bottom of this view, there is a field to manage the roles assigned to the user selected. To add a role, enter the role name into the text field and press the Add button.
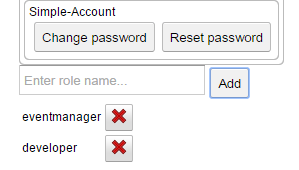
Roles currently assigned to the user can be removed by pressing the red X button next to the role name:
These changes take effect immediately if the user that is being edited is the user currently signed in. Note that in particular if you are signed in with the admin role and remove this role for yourself, you will not be able to edit your roles any further but will need to ask another administrator to do so.
RESTful API
There is a RESTful web service reachable at the URL /security/api/restsecurity:
-
/security/api/restsecurity/login, type POST, parameters areusernameandpassword. Use, e.g., withcurlfrom the command line as incurl -D /tmp/header -d "username=admin&password=admin" http://myserver.sapsailing.com/security/api/restsecurity/loginand find the cookie identifying the session in file/tmp/headerwhich should contain a line of the form<pre> Set-Cookie: JSESSIONID=f563a4fc-2333-45c4-8f82-3069f502680d; Path=/; HttpOnly
</pre>
-
/security/api/restsecurity/logout, type GET, which terminates the current session when provided with the right cookie. Example:curl --cookie JSESSIONID=f563a4fc-2333-45c4-8f82-3069f502680d http://myserver.sapsailing.com/security/api/restsecurity/logout