OnBoarding Information
This document describes the onboarding process for a new team member (developer)
First of all, make sure you've looked at http://www.amazon.de/Patterns-Elements-Reusable-Object-Oriented-Software/dp/0201633612. That's a great book, and knowing at least some of it will help you a great deal finding your way around our solution.
SAP Sailing Analytics Development Setup
Accounts
-
Git Account
- The primary Git repository for the project is hosted on Github (see https://github.com/SAP/sailing-analytics). To clone, use
git@github.com:SAP/sailing-analytics.git. - If you are on Windows, keep in mind you may run into the following problem. By default, the filesystem in Windows enforces a 260 character limit on paths. The longest path length for a file in this project, if the drive name is included, is 263 characters. A possible solution is to pass a single character name for the project folder in the git clone command, and clone the project on drive root, which may bring the longest file path down to compatible length. Alternatively, Windows 10 and 11 offer settings to enable a much much longer maximum file path that requires additional configuration. You may check that out at your own will.
- To gain write access you have to become member of the sailing-analytics-team organization. For that you need to link your Github user to the Github SAP organization. For that to work, your Github account needs to have your @sap.com e-mail address assigned and verified. We still have a shadow repository around that, e.g., powers our Wiki at https://wiki.sapsailing.com and which lives at
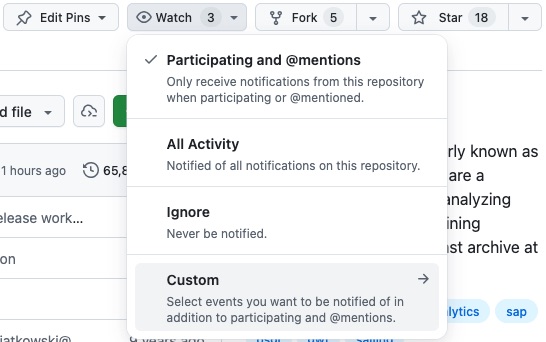
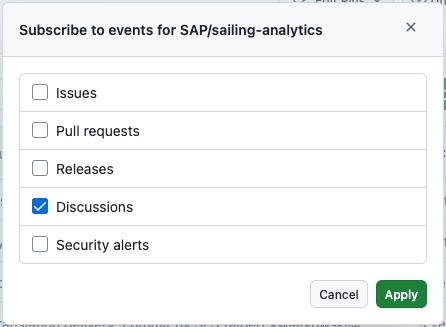
ssh://trac@sapsailing.com/home/trac/git. - Announcements relevant for developers are posted on GitHub in the Discussions tab. In order to get notifications you can subscribe to discussions by clicking on "Watch" in the Repository, then "Custom". In the new Popup select "Discussions" and confirm by clicking "Apply".
- In case you'd like to get access to the external git at
ssh://trac@sapsailing.com/home/trac/gitplease send your SSH public key to one of the project maintainers, requesting git access. Make sure to NOT generate the key using Putty. Putty keys don't work reliably under Linux and on Windows/Cygwin environments. Use ssh-keygen in a Cygwin or Linux or MacOS/X environment instead. For further instructions for generating an ssh-key see GitHub.
Note: If you want to use the ssh-key in the context of our solution, it can be an RSA or ED25519 format. Example for creating a key:ssh-keygen -t ed25519 -b 512 -C "test@test.com". Make sure to set a non-empty password for your key. Everytime you use your ssh key with encryption key you get prompted to provide the passphrase. To automate this process you can setup an ssh agent. On Linux your desktop environment will usually handle this for you. For macOS you can use this guide.
- The primary Git repository for the project is hosted on Github (see https://github.com/SAP/sailing-analytics). To clone, use
-
Bugzilla
- Create an account at https://bugzilla.sapsailing.com
- Ask a Bugzilla administrator (e.g., axel.uhl@sap.com) to enable your account for editing bugs
- Bugzilla URL: https://bugzilla.sapsailing.com
-
Wiki
- We have so far decided against migrating our existing Gollum-based Wiki to Github's Wiki pages. Therefore, for the time being, you can either push changes to the
wiki/folder to themainbranch of the repository from where they will make it to the Gollum-provided Wiki, or our can request a Gollum account to be created for you. This will also allow you to view non-public pages through https://wiki.sapsailing.com. - For a Gollum Wiki account send a request to Axel Uhl or Simon Marcel Pamies that includes the SHA1 hash of your desired password. Obtain such an SHA1 hash for your password here: http://www.sha1-online.com/.
- Once our Github repository is switched to a "public" repository, we will change our Gollum configuration such that at least read-only access is granted for all pages also for anonymous users.
- We have so far decided against migrating our existing Gollum-based Wiki to Github's Wiki pages. Therefore, for the time being, you can either push changes to the
-
Hudson
- Request a Hudson user by sending e-mail to Axel Uhl or Simon Marcel Pamies.
Installations
- Eclipse IDE for Eclipse Committers, version "2026-03". If you are using a Mac and want to use SAPJVM, this has to be the 64 bit version. This is because SAPJVM is not available for Apple Silicon Macs, and Eclipse's OS architecture must match the JVM architecture. Mac users can install SDKMAN! to manage and install different JDKs. For example Amazon Corretto 8:
sdk install java 8.0.472-amzn. - JDK 1.8 (Java SE 8), ideal is the SAPJVM 1.8: Go to https://tools.eu1.hana.ondemand.com/#cloud, scroll down to
SAP JVMselect your operating System, extract the downloaded .zip into desired location (e.g. WindowsC:\Program Files\Java. If you want to make this your default JDK, set theJAVA_HOMEvariable to it. In any case, set theJAVA8_HOMEvariable to it which is required by a few build scripts where certain steps currently are not yet compatible with newer JDK releases. For Gradle builds (currently using Gradle 7.6), such as our Android build process, also install Java 17 and set theJAVA17_HOMEvariable to it. - Git (e.g. Git for Windows v2.18), http://git-scm.com / https://git-for-windows.github.io still
- Configure git (see Git repository configuration essentials)
- MongoDB (at least Release 6.0), download: https://www.mongodb.com/. You may need to choose the community edition. In addition, install
mongosh. - RabbitMQ, download from http://www.rabbitmq.com. Requires Erlang to be installed. RabbitMQ installer will assist in installing Erlang. Some sources report that there may be trouble with the latest versions of RabbitMQ. In some cases, McAffee seems to block the installation of the latest version on SAP hardware; in other cases connection problems to the newest versions have been reported. We know that version 3.6.8 works well. https://github.com/rabbitmq/rabbitmq-server/releases/tag/rabbitmq_v3_6_8
- Maven 3.1.1 (or higher), http://maven.apache.org A setup guide for windows can be found on this webpage: https://maven.apache.org/guides/getting-started/windows-prerequisites.html
- Forked GWT SDK 2.12.4 release https://github.com/SAP/gwt-forward-serialization-rpc/releases/download/gwt-2.12.4/gwt-2.12.4.zip). The official releases can be found at http://www.gwtproject.org/download.html
but shouldn't be used unless we roll back the changes of branch
bug5077or GWT has merged and released the pull request 9779. Download the GWT SDK and extract it to a location of your preference (e.g.C:\Program Files\gwton Windows or/opton Linux or MacOS/X). You will see in section Tuning the Eclipse Installation below how you announce this GWT SDK to your Eclipse installation. - Standalone Android SDK (see section "Additional steps required for Android projects"). OPTIONALLY: You may additionally install Android Studio (https://developer.android.com/tools/studio/index.html) or IntelliJ IDEA (https://www.jetbrains.com/idea/download/).
Make sure that the environment variable
ANDROID_HOMEis set (e.g. Windows C:\Users\'user'\AppData\Local\Android\Sdk ) - Get the content of the git repository
Clone the repository to your local file system from
git@github.com:SAP/sailing-analytics.gitorssh://trac@sapsailing.com/home/trac/gitUser "trac" has all public ssh keys. - Install the eclipse plugins (see Automatic Eclipse plugin installation)
- Configure Eclipse (see Tuning the Eclipse Installation)
- Configure Maven to use the correct JRE by following the instructions in the paragraph maven-setup
- Follow the instructions in the development setup to build the project.
- The steps for building the project for a deployment can be found in the Build for deployment section. This is not needed in the daily development workflow and should only be run when needed.
- Install Ant: https://ant.apache.org/manual/install.html and makes sure to add to path: it is necessary for building gwt.
- Chrome or Firefox. Safari does not work reliably with this project.
Further optional but recommended installations
- For Windows users, Cygwin or a Git Bash may be useful for being able to run any Bash scripts. Please note that when using one of the newer versions of Cygwin, your Cygwin home folder setting might differ from your Windows home folder. This will likely lead to problems when issuing certain commands. For troubleshooting, take a look at the following thread: https://stackoverflow.com/questions/1494658/how-can-i-change-my-cygwin-home-folder-after-installation
- Eclipse Mylyn Bugzilla extension
- kdiff3 (git tool)
- Firebug (javascript & .css debugging, included in Firefox Developer Tools in newer versions of Firefox by default)
Git repository configuration essentials
The project has some configuration of line endings for specific file types in ".gitattributes". To make this work as intended, you need to ensure that the git attribute "core.autocrlf" is set to "false". This can be done by navigating to your local repository in a Bash/Git Bash/Cygwin instance and executing the command git config core.autocrlf false.
If you are first time git user, don't forget to specify your user metadata. Use the commands git config user.name "My Name" and git config user.email my.email@sap.com to tell git your name and email address.
Depending on the location of your local repository, it's filepaths might be too long for the default settings to handle. Excecute the command git config --system core.longpaths true to enable your system wide git installation to handle long file paths.
Maven Setup
Copy the settings.xml (may be in $GIT_HOME/configuration/maven-settings.xml and $GIT_HOME/configuration/maven-settings-proxy.xml) and the toolchains.xml from the top-level git folder to your ~/.m2 directory. Adjust the proxy settings in settings.xml accordingly (suggested settings for inside a corporate network requiring a HTTP proxy for access to external web). Set the paths inside of toolchains.xml to your JDKs depending on where you installed them (this is like setting the compiler for your IDE, but for Maven; This makes it possible to build with the same Maven configuration on every system). Make sure the mvn executable you installed above is in your path.
Automatic Eclipse plugin installation
The necessary Eclipse plugins can be automatically installed into a newly unzipped version of "2025-12" by using the ./configuration/pluginsForEclipse2026-03.p2f file, found in the git repository cloned in step 11. To install the plugins open Eclipse and install Software Items from File. (File ⇒ Import ⇒ Install ⇒ Install Software from File). The description file is located at /configuration/pluginsForEclipse2026-03.p2f.
Make sure to select all Plugins (it might not be possible to select Lucene ignore that) and click next. In the pop-up dialog shown next, select the top radio button ("Update my installation to be compatible with the items being installed"). Skip the Installation details, accept the licence agreements and click finish. While Eclipse is installing the plugins a pop-up will appear in the background where you need to trust all plugins. Be aware that the installation may take several minutes depending on your Internet connection.
Be also aware that with this p2f-file it's not possible to update the plugins to newer versions.
The p2f-file includes the following plugins for your convenience:
- GWT Plugin (https://github.com/gwt-plugins/gwt-eclipse-plugin)
- GWT SDM Debug Bridge (http://sdbg.github.io/)
- Easy Shell (https://anb0s.github.io/EasyShell/)
- Memory Analyzer (https://www.eclipse.org/mat/)
- SAP JVM Profiler (https://tools.hana.ondemand.com)
- UMLet (https://www.umlet.com/)
- various updates to preinstalled plugins
Tuning the Eclipse Installation
Out of the box, multiple settings in Eclipse need to be changed. You can either import the configurations from the configuration/eclipse-preferences.epf file or follow the given instructions;
Go to Window ⇒ Preferences and change the following two settings:
- In "General ⇒ Content Types" select on CSS (Text ⇒ CSS) and add *.gss in the lower file association list to get limited syntax highlighting and content assist in GSS files
- In "General ⇒ Editors ⇒ Text Editors" check Insert Spaces for Tabs
- In "General ⇒ Editors ⇒ Text Editors ⇒ Quick Diff" change the reference source from 'Version on Disk' to 'A Git Revision'. If you like other colours for marking diffs change them here. (Example: Changes = Yellow, Additions = Green, Deletions = Red)
- If you'd like to be able to import official results from the Manage2Sail regatta management system: In Run/Debug ⇒ String Substitution add a variable
MANAGE2SAIL_ACCESS_TOKEN. Ask your team lead for the value of such an access token you can uses for testing. The variable is used by the "Sailing Server (No Proxy)" launch configuration. and maybe others. - For Google Maps API access, the server needs to know authentication parameters. These are provided through an Eclipse variable used by various launch configurations named
GOOGLE_MAPS_AUTHENTICATION_PARAMS. Ask for the official SAP Google Maps API credentials, or usekey=AIzaSyD1Se4tIkt-wglccbco3S7twaHiG20hR9Efor a test key that works for your localhost-based tests. - For YouTube API access, provide an Eclipse variable
YOUTUBE_API_KEY. You can use your own Google developer account to create such a key; see here. - In case you need to test with the payment provider (ChargeBee) active, you need to provide Eclipse variables (Run/Rebug ⇒ String Substitution)
CHARGEBEE_SITEandCHARGEBEE_API_KEYwhere the recommendation is to usesailytics-testfor the site and a corresponding test API key; there is one launch configuration running against the live ChargeBee site, but its use is not recommended for obvious reasons. For it, define the variablesCHARGEBEE_SITE_LIVEandCHARGEBEE_API_KEY_LIVE, respectively. - To successfully obtain polar and wind estimation data from
sapsailing.com, you need to define the Eclipse variables (Run/Debug ⇒ String Substitution)POLAR_DATA_BEARER_TOKENandWIND_ESTIMATION_MODEL_BEARER_TOKENthat need to authenticate a user with permissions to read the respective models. - Define a
GITHUB_TOKENvariable; it may be empty (but has to be generally present), or you can use it to set a personal access token (PAT) which will then be used, in particular, for requesting application releases from GitHub. - To work with the wind estimation model training launch configuration (e.g., SimpleModelsTrainingPart1.launch), define an Eclipse variable (Run/Debug ⇒ String Substitution)
SAPSAILING_BEARER_TOKENwhich needs to authenticate a user eligible to read all maneuver data from sapsailing.com - In "GWT ⇒ Errors/Warnings" set "Missing SDK" to "Ignore"
- In "GWT ⇒ GWT Settings ⇒ Add…" add the GWT SDK you downloaded and unpacked earlier
- In "Java ⇒ Build Path ⇒ Classpath Variables" create a new classpath variable called
ANDROID_HOME. Set its value to the installation location of your Android SDK, e.g.,C:\Users\'user'\AppData\Local\Android\Sdkor/usr/local/android-sdk-linux. - In "Java ⇒ Code Style ⇒ Formatter" import the CodeFormatter.xml from $GIT_HOME/java (where$GIT_HOME is the directory cloned in step 11).
- In "Java ⇒ Compiler" set the Compiler compliance level to 1.8
- In "Java ⇒ Installed JREs" add the Java 8 sdk and activate it.
- In "Java ⇒ Installed JREs ⇒ Execution Environments" make sure that the Java 8 JRE is selected for JavaSE-1.8 (if the jre is not listed open and close the preference Window once)
- For the next step, you may need to go to "Help ⇒ Install New Software"; type web; then select webtools; click web tools platform (this may have changed since the time of writing, so use your best judgement); and then install the plugins.
- In "Web ⇒ Client-side JavaScript ⇒ Code Style ⇒ Formatter" import the CodeFormatter_JavaScript.xml for JavaScript from $GIT_HOME/java to ensure correct formatting of JavaScript Native Interface (JSNI) implementations.
- In "Web ⇒ HTML Files ⇒ Editor" activate indent using Spaces
- In "XML(Wild Web Developer) ⇒ Validation & Resolution ⇒ Enable Validation" Disable the Checkbox
- For Eclipse-based debugging of GWT web applications with SDBG, make sure that Chrome is set as your default browser: "General ⇒ Web Browser". If missing, add a profile for Chrome and specify "%URL%" as the parameter.
- Consider installing https://marketplace.eclipse.org/content/protocol-buffer-editor for a Protocol Buffers (protobuf) editor
Steps to build and run the Sailing Analytics
- Check out the
mainbranch from the git repository. Themainbranch is the main development branch. Please check that you start your work based on this branch. - Setup and configure Eclipse
- Import all Race Analysis projects from the
java/subdirectory of the git main folder (make sure to import via the wizard [but without smart import] "Import ⇒ General ⇒ Projects from Folder or Archive" in Eclipse, and additionally make sure to scan for nested projects!) - In "Window ⇒ Preferences ⇒ Plug-in Development ⇒ Target Platform" set the Eclipse target platform to
Race Analysis Target(located in com.sap.sailing.targetplatform/definitions//race-analysis-p2-remote.target) - Wait until the target platform has been resolved completely
- Start a clean build (Project ⇒ Clean)
- Import all Race Analysis projects from the
- To get a clean workspace, additional steps should be performed once:
- Run "GWT Dashboards SDM" launch configuration. After successful start, launch configuration can be stopped.
- Run "GWT Security SDM" launch configuration. After successful start, launch configuration can be stopped.
- Run "GWT xdStorage Sample SDM" launch configuration. After successful start, launch configuration can be stopped.
- Run the Race Analysis Suite
- Ensure your local MongoDB Server is running; depending on your platform, maybe you can start your MongoDB using
sudo systemctl start mongod, or you may have to do something like:- Create a folder for the mongoDB to store the data. For existing folders make sure they do not contain a
mongod.lockfile - Open a terminal and navigate to the location of the MongoDB installation
cd /somePathTo MongoDBInstallation/mongodb/bin - Start the databse in the with the mongoDB Datafolder as db path:
./mongod --dbpath /somePathTo/MongoDBDataDirectory
- Create a folder for the mongoDB to store the data. For existing folders make sure they do not contain a
- Run "GWT Sailing SDM" in the debug dropdown
- Start the appropriate Eclipse back-end launch configuration (in most cases 'Sailing Server (no Proxy)'). You´ll find this in the debug dropdown.
- Ensure your local MongoDB Server is running; depending on your platform, maybe you can start your MongoDB using
- Import races within the Race Analysis Suite
- Choose "GWT Sailing SDM" in the "Development Mode" Tab and open "…AdminConsole.html…". This should open http://127.0.0.1:8888/gwt/AdminConsole. (It is normal that the first try fails. Reload the page after the first try)
- Default Login: user "admin", password "admin"
- In the list on the left, click on "Connectors"
- For TracTrac Events: In the "TracTrac Connections" Form, fill in the JSON URL http://germanmaster.traclive.dk/events/event_20120905_erEuropean/jsonservice.php(all other required information will be filled in automatically)
- Press "List Races"
- Further useful launch configurations
- Use SAP JVM Profiler. If you used the script above and installed the SAPJVM instead of the jdk, you can now open the profiling perspective by clicking on Window ⇒ Perspective ⇒ Open Perspective ⇒ Profiling)
- Debugging gwt: For further instructions please see here
If you want to use breakpoints, avoid clicking on the options in the Development Mode tab. Instead, within the Debug Configurations menu, select the Debug AdminConsole (found in the Launch Browser subtab); change the browser search order, such that chrome is the leftmost; and then launch. This is necessary because SDBG is compatible with Chrome. Further, details of how GWT Super Dev Mode (SDM) works, can be found in the link above.
Using Android Studio for App Development (Only if You're Working on Mobile Apps)
The Android Apps can be built in Android Studio or gradle command line. Android Studio is built on top of IntelliJ IDEA, so it is possible to use IntelliJ IDEA as well.
- On the "Welcome Screen" choose "Import Project (Eclipse, ADT, Gradle, etc.)"
- Navigate to the project root folder and select the "build.gradle" file (all used modules are defined in "settings.gradle")
- it will download all necessary gradle runtime files
- you will see floating messages at the top right
- ignore "non-managed pom.xml file…"
- choose "add root" from "Unregistered VCS root detected" (you can add this later, if you missed it)
- Setup the Android SDK
- in Android Studio press Tools ⇒ Android ⇒ SDK Manager
- Install from section "Tools" (hint: carefull not to update
- Android SDK Tools
- Android SDK Platform-tools
- Android SDK Build-tools 22.0.1 (latest version at the time of writing)
- Install everything of "Android 5.1.1 (API 22)" (latest API at the time of writing)
- the "System Images" are optional and only needed for the emulators, which can't be fully used because of the missing Google Play Services (needed for location detection in the wind fragment)
- Install from section "Extras"
- Android Support Repository
- Google Repository
- Google USB Driver (only on Windows)
- To edit all (not only Android) modules, open the left window "1: Project" and switch the view from "Android" to "Project" (folder view)
- At the top is a drop down, where you can switch the mobile projects (com.sap.sailing.*) and start with buttons right to it
- Run (starts the app on a real device or emulator)
- Debug (starts the app with an attached debugger)
- Attach Debugger (useful, if the app is currently running and you want to start debugging against the correspond sources)
If git is not in the Path system environment variable, the gradle build will not work.
Further hints
Build for deployment
Open a shell (preferrably a git bash or a cygwin bash), cd to the git workspace's root folder and issue "./configuration/buildAndUpdateProduct.sh build". This should build the software and run all the tests. If you want to avoid the tests being executed, use the -t option. If you only want to build one GWT permutation (Chrome/English), use the -b option. When inside the SAP VPN, add the -p option for proxy use. Run the build script without arguments to get usage hints.
Development Environment
Read here and importantly for pushing to main.
Steps to consider for using other GWT modules
- For Eclipse Build
- MANIFEST.MF, add module names under dependencies
- *.gwt.xml , add
<inherits name="-modulename-.-gwt.xml file name-" /> - In DebugConfigurations => Classpaths, Add Sourcefolder where classes are you want to user from the module
- For Maven Build
- pom.xml , Add Dependency to used module ie.
<dependency>
<groupId>com.sap.sailing</groupId>
<artifactId>com.sap.sailing.domain.common</artifactId>
<version>1.0.0-SNAPSHOT</version>
<classifier>sources</classifier>
</dependency>
- pom.xml , Add Dependency to used module ie.
Git usage troubleshooting
There are some inconsistencies regarding line endings (unix vs windows) in our git repository. There is a configuration named ".gitattributes" committed to the root folder of the repository that helps to prevent inconsistencies of line endings when committing files. Files that existed before are partially using unix (LF) or windows (CRLF) line endings. When committing files, git will ensure unix line endings for e.g. *.java files. This can lead to big diffs that hurt when trying to merge/diff.
When merging branches that potentially have conflicts regarding line endings, you can specifically parameterize the git command line to not produce a big bunch of conflicts. Using the parameter -Xignore-space-at-eol while doing a merge will drastically reduce such conflicts. Using this, the commandline to merge "master" into your current branch is git merge -Xignore-space-at-eol master.
In cases where code was reformatted, you can also ignore all whitespace changes by using the parameter -Xignore-space-change.
When doing a diff, you can also use the parameters --ignore-space-at-eol and --ignore-space-change.
When doing a merge in Eclipse, you can tell the merge editor to do a similar thing by right clicking and selecting "Ignore White Space". Other merge/diff tools also provide such a functionality.
When a file has "wrong line endings" (line endings are different to what is configured in ".gitattributes" file) and you touch those files without changing the contents, git will potentially show that these files are changed. To get rid of those phantom changes, you can do a "git checkout HEAD path/toFile/in/repository".
To enable missing git integration
- navigate to VCS ⇒ Enable Version Control Integration
- choose git in the drop down
- if everything is correct, you'll see the current branch at the bottom line
See RaceCommittee App for more information regarding the mobile app.
Java on ARM based Mac troubleshooting
Irritating behavior can occur on ARM-based processors, such as on a MacBook. There are some problems, especially with graphical functions. There are cases where javax.imageio.ImageIO, javax.imageio.ImageReader or java.awt.graphics2D stops responding without error message.
In such cases it might help to set AWT to headless mode (-Djava.awt.headless=true, see stackoverflow).
Another struggle can be to install the JVM Profiler Plug-in on ARM based Eclipse. It seems to block the necessary Software while the Automatic Eclipse plugin installation. One way is to use the Eclipse x64 Installer. It will take more time for transformation, but you will be able to use the Profiler.
GWT Browser Plugin
This applies only if you try to get old "GWT Dev Mode" to work, support for which has ended on very old Firefox version 24. Install the GWT Browser Plugin for the GWT Development mode. As of 2016-08-31 Firefox is the only browser supporting the GWT plugin, you have to download Firefox version 24 for it to work. The Plugin can be found on this page: https://code.google.com/archive/p/google-web-toolkit/downloads
Create Hudson Job
If you want a hudson job to run when you push your branch then you can run a script in configuration called createHudsonJobForBug.sh. For you bug branch titled bug<bug number>, create a build job, which will create a release, by running the script like so: ./createHudsonJobForBug.sh <bug number>.
If you'd like the script to include the bug's summary in its description, set your BUGZILLA_API_KEY environment variable to an API key you obtain from https://bugzilla.sapsailing.com/bugzilla/userprefs.cgi?tab=apikey or pass the API key as the second argument, after the bug ID, as in
./configuration/createHudsonJobForBug.sh <bug number> {Bugzilla-API-Key}
If on Windows, you may need to disable any web shields in antivirus software, to allow curl to function. If on Mac, you may need to install gnu-sed (gsed) via Homebrew.
Issues when playing around with AWS
- The problem: aws cli (used for aws ec2 describe-tags) hangs in eu-west-2 in all AZs on new instances I created, using a target group which permitted all outbound connections and inbound https, http and ssh connections. I tried permitting everything but that didn’t work. When I attached (at Axel’s suggestion) the Java Application with Reverse Proxy security group, it worked but — even if I duplicated this security group, and applied that copy instead — it still didn’t work.
Curl issue solution: it turns out that the network interface only permits certain outbound and inbounds from certain target groups.
The path to the solution: On my instance in eu-west-2a, I ran aws –debug ec2 describe-tags (you may need to do aws configure first). This is much akin to verbose mode of other unix commands. I noticed it hang on a request to ec2.eu-west-2.amazonaws.com. If you do
dig -t any ec2.eu-west-2.amazonaws.comyou see 3 ip addresses, which — as you will see later — are IPs in each of the eu-west-2 availability zones. When I ran curl -v ec2.eu-west-2.amazonaws.com (the v flag is verbose), one of the IPs from dig was used (namely the one in eu-west-2a, where the instance resides) and it hangs. I then went to endpoints for the VPC and noticed a service for the servicecom.amazonaws.eu-west-2.ec2. It had the default security group, which turned out to only allow inbound rules from the default or Java Application with Reverse Proxy target group. - Problem: A load balancer's target group health checks fail. I was told the checks failed with 403 errors. Solution: This was occurring because the website didn't have any content in the /var/www/html. Whilst a site was still served (namely the Apache test page) it does throw a 403 error. If you fill the directory with and index.html the test then passes and a 200 code is returned
- Problem: Target platform reload in Eclipse. Sometimes reloading via Window -> Plug-in Development -> Target Platform doesn't work, so open the target definition itself and try reloading there. Often a restart proves helpful after the reload. In addition, you can clean all projects and rebuild; then rebuild the individual projects that fail. Sometimes the errors are actually just warnings and you can try to run the GWT SDM (remember the other SDM's must be run if everything is brand new). Lastly, try clearing the plugins content found at
WORKSPACE_HOME/.metadata/.plugins/org.eclipse.pde.core/.bundle_pool/plugins.
Extra Reading
Check out refactoring patterns as a sort of cheatsheet for the aforementioned design patterns books. We also have an onboarding glossary.